Let’s make it even easier: an MCP server for the M365 Generator tool
Now days, a tool without AI feels outdated. By connecting M365 Generator to Anthropic’s MCP, we unlock a smarter, agentic AI experience, fewer clicks, better results, and seamless automation driven by intelligent AI agents.


Now days, what’s a tool without a touch of AI? Let’s be honest, feels a bit like using dial-up modem in a fiber world, right? 😅
So I figured, why not plug AI right into M365 Generator and make everything smoother, smarter, and way more intuitive for users?
Less clicks, more results.
To make that happen, Anthropic has cooked up a slick and powerful protocol just for this: MCP (Model Context Protocol).
It’s specifically designed to streamline interactions between tools and AI agents.
Let’s dive into how it works, and how we can integrate it into the M365 Generator.
What's planned :
- How does MCP works?
- What are the limitations with Claude?
- How to connect the M365 Generator with Claude Desktop?
- What's are the capacities?
- Examples
- More complex prompts using automation flow and scheduler
1/ How does MCP works?
MCP (Model Context Protocol) is an open standard that lets LLMs (Large Language Models) communicate with external tools and data in a clean, structured, and predictable way.
Think of it as a universal translator between your AI and the outside world, specifically, external APIs. Instead of hardcoding connectors or custom interpreters for every new tool, MCP defines a shared logic and structure for how information is exchanged.
It keeps everything modular, reusable, and neatly separated: the model focuses on reasoning, while the tools handle execution. No mess, no glue code, just smart coordination that makes your LLM way more useful, without the headache.
Here’s how it rolls:
the model connects to an MCP server (via HTTP or stdio), kicks things off with an initialize handshake, checks out what tools are available with tools/list, and when it’s ready to act, calls tools/call with some neatly structured inputs. The server runs the command, sends back the result, and voilà, the AI just did something useful, without reinventing the wheel.
Perfect for giving our M365 Generator a brain, it doesn’t just follow clicks anymore, it starts listen to you and making smart moves.
2/ What are the limitations with Claude?
Claude offers an MCP HTTP connector in its paid web version (not available for free users), letting it chat with tools over the network like a proper cloud-native brain. Meanwhile, the Desktop version is still rocking the old-school stdio-only connection, at least for now.
3/ How to connect the M365 Generator with Claude Desktop?
Before you begin, make sure you have:
✅ Claude Desktop installed on your computer
✅ Python 3.8+ installed and accessible from command line
✅ A user ID on the M365 Generator tool web interface
✅ Your Microsoft 365 credentials configured in the web interface: Tenant ID, Client ID, Client Secret. (You need to have deployed the Enterprise App to get those credentials)
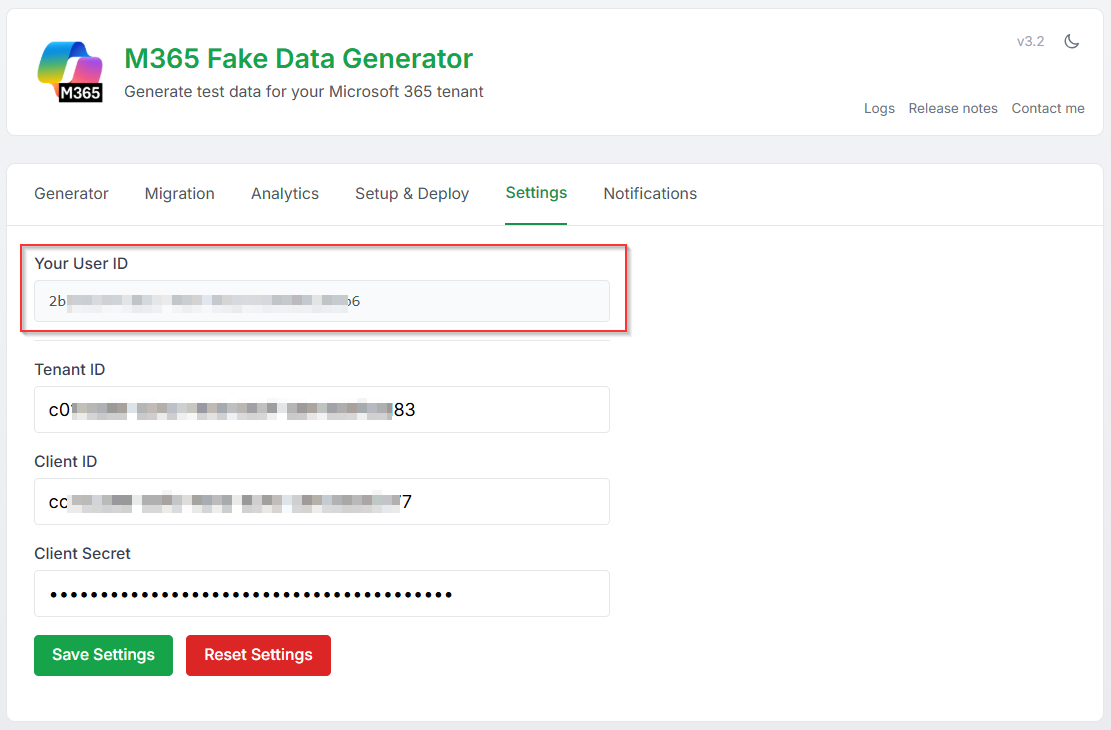
Step 1: Get Your User ID
the user ID is shown in the web interface in the 'Settings' tab :
Step 2: Download the Proxy Script
Since MCP connectors aren’t available in the free Claude Desktop setup, we get a bit creative: we run a local Python MCP server script that talks to Claude over stdio.
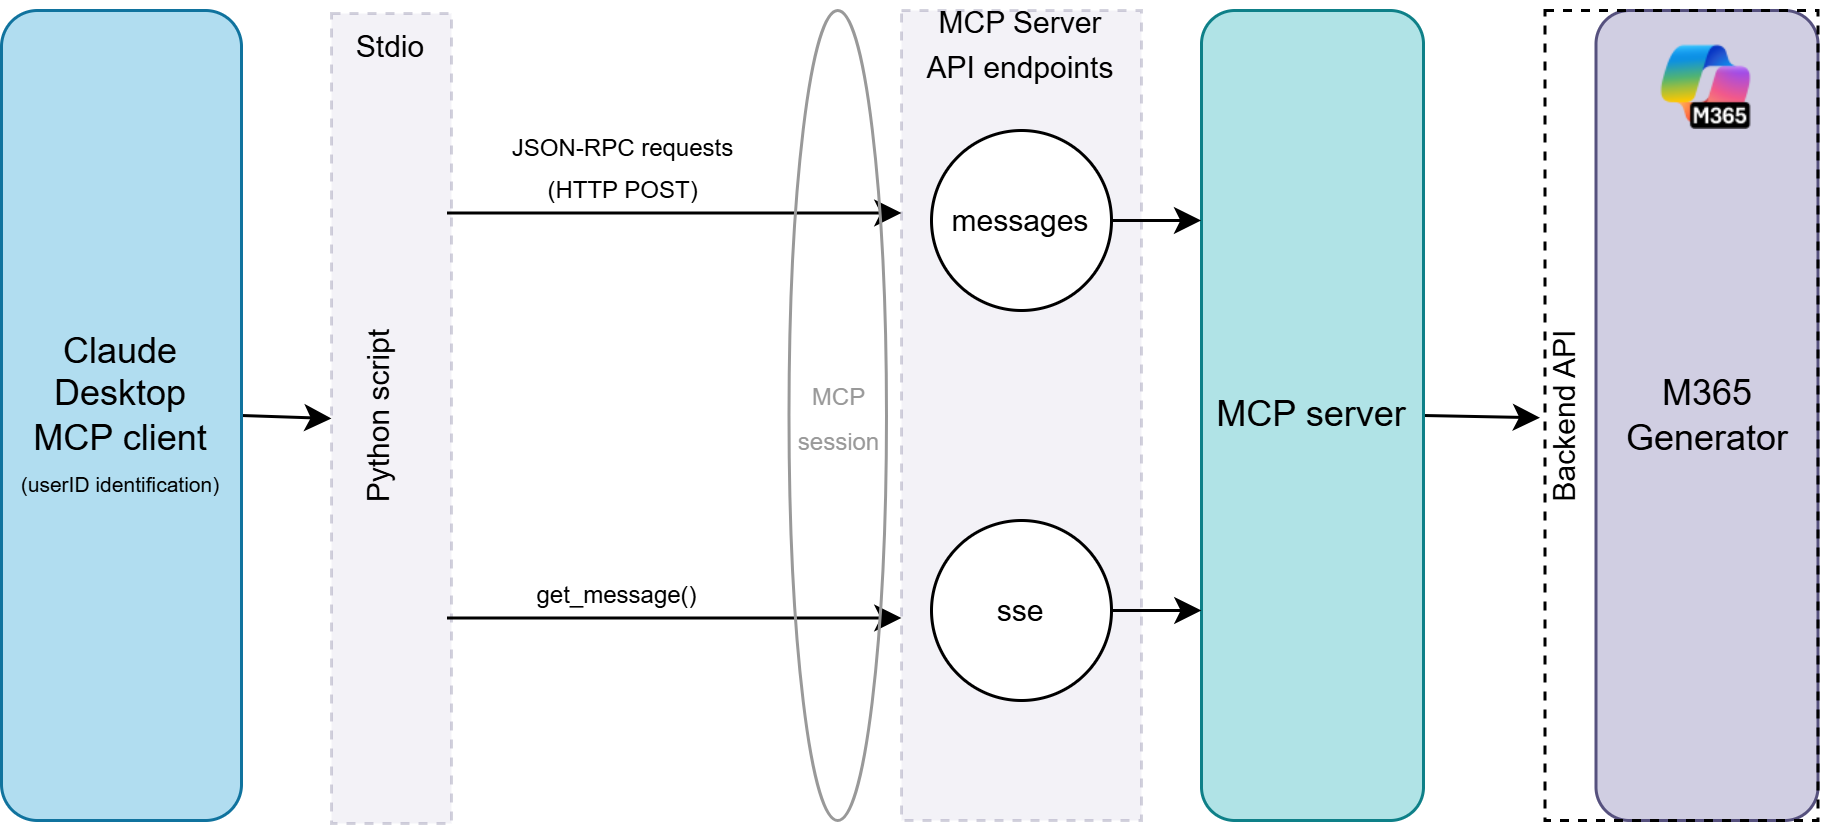
This script then acts as a bridge, connecting to the remote MCP services over HTTPS, letting Claude stay local while still chatting with the M365 generator MCP server like a pro, efficiently and sneaky.
Here’s a logical diagram that ties the whole stack together :
You need to download the Python file from here :
Save it somewhere and keep the path in memory.
Step 3: Configure Claude Desktop
Now it’s time to let Claude know where to find your shiny MCP server.
First, locate the Claude Desktop configuration file
- Windows:
%APPDATA%/Claude/claude_desktop_config.json - macOS:
~/Library/Application Support/Claude/claude_desktop_config.json - Linux:
~/.config/Claude/claude_desktop_config.json
Add the following configuration:
```json
{
  "mcpServers": {
    "fake-m365": {
      "command": "python",
      "args": [
        "C:/Tools/mcp_proxy.py",
        "--server-url", "https://m365generator.point4.fr",
        "--user-id", "YOUR_USER_ID_HERE"
      ]
    }
  }
}
```
✅ Replace `C:/Tools/mcp_proxy.py` with the actual path to your python script.
✅ Replace `YOUR_USER_ID_HERE` with your actual User ID.
Step 4: Restart Claude Desktop
For the changes to take effect, Claude needs to be fully closed, no sneaky background processes allowed.
On Windows, make sure to: Right-click the Claude icon in the system tray → select "Quit". (Only then will Claude reload the config and start talking to your MCP server like it should)
Step 5: Verify the Connection
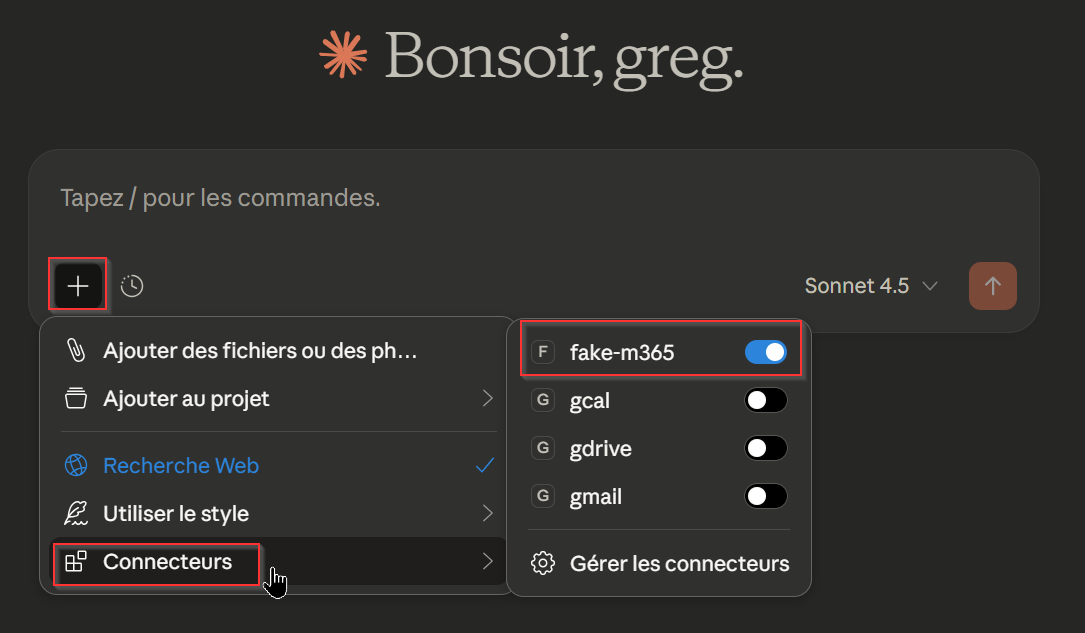
After restarting Claude Desktop, click the “+” icon at the bottom left of the prompt window, then select “Connectors”.
If everything's wired up correctly, you should see your fake-m365 connector listed and ready to go.
Additionally, you can head over to “Settings” → “Developer” and double-check that the fake-m365 MCP connector is up and running.
4/ What are the capacities?
Rather than listing all the M365 Generator capabilities here, why not let our new friend Claude do the work? 😁
Try prompting:
"Can you show me as a list all the capacities from the fake-m365 connector?"
Claude will use the freshly connected fake-m365 MCP connector to fetch all available API capabilities directly from the M365 Generator, and return a nice, structured list, clean and ready to explore.

Alternatively, you can head over to “Settings” → “Connectors”, then click on “Configure” next to the fake-m365 connector.
There, you’ll get a full list of the API endpoints Claude can access through this connector, clear, and detailed.
5/ Examples
You can ask Claude to create users, generate emails, upload files, migrate data between UPNs, show your current settings, and more, all in a single prompt. He’ll figure out the workflow behind the scenes and execute it effortlessly.
Here’s a simple example to create emails, SharePoint files & pages, in one prompt:
Some example :
- Create 5 fake users in my Microsoft 365 tenant and add a M365 licence to each of them.
- Generate 10 test emails for user@domain.com with an attach file from 10KB to 50KB each.
- Create some test files in john@contoso.com's OneDrive.
- Create 3 Microsoft Teams with 4 channels each.
- Create 3 folders of 4 test files each in the 'Marketing' SharePoint site.
6/ More complex prompts using automation flow and scheduler
Now that Claude knows how to talk with the M365 Generator tool, it’s time to level up!
You can now build more complex scenarios using the Automation Flow, a chain of actions that execute sequentially, just like a workflow. And the best part? You can even schedule it to run in the background at a user-defined time.
Let’s try a more advanced prompt :
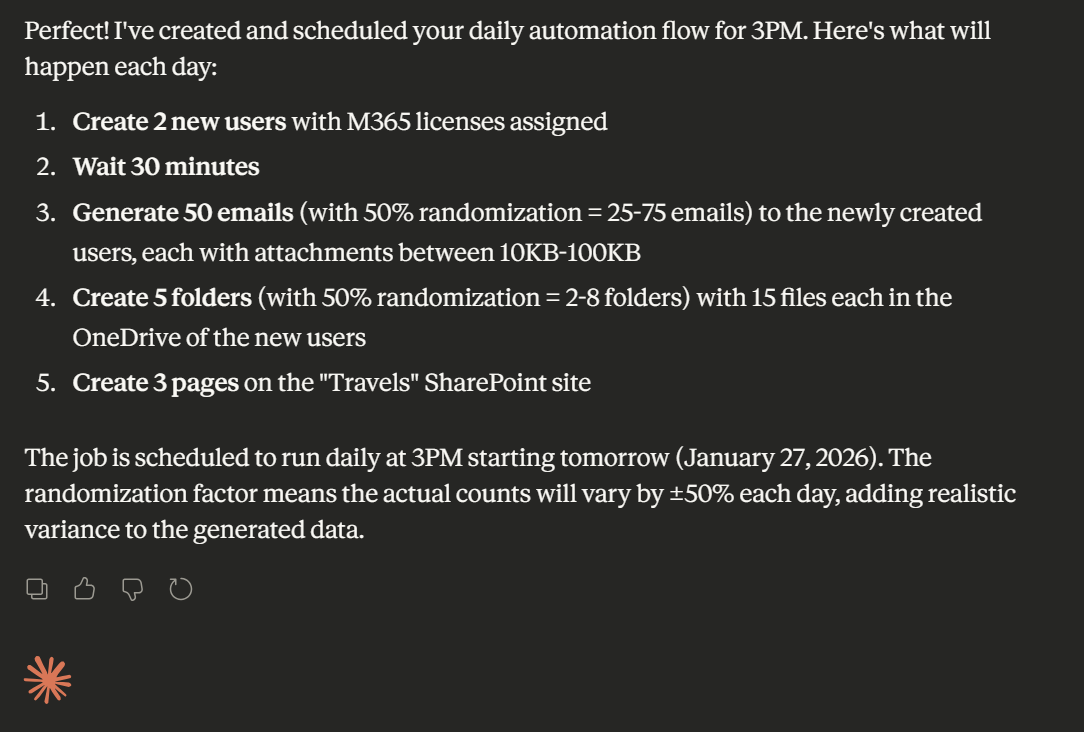
"In the M365 generator tool, every day at 3PM, I want to create 2 new users with a M365 licence assigned, then wait for 30mn and create 50 new emails with an attach file between 10KB and 100KB to this newly created users.
Then, create 5 folders with 15 files in each folders to the OneDrives of this new users.
On both email and OneDrive creation, I want you to add a randomization factor of 50%.
At the end, you will create 3 new pages on the "Travels" SharePoint site."
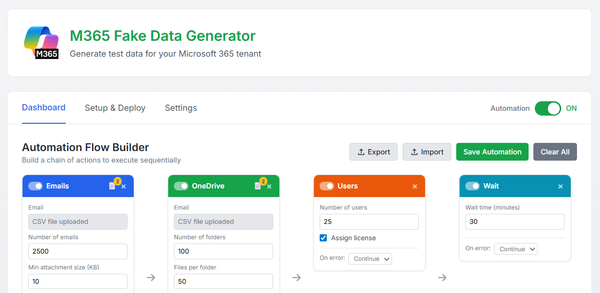
As a result, you will see the following :
And if you hop over to the Web GUI of the M365 Generator tool, you’ll find all the cards neatly created and properly configured in the Automation Flow console, ready to run or tweak as you see fit.
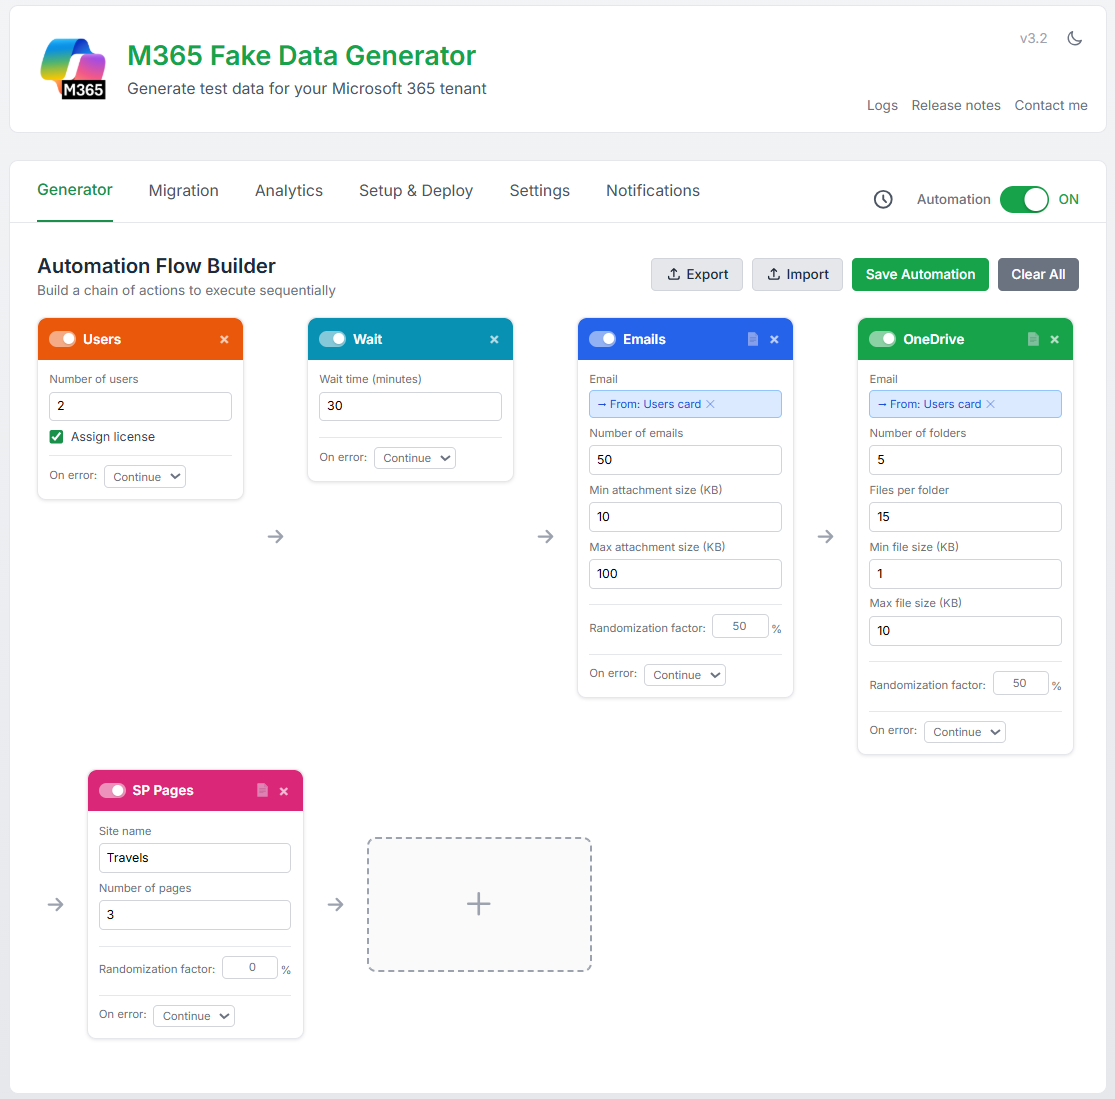
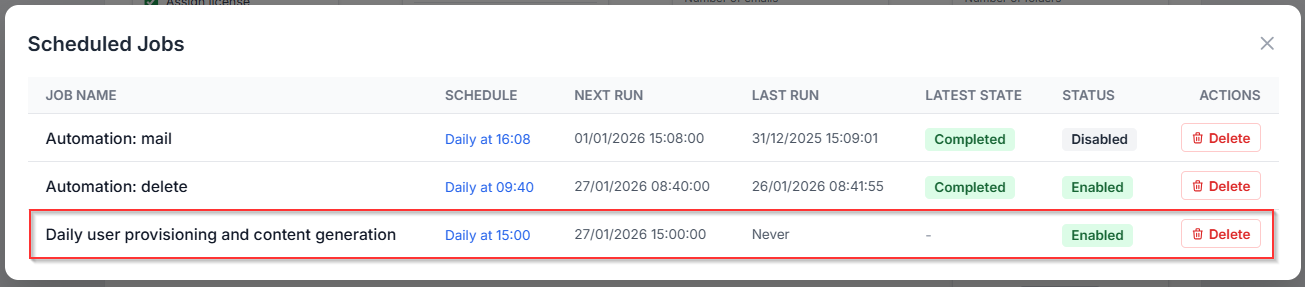
The automation flow is also perfectly scheduled, locked in and ready to run in the background at the exact time and interval you defined.
Et voilà, your minion is fully trained, sleeves rolled up, no complaints, just results!
Previously, accessing the M365 Generator tool required a login and password.
Since then, the beta phase has ended and the tool is now public.
There is now a single, simple address:
https://www.m365simulator.com

Now you’re all set to launch powerful automation flows, perfectly tailored to your M365 needs, all by simply asking your loyal assistant, Claude. 🤖