Connecting the dots: setting up a multi-location mesh VPN with Tailscale
When you need to unify your infrastructure, no matter where your servers are scattered across the globe.


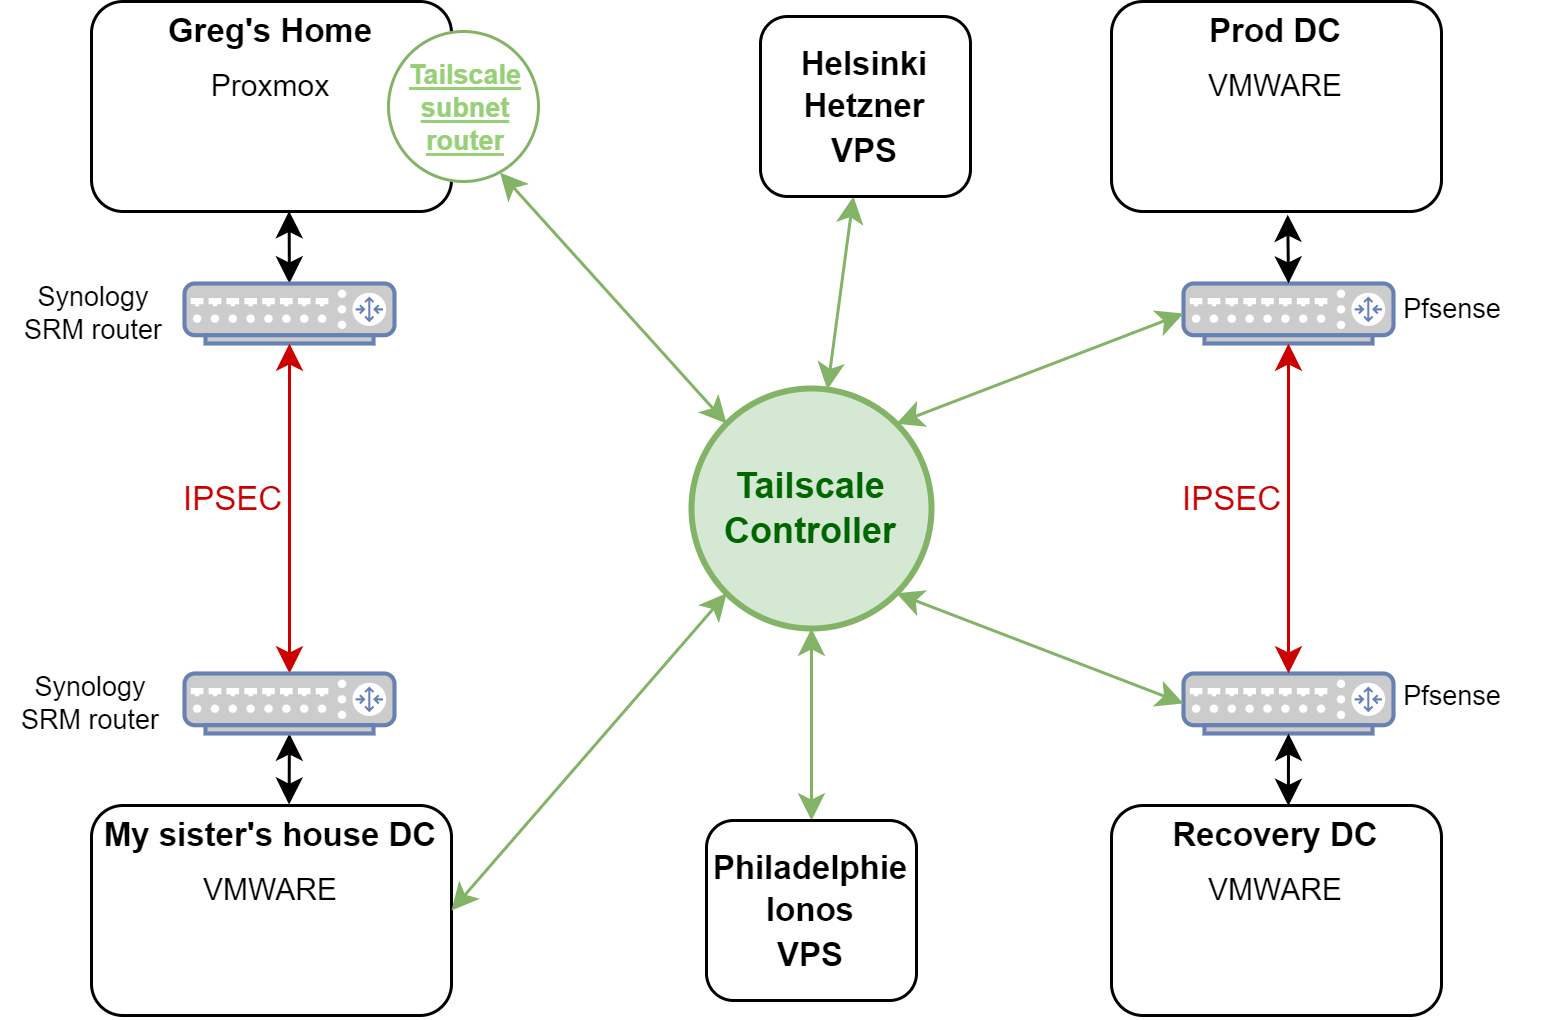
My lab isn’t confined to one location; it’s a patchwork of infrastructure spread across multiple spots—from my sister’s garage to low-cost VPS at Hetzner or Ionos, to datacenters collocation with ESXi, and even a Proxmox cluster at home.
The challenge is to build a network that unifies all these different locations into a seamless, secure network where everything can connect and communicate.
My first reflex was to set up IPsec VPN across some locations, but things got complicated with VPS where you don’t have access to a backend network, therefore no routers are available to build site-to-site VPN tunnels.
Then, I moved on to Wireguard, which is great for setting up point-to-site tunnels but can be a bit of a challenge for site-to-site configurations. And, like IPsec, it obviously shares the same limitations when it comes to VPS environments.
That’s when I discovered a third solution: Tailscale
Tailscale is a software-defined mesh VPN built on Wireguard that helps you create a seamless mesh private network. It uses a centralized coordination server to establish and manage access right and tunnel connections, relying on IPv4 CGNAT addresses that are provided by Tailscale for his customers.
One of his competitors is Zerotier, though I haven’t tried it yet, so I can’t speak to that solution.
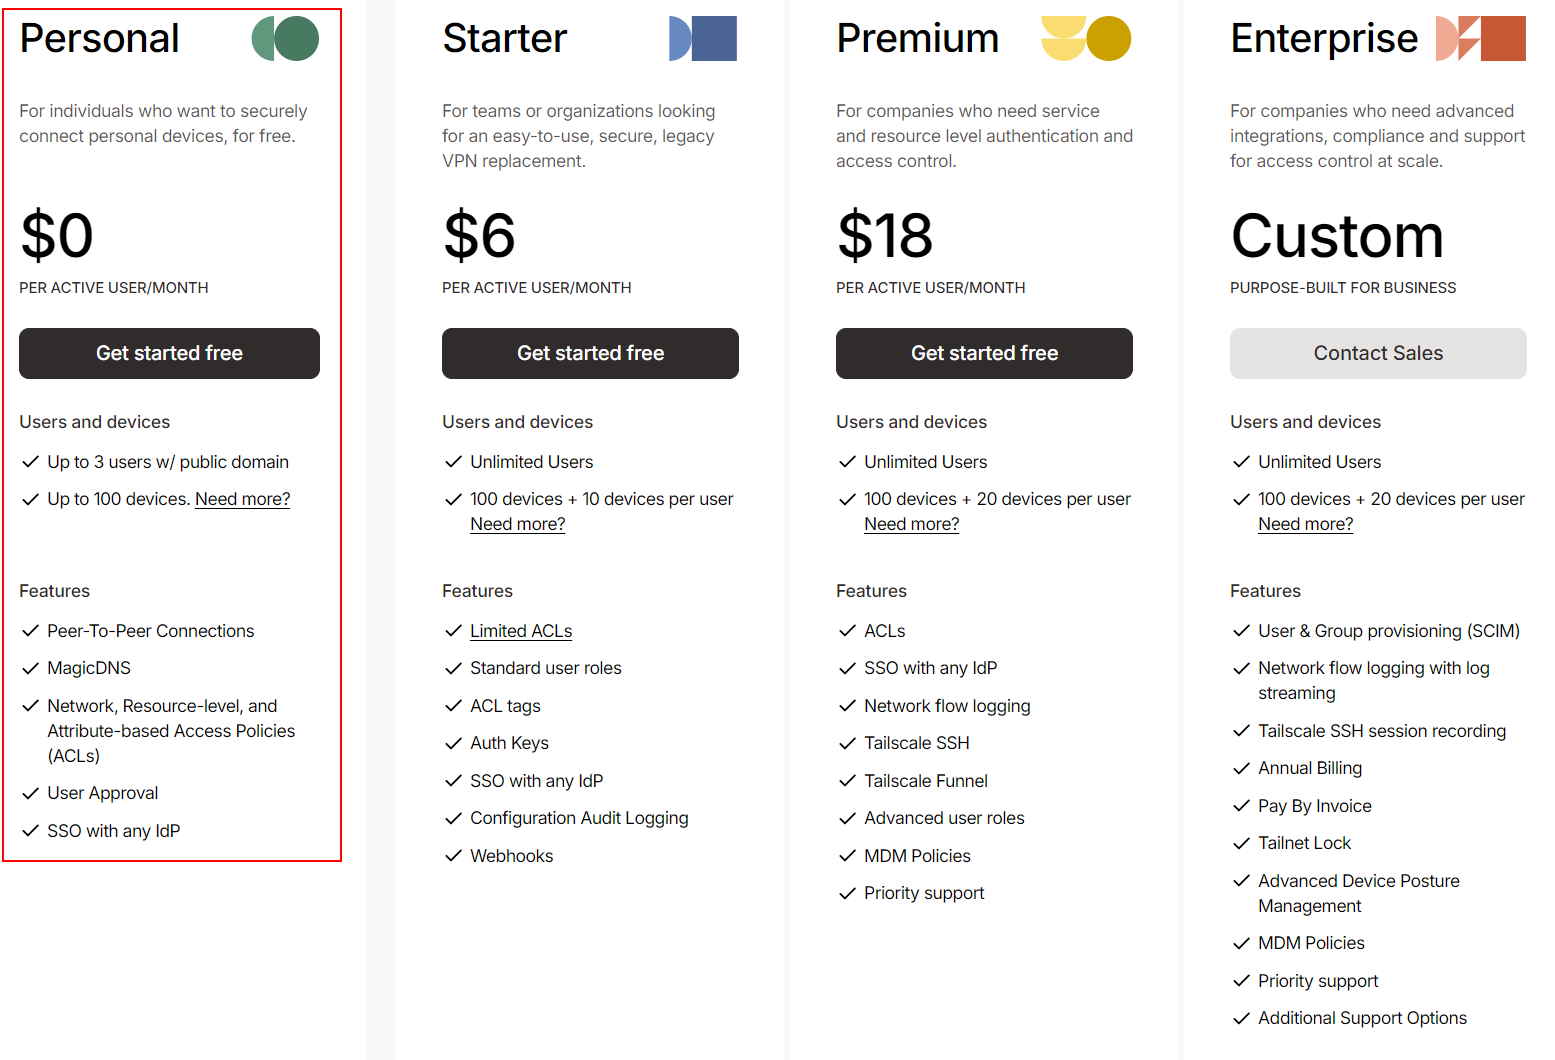
Tailscale is a paid service, but they offer a free tier for personal use, which is pretty appealing (up to 3 users and 100 devices !):
The solution is available for Windows, Linux, and macOS, as well for Android and iOS, and even Docker, Kubernetes, synology, Qnap or Pfsense.
And I’m pretty sure there are plenty of other ways to deploy it like described in the documentation here (for devices) and here (for cloud providers).
The beauty of Tailscale is that you don’t need to open ports on your firewall and set up NAT for device access. This makes the software-defined mesh VPN more secure than traditional VPN.
So, let's start the process to deploy Tailscale.
First, a little insight
My current infrastructure is as follow :
- 1 Vmware DC at my sister's garage with subnet 10.0.4.0/24
- 1 homelab DC at home with subnet 10.0.5.0/24
- 1 Production DC with vmware at Hetzner Germany with subnet 10.1.22.0/24
- 1 recovery DC with vmware at Hetzner Germany with subnet 10.1.21.0/24
- 1 VPS at hetzener Helsinki with only one public IP/32
- 1 VPS at Ionos Philadelphie with only one public IP/32
I’ve kept some IPsec tunnels as my main backbone to avoid exceeding the personal free tier limitations with Tailscale because only one subnet router is allowed (we’ll dive into what Tailscale routers are used for later in this article).
Below is the final network topology diagram, showcasing all the different VPN connections in use:
Steps to setup Tailscale :
- Sign up on Tailscale service
- Install Tailscale agent on devices
- Install Tailscale on Pfsense
- Tailscale's subnet router
- Accept route anouncement.
- Tailscale magic DNS
- ACL and Tags
- SSH access
- Serv
- Funnel
- Exit node
- Taildrop
Alright, let’s jump in and get it configured, step by step!
1/ Sign up on Tailscale service
Signing in is a breeze. You can use a variety of SSO options—just pick your favorite and log in to the service here.
2/ Install Tailscale agent on devices
Once you’re signed in, you’ll be greeted by an assistant to guide you through the first steps.
Adding your first device— In my case, I'll be adding a Debian 11. Tailscale makes it super easy with the following script:
curl -fsSL https://tailscale.com/install.sh | shOnce the script is finished, you’ll need to activate Tailscale by the following command:
tailscale upSince this is the first time you're adding this device to your Tailscale network, you’ll be given a URL to validate the device.
https://login/tailscale.com/a/de3017a04b2e7After following the URL, you’ll be prompted to enter your credentials, and the device will be added to your Tailscale network.
The assistant will then prompt you to add a second device. Just follow the same steps to get it connected.
Once your two devices will be connected to your Tailscale network, you will be prompt to check the connection using Tailscale IP from Device#1 to Device#2.
In my case from my my Debian11 called "localhost-0" to my Debian11 called "debian11-test".
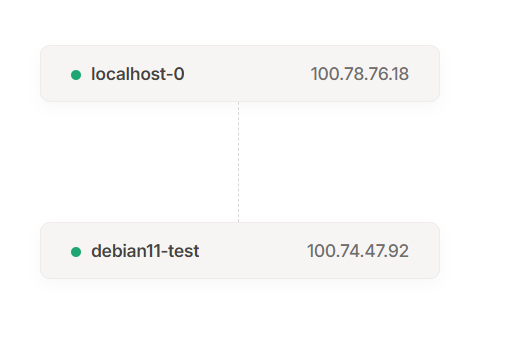
Run the following command on Debian11 "localhost-0":
ping 100.74.47.92 -c 4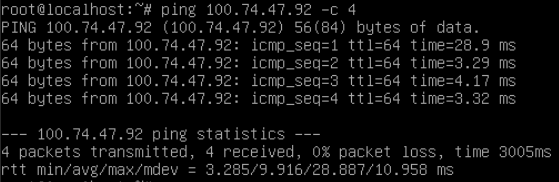
3/ Install Tailscale on Pfsense
Now, let’s assume I’ve added the two VPS, the one in Helsinki and the one in Philadelphia, using the process outlined above.
The next step is to link the PFsense routers from our production and recovery data centers. Since these locations host multiple VMs, we need to connect the entire site to our Tailscale private network, which is why we’re applying the connection at the router level.
Luckily, Tailscale is available on PFsense through the package manager.
Go to : System > Package Manager, search for Tailscale en click on "install".
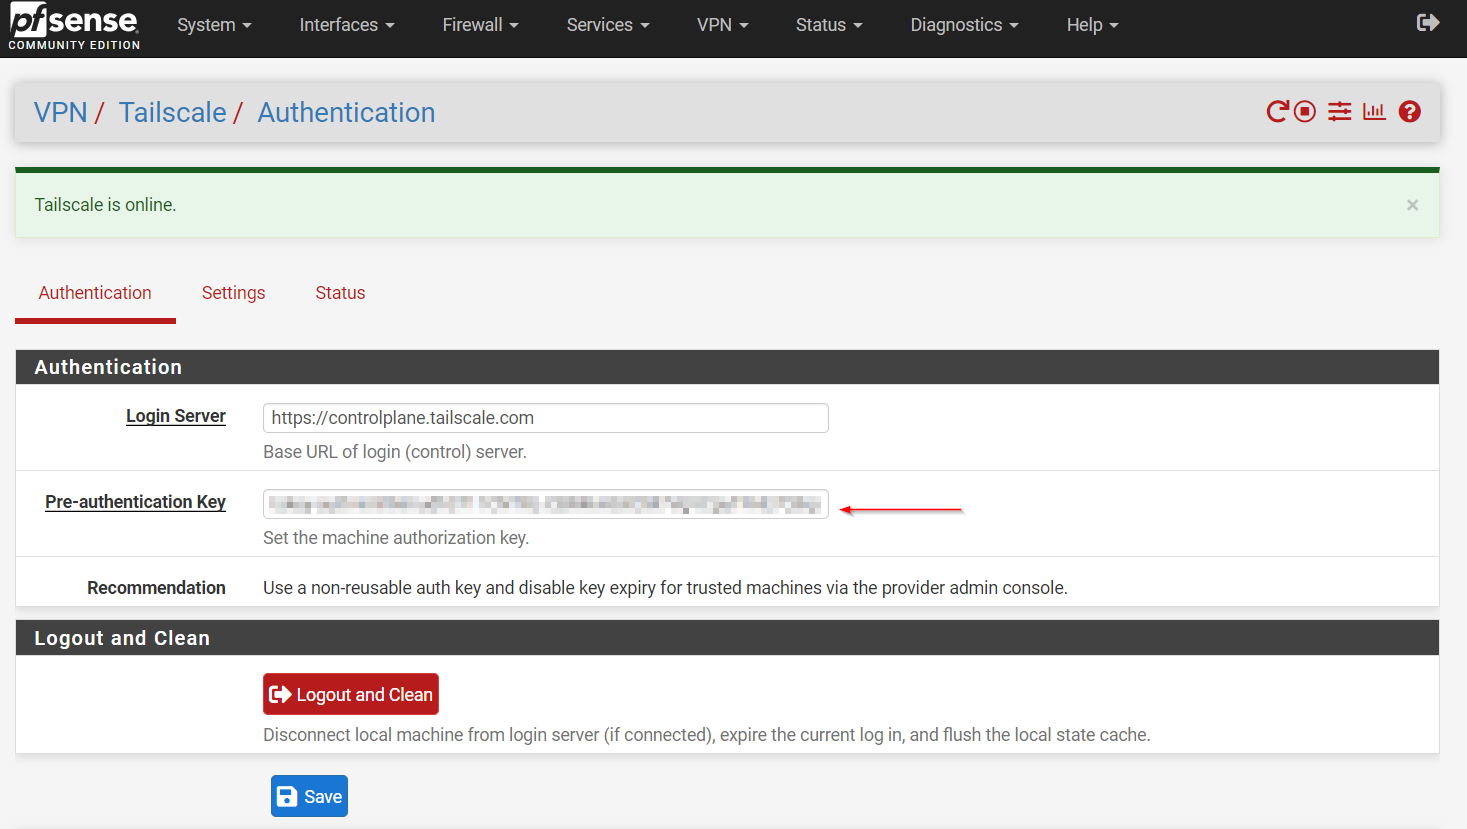
Next, we need to configure Tailscale. Start by navigating to VPN -> Tailscale -> Authentication in the menu.
To create the auth key, head over to the Tailscale admin GUI, go to Settings, and click on Generate auth key. Add a name, generate your key, then return to PFsense and paste your key into the Pre-authentication Key field.
Next, switch over to the "Settings" tab. Select "Enable Tailscale", check both "Accept subnet routes" and "Accept DNS." Leave the listen port as it is.
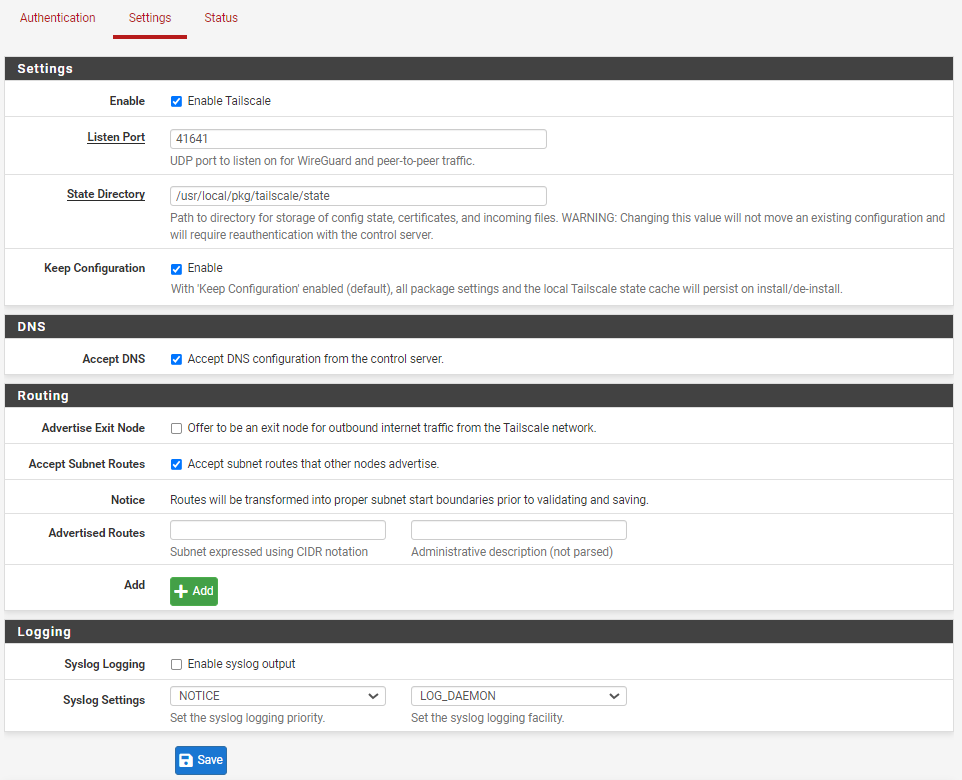
for that, see below the chapter about Tailscale's subnet router.
As a result, you should see on "Status" tab, that a new interface "tailscale0" has been added and devices from your Tailscale network should appear.
Now, we need to configure PFsense to NAT the outbound traffic to the Tailscale network. Navigate to Firewall -> NAT -> Outbound and select "Hybrid Outbound NAT rule generation."
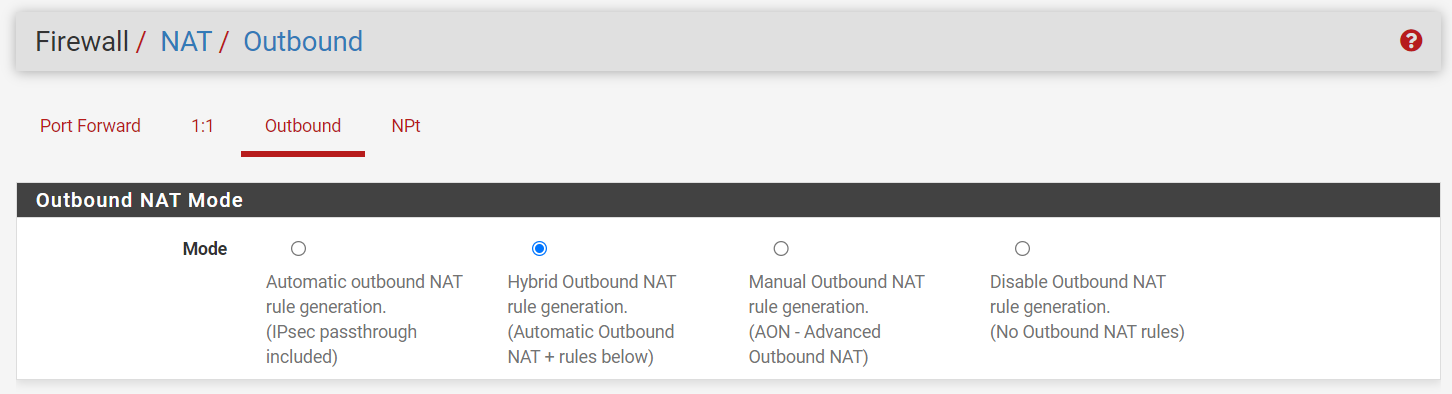
Next, add a new rule: Select the new Tailscale interface, set your LAN subnets as the source, and choose "any" for both the destination and port. Then, NAT the traffic to your PFsense Tailscale IP so it routes through your Tailscale network.
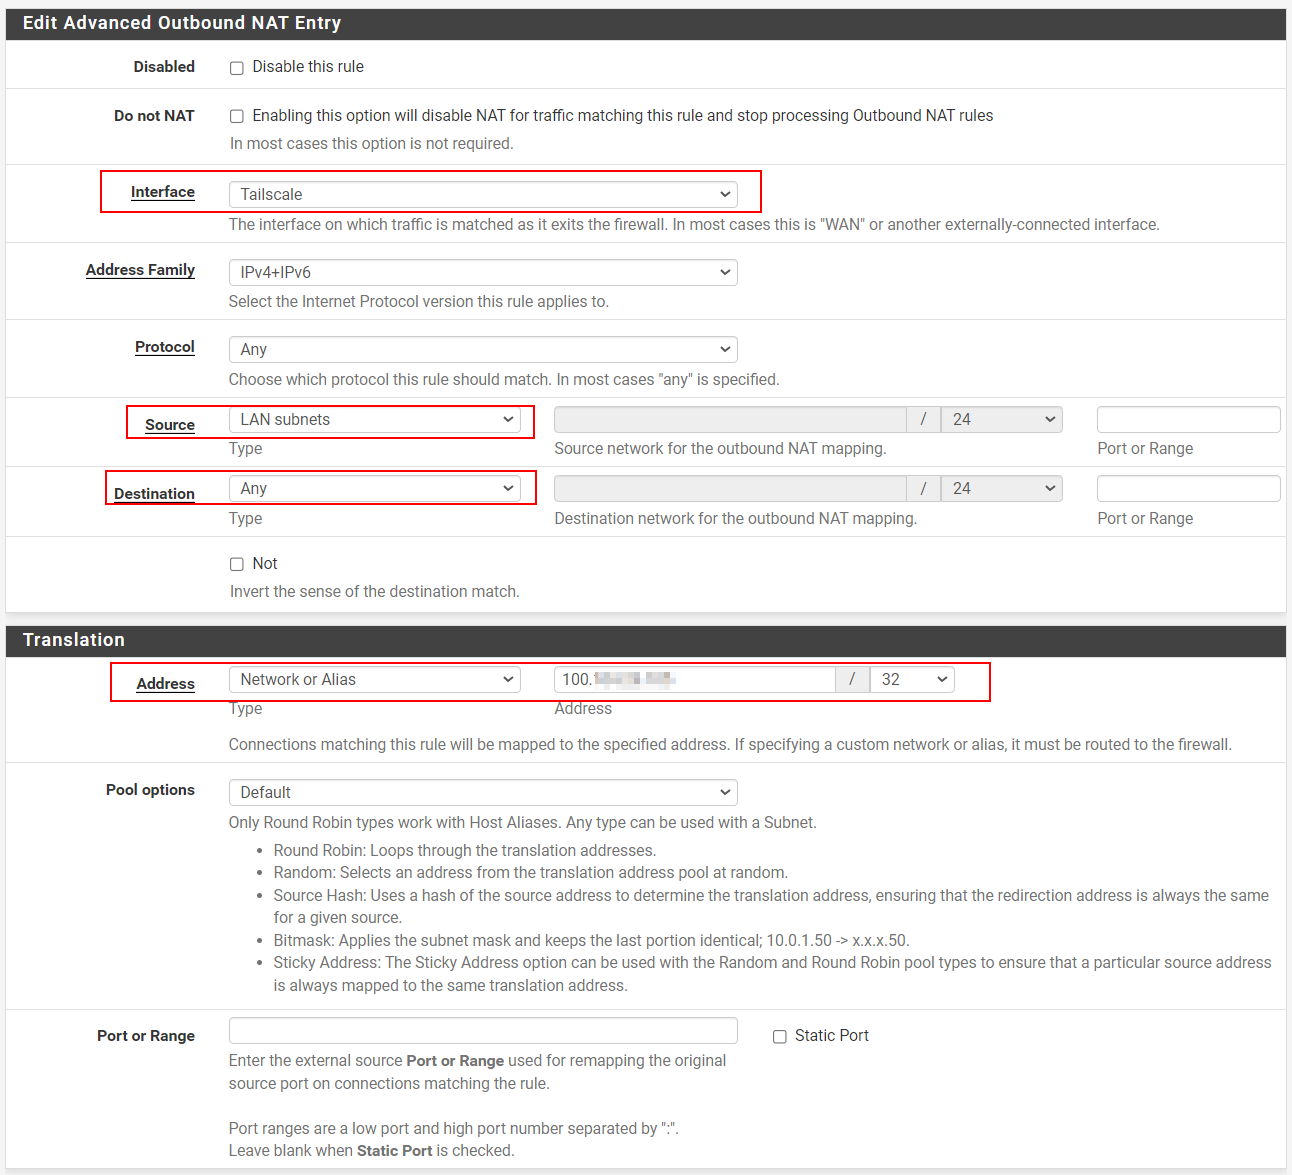
As a result, any devices on your PFsense LAN subnets should now be able to ping any devices connected to your Tailscale network—like our two VPSs in Helsinki and Philadelphia.
4/ Tailscale's subnet router
You might need to allow devices on your Tailscale network (Tailnet) to connect to devices on other private subnets you have. For example, I need my VPS in Helsinki to be able to print to a printer located at home, in my private home LAN subnet. Since it's a printer, I can't install the Tailscale agent on it. This is where a Tailscale subnet router comes in handy.
A Tailscale subnet router allows you to "advertise" private subnets to your Tailnet, enabling your Tailnet devices to accept and route traffic to these advertised subnets.
Here’s how to route Tailnet traffic to my home network (10.0.4.0/24):
First, I need one of my devices with the Tailscale agent installed.
This device will serve as the entry point for Tailnet to access my private subnet.
After installing the Tailscale agent, you need to specify the private subnet where the agent will route the Tailnet traffic.
This can be done with a simple command.
First activate routing for IPv4 & IPv6:
echo 'net.ipv4.ip_forward = 1' | sudo tee -a /etc/sysctl.conf #Activate routing for IPv4
echo 'net.ipv6.conf.all.forwarding = 1' | sudo tee -a /etc/sysctl.conf #Activate routing for IPv6
sudo sysctl -p /etc/sysctl.conf # Apply routing configuration at kernel level
Then advertise the route to Tailnet:
tailscale up --advertise-routes=10.0.4.0/24 --accept-routes--advertise-routes : advertise your private subnet routes to your Tailscale network
--accept-routes : Approve the advertised route of the other subnet router, along with any other nodes that are acting as subnet routers.
As a result, the device will be labeled as a subnet router in your Tailscale admin console:

5/ Accept route anouncement
For security reasons, the advertised route won’t be automatically approved by Tailnet, so we’ll need to manually approve it.
To do this, click on the three dots at the end of the device’s line, and select "Edit Route Settings."
Then, approve your private subnet in this setting.
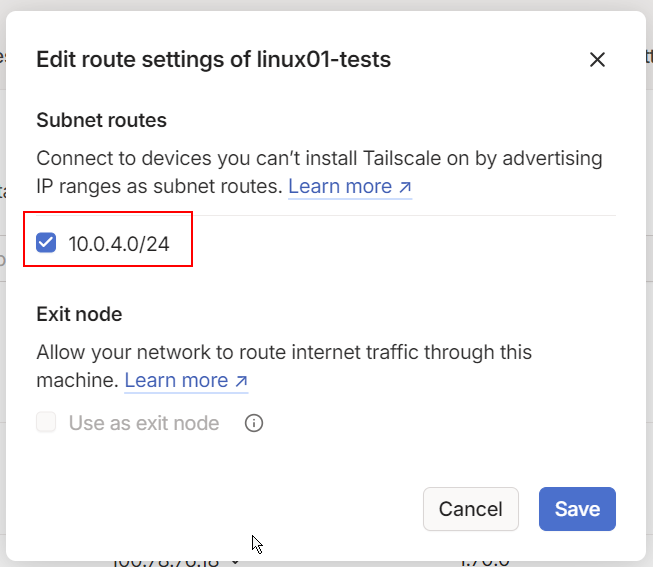
As a result, any of your Tailnet devices (like Helsinki, for example) should now be able to connect to devices on your private subnet, even if those devices don’t have the Tailscale agent installed (such as a printer).
When you have 2 or more subnet routers exposing the same route on the network, the Tailscale coordination server will automatically handle failover between them. In failover mode, if a subnet router loses connection to the control plane for more than 15 seconds, traffic will automatically be rerouted to another subnet router.
6/ Tailscale magic DNS
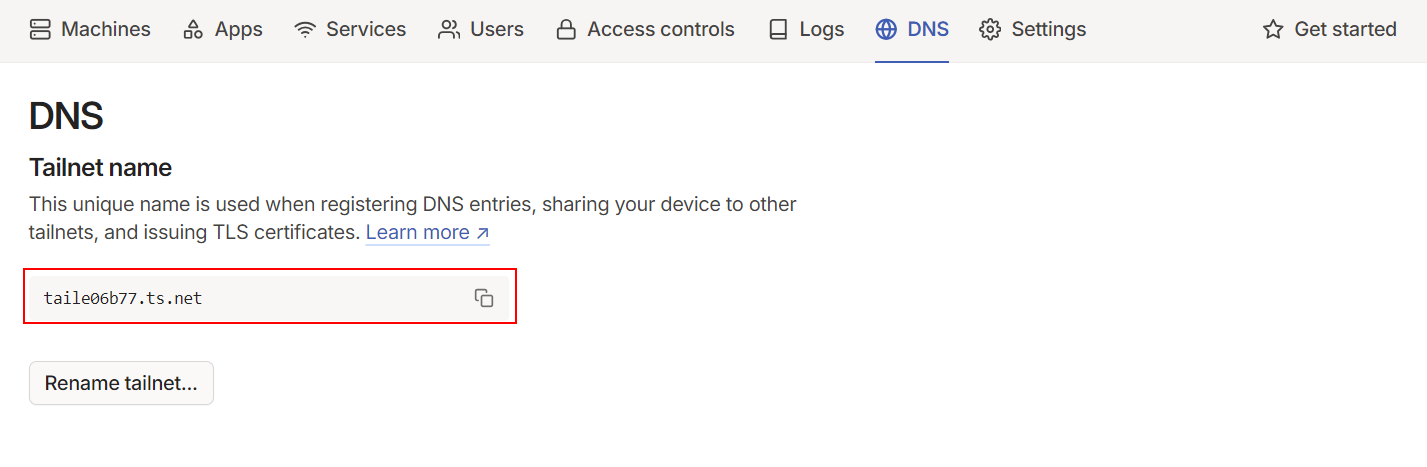
By default, every Tailscale agent acts as a DNS server on top of a Wireguard point-to-point agent. Your Tailnet private network is managed under a domain automatically created by Tailscale. If you navigate to your admin console and go to the "DNS" tab, you’ll see your Tailnet domain name like "xxxxxx.ts.net".
(As an example, mine is "taile06b77.ts.net")
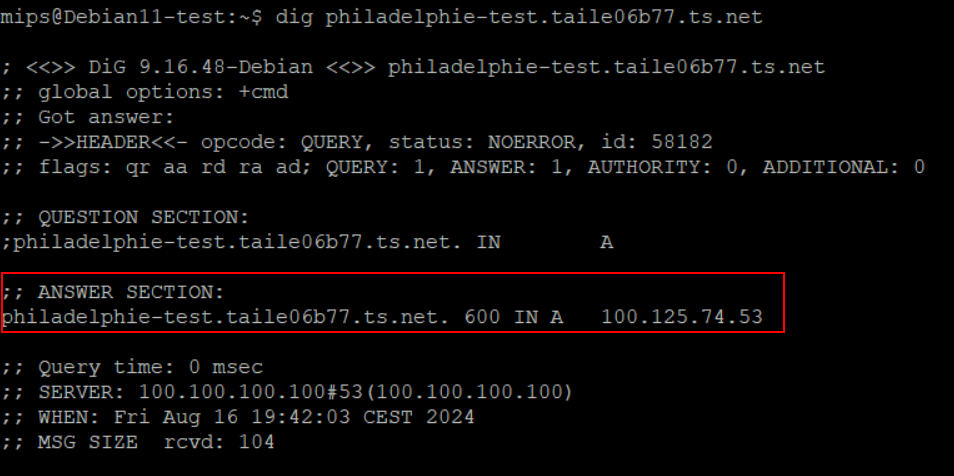
This means any device connected to Tailnet can resolve their IP addresses by their name.
For example, I can resolve the Philadelphie VPS with the following command:
dig philadelphie-test.taile06b77.ts.netThe result show my Tailnet private IP :
Now we know that Tailnet manages its own DNS records, which is super handy.
However, I also have my own DNS server in my lab. While I can access any IP in my LAN private subnet from Tailnet device (thanks to the Tailscale subnet router), it would be incredibly useful if my Tailscale network could also resolve entries from my lab domain. This way, I could easily request my lab machine and services from any Tailnet-connected device.
This can be achieved using a feature called "Split DNS" in the Tailscale DNS configuration.
My lab has a DNS server at the following IP : 10.0.4.6.
This DNS server manage my lab domain called "greg.home".
This DNS server hosts several entries like "truenas.greg.home.", "surveillance.greg.home", "jellyfin.greg.home", and so on...
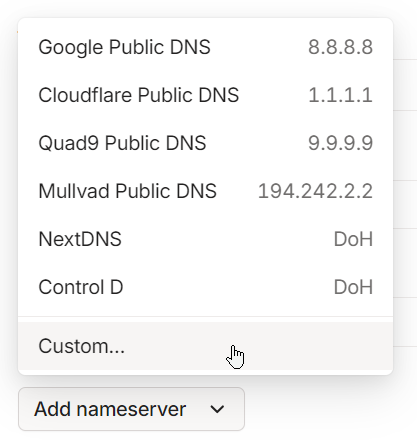
To use Split DNS, in Tailscale's console DNS setting, add a custom nameserver :
and configure Tailnet to resolve domain "greg.home" thru DNS server on IP 10.0.4.6 :
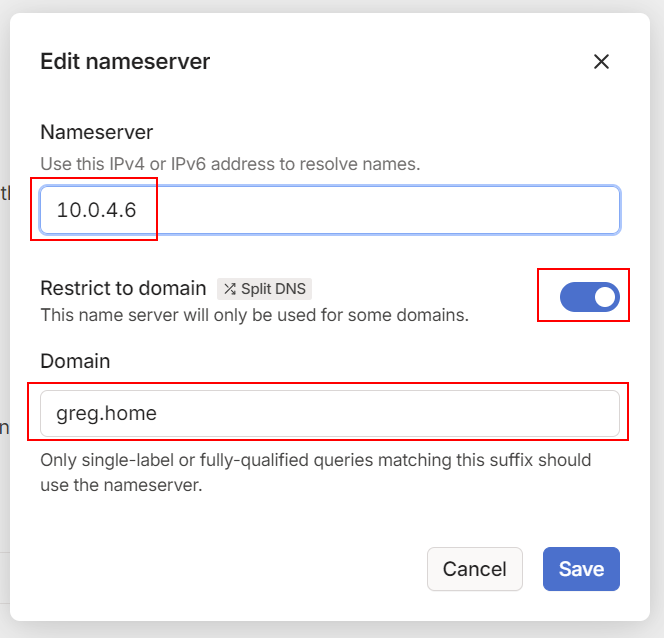
This record acts as a wildcard, meaning any request of any subdomain from "greg.home" will be directed to the 10.0.4.6 DNS server. This way, any Tailscale device on my Tailnet can reach any machine with a DNS record under "greg.home".
As a result, if I request the record "truenas.greg.home" from the VPS in Helsinki, it knows how to resolve it and, thanks to the Tailscale subnet router, it also knows how to connect to it !
dig truenas.greg.home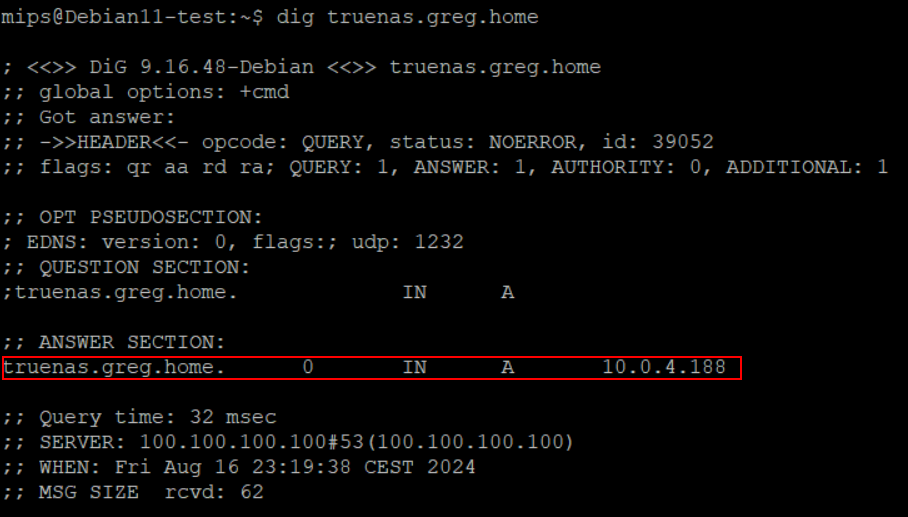
7/ ACL and Tags
Tailscale's tags are labels you can assign to devices within a Tailnet to help manage access control. They allow you to group devices and apply specific permissions or rules, making it simpler to manage access and security within your Tailnet based on roles/functions instead of individual devices.
The first step is to define the tags available within your Tailnet. You can do this in the config file under the "Access Control" tab in your admin console.
Edit your config by adding :
	"tagOwners": {
		"tag:Linux":   [],
		"tag:Lab":     [],
		"tag:Windows": [],
	},
Save your changes and head over to the "Machines" tab.
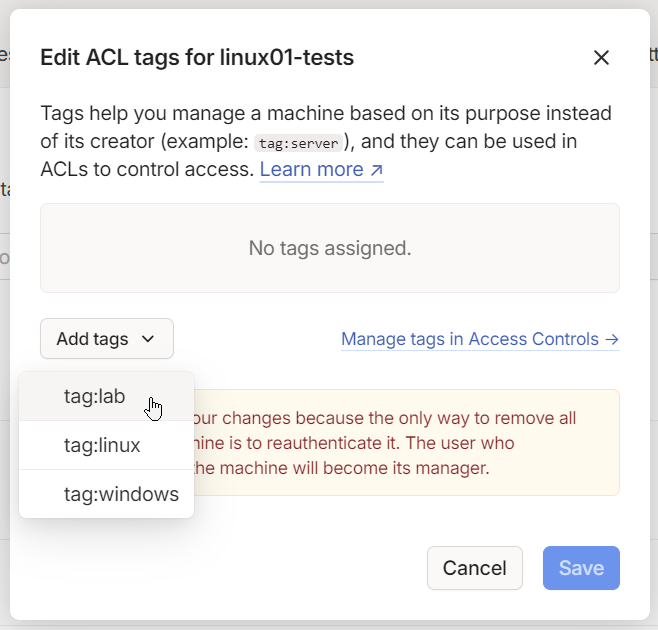
Click on the three dots next to one of your devices and select "Edit ACL tags".
From there, choose the tag you want to assign to this device :
Now, you can see the tags applied to each of your devices in your device list and own the device in place of the user:

You can also assign ownership properties to the tags. In the free personal license, only 3 users are allowed, which limits the capacity of the system's permission features, but for a homelab, it's more than enough.
First of all, through the ACL, you can organize users into groups, which can be more convenient for managing access:
	"groups": {
		"group:admin": ["gl@gmail.com"],
	},
Then, you can assign group properties to the tags for easier management:
	"tagOwners": {
		"tag:Linux":   ["group:admin"],
		"tag:Lab":     ["group:admin"],
		"tag:Windows": ["group:admin"],
	},
8/ SSH access
Tailscale SSH allows users to securely access SSH-enabled devices within a Tailnet network without the hassle of managing separate SSH keys. It uses Tailscale's existing authentication and ACL system to automatically authorize SSH sessions based on the user's identity and permissions set in the Tailscale admin console. Once configured, users can SSH into devices using their Tailscale IP addresses or hostnames, with Tailscale taking care of encryption and access control.
To enable Tailscale SSH on an SSH-enable device, run the following command:
sudo tailscale up --sshNext, we need to update the config file to accept SSH connections and manage security access:
"ssh": [
		{ // Group admin access to SSH
			"action": "accept",
			"src":    ["group:admin"],
			"dst":    ["tag:Linux", "tag:Lab"],
			"users":  ["autogroup:nonroot", "root"],
		},
	],
The SSH ACL is set to "accept". It mean there is no other challenge than providing identity to open an SSH session to the device.
Now, you can SSH into this server via the Tailscale network using the access defined in the ACL config file.
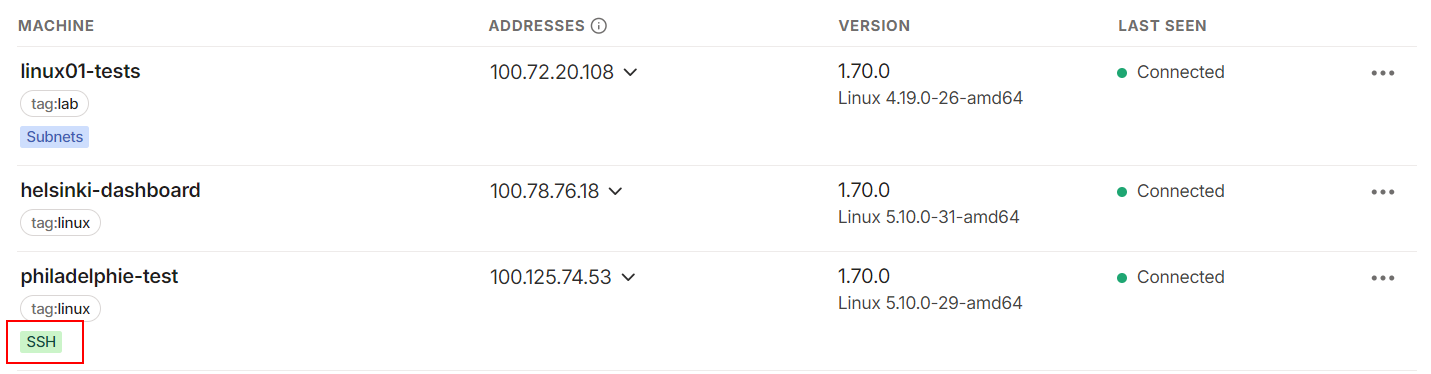
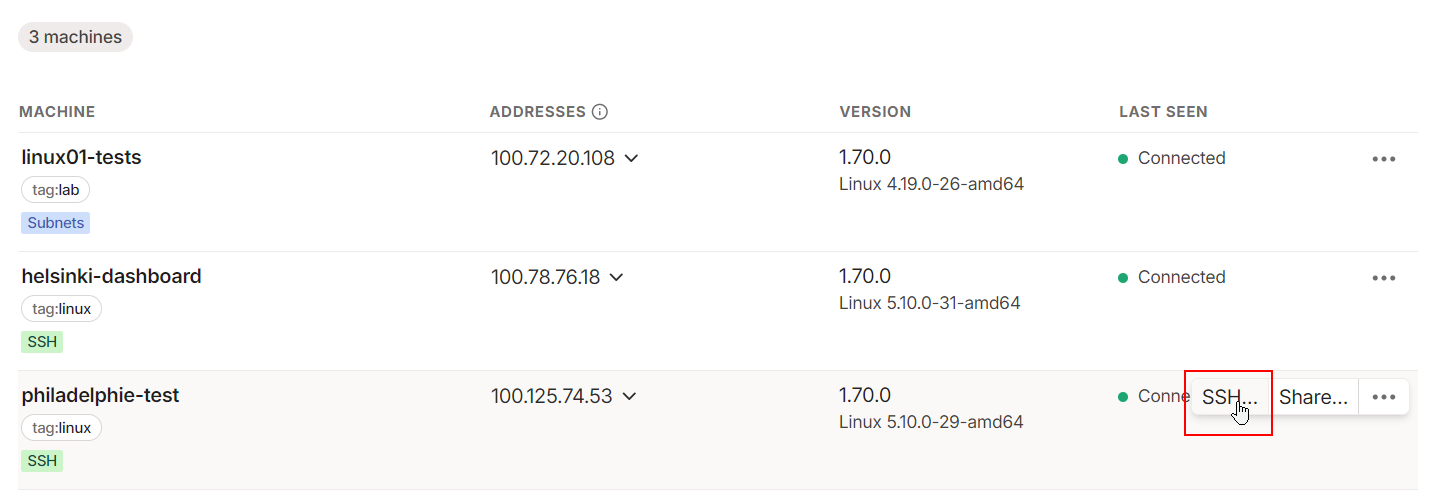
You can also check the Machines list to see which devices have the Tailscale SSH server enabled:
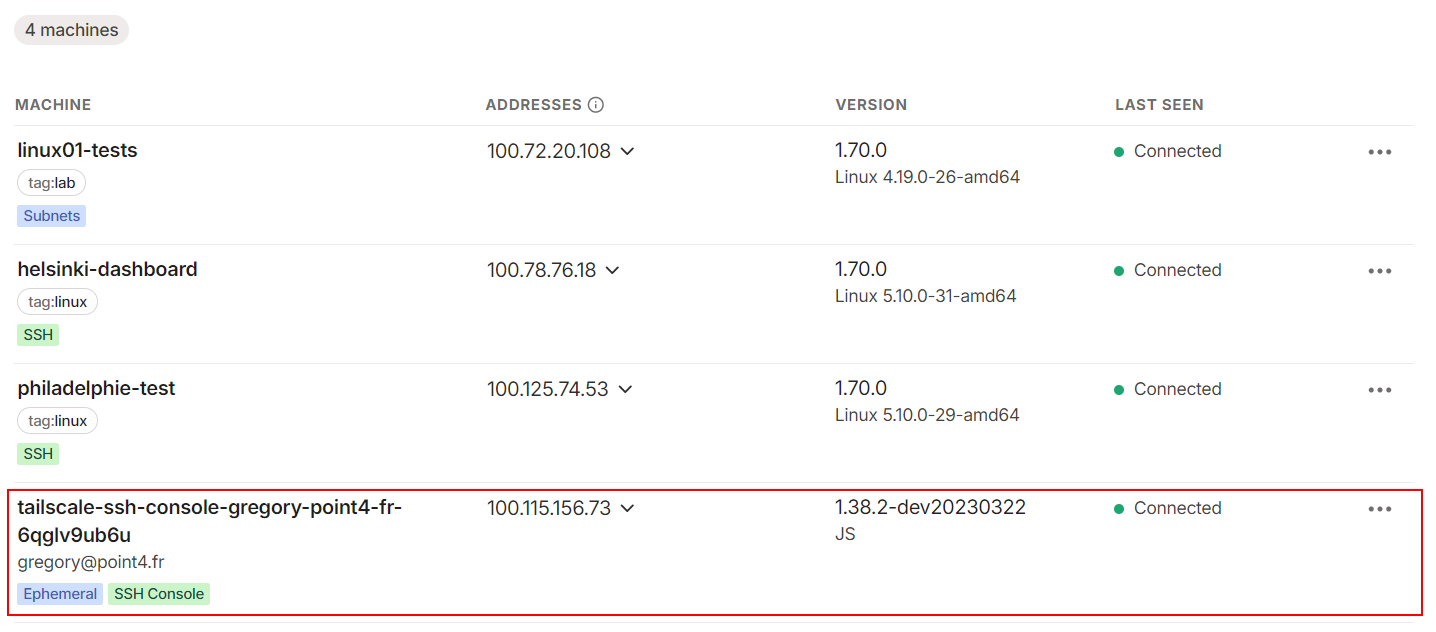
An easy way to check the connection is to use the SSH console from the admin GUI:
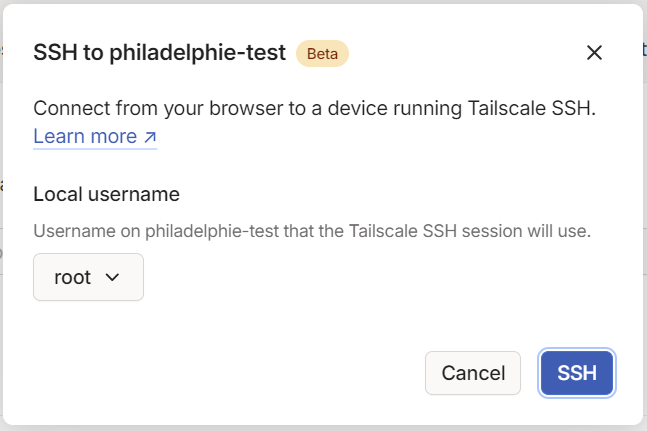
With the ACL set to "accept" for SSH (as shown above), once you authenticate through your identity provider, you’ll be connected.
If everything is configured properly, you'll connect to the device's SSH server via the Tailnet network—no need to open firewall ports or set up NAT.
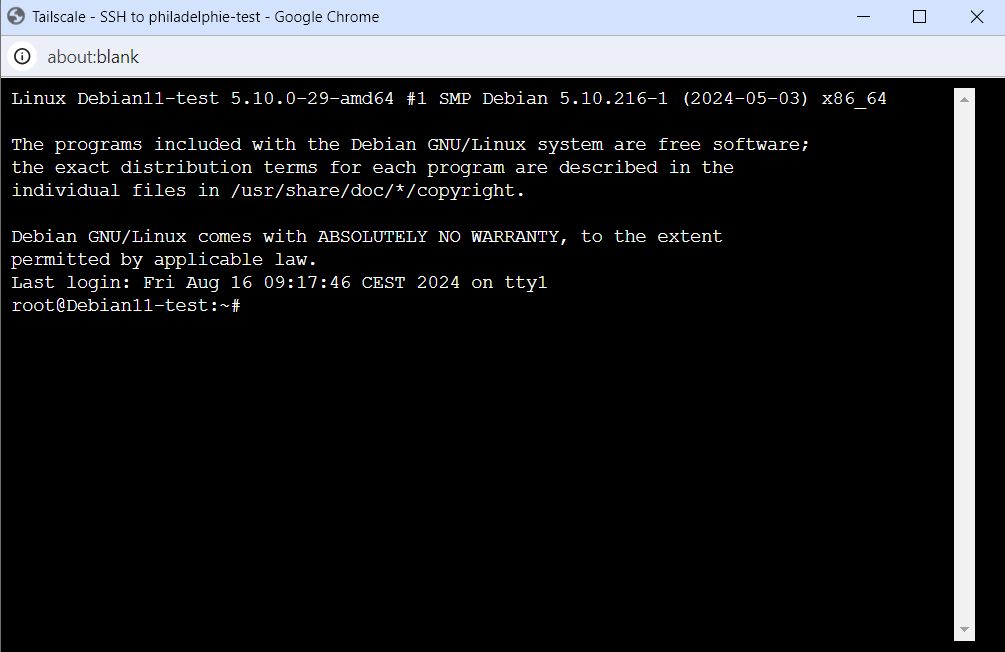
If the connection is successful, you’ll notice that the console has opened a session in your machine list:
sudo tailscale up --ssh=false
If you revoke the permission in the ACL config file, the connection is instantly closed.
9/ Serve
Sometimes, I need to share data between my devices, like a config file, bash script, or .deb/.rpm install package. I usually use WinSCP to transfer files to and from the endpoint. But with Tailscale, there’s an even easier way to do this.
The feature is called "serv".
The "serve" feature in Tailscale lets devices within a Tailnet serve HTTP and HTTPS content directly over the Tailscale network. This feature allows you to expose web services, files, or applications running on a device to other Tailscale devices without the hassle of configuring external DNS, firewall rules, or port forwarding.
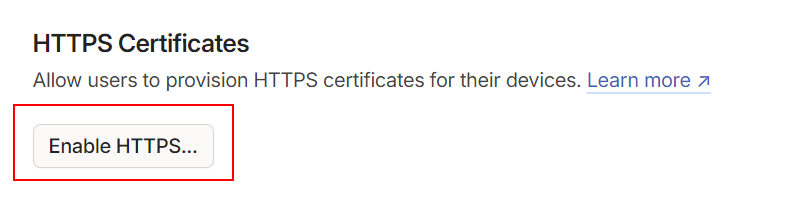
To use "serve" it's mandatory to enable HTTPS certificats on Tailnet.
In order to enable HTTPS on your Tailnet, do to "DNS" tab en click on "Enable HTTPS":
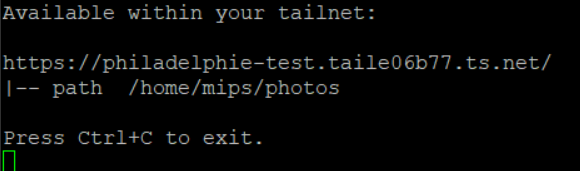
Let’s say I have a set of photos stored in "/home/mips/photos" that I want to share with other devices in my Tailscale network.
Once HTTPS certificates are enabled, you can easily share these photos from your device with the following command:
sudo tailscale serve /home/mips/photos/As a result, Tailscale will expose a web service mapped to the specified path:
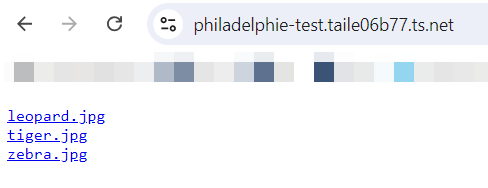
And sure enough, if I browse this URL from a device connected to the Tailnet network, I can view the data shared by this service:
to stop it, just run the following command: tailscale serve off
10/ Funnel
The Funnel feature is very similar to Serve, with one key difference: Funnel exposes the web service publicly, not just within your Tailnet network. Acting as a secure reverse proxy, it simplifies sharing web applications, APIs, or other services. In a nutshell, Funnel provides a secure, temporary, or permanent public URL for your internal services, all protected by Tailscale's authentication and encryption.
The command is quite similar to the Serve command:
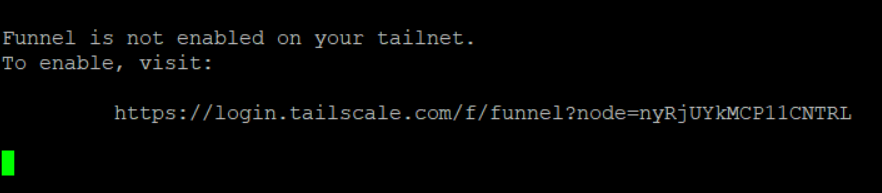
sudo tailscale funnel /home/mips/photos/For security reasons, Funnel is not activated by default on your Tailnet. When you run the command, it will prompt you to authenticate in order to activate Funnel:
Once Funnel is activated, re-running the command will start the web service as shown below:
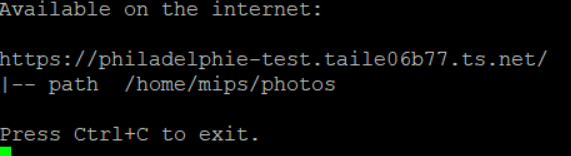
The provided URL is publicly accessible on the internet, not just within your Tailnet.
11/ Exit node
An exit node in Tailscale is like a secret passageway for your internet-bound traffic, routing it through another device in your Tailnet. When you designate a device as an exit node, other devices can choose to send all their internet traffic through it, effectively turning it into a VPN gateway. This is perfect for accessing region-specific content, securing traffic on sketchy networks, or masking your IP address.
To designate one of your devices as an exit node for your traffic, just run the following command:
sudo tailscale up --advertise-exit-nodeAnd to have your devices route their internet-bound traffic through this exit node, run the following command:
sudo tailscale set --exit-node=100.125.74.53where IP is the IP of the device defined as the exit-node
As a result, if you check your public IP on this device, you’ll see that it matches the IP of the exit node, confirming that the traffic is being correctly rerouted.
like: sudo tailscale up --exit-node=
In a nutshell:
Tailscale is an SD mesh VPN service that unifies networks, even when they’re quite diverse in how they function or where they’re located. The software-defined nature of this network type gives you great control over data security and access. Tailscale, with its Tailnet network built on Wireguard, ensures solid performance, even with encrypted point-to-point connections.
The personal tier of Tailscale's license is minimally restrictive, making it easy to deploy and manage a homelab with multiple environments without too much hassle.
The versatility of the available features allows you to tailor your Tailnet to your specific needs. It also simplifies services that used to require more complex configurations.
All my little tech babies are now happily connected through the same network and managed like a charm.
Time for a well-deserved coffee break! Cheers!

Additionally, Tailscale’s network relies on a coordination server hosted by Tailscale. But if you prefer to go fully autonomous, you can host your own coordination server called Headscale.
Headscale is an open-source, self-hosted alternative to Tailscale's coordination server. It lets you manage your own Tailnet, offering similar functionality to Tailscale’s SaaS, but with the bonus of full control over your infrastructure, user management, and data privacy.
I haven’t tried Headscale yet, so I’m not sure if there are any differences compared to Tailscale in terms of the services provided.