PXE Boot made easy: Auto-connect your ISO !
Get straightforward instructions on deploying your own PXE servers. Simplify your workflow by booting your devices into any ISO installation, Live CD, or ISO tools—all from a single pane of glass.

As a homelab owner, I often find myself stuck in the cycle of installing or reinstalling systems, a task that’s all too familiar and a bit of a drag.
Sometimes, I need to boot a machine or VM into another live system for those low-level tasks like extending a partition, running security checks, or handling backups.
These chores all boil down to one key component: booting the VM or physical machine from an ISO file.
The usual drill involves either writing the ISO to a USB stick for physical machines or telling the VM to boot from a specific ISO linked to a virtual CD-Drive.
Sure, that works, but there’s a much more convenient solution that keeps all your ISO readily accessible at any time, from any device on your LAN, whether physical or virtual.
Ladies, Gentlemen, enter iVentoy.
iVentoy is a PXE server that can boot directly from ISO files without needing to extract them first.
What is a PXE server ?
A PXE server is a dedicated server on your network that other devices use to request a bootable image over the network when they perform a PXE Boot.
Typically, a PXE server provides DHCP services (or works with an existing DHCP service) to direct clients to the location where they can download the bootable image to use (usually from a TFTP server).
What is iVentoy ?
iVentoy is an enhanced version of the PXE server that could offer ISO files to boot directly from to other devices.
What is the cost of iVentoy ?
iVentoy offers both free and paid licenses.
Below is a table comparing the two:
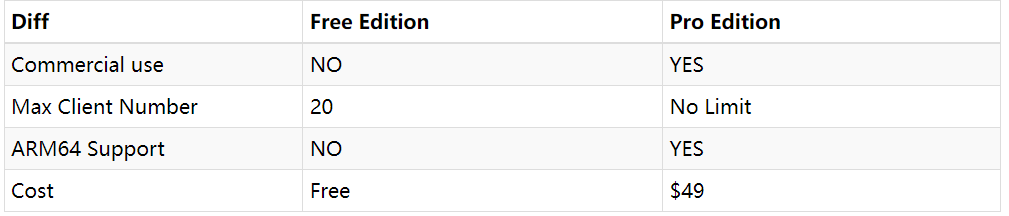
The free edition offers all the features, but it’s limited to 20 client devices and doesn’t support ARM architecture.
How to enable PXE boot option on your network card ?
PXE Boot is a BIOS/UEFI feature.
Most of the time, you’ll find it in your boot order sequence. Check your laptop, desktop, or server manual to see which function key to press at startup to access the boot order configuration. The specific key can vary from one brand to another.
Here’s a tip: Set your boot order with the local drives first, and PXE as the second option. This way, if a system is already installed on the device, it will boot from the local drive. If not, it will automatically boot from PXE to install a system.
How to install your iVentoy server ?
I’ll be using one of my Debian 11 Linux servers as my iVentoy server.
To install iVentoy, first, grab the latest release from the official website here: iVentoy GitHub.
Then, copy the link for the package and use wget on your Linux server to download the binary.
wget https://github.com/ventoy/PXE/releases/download/v1.0.20/iventoy-1.0.20-linux-free.tar.gzThen we need to uncompress the tar archive:
tar -xvf iventoy-1.0.20-linux-free.tar.gzIn the new iVentoy folder, run iVentoy by using the script as follow:
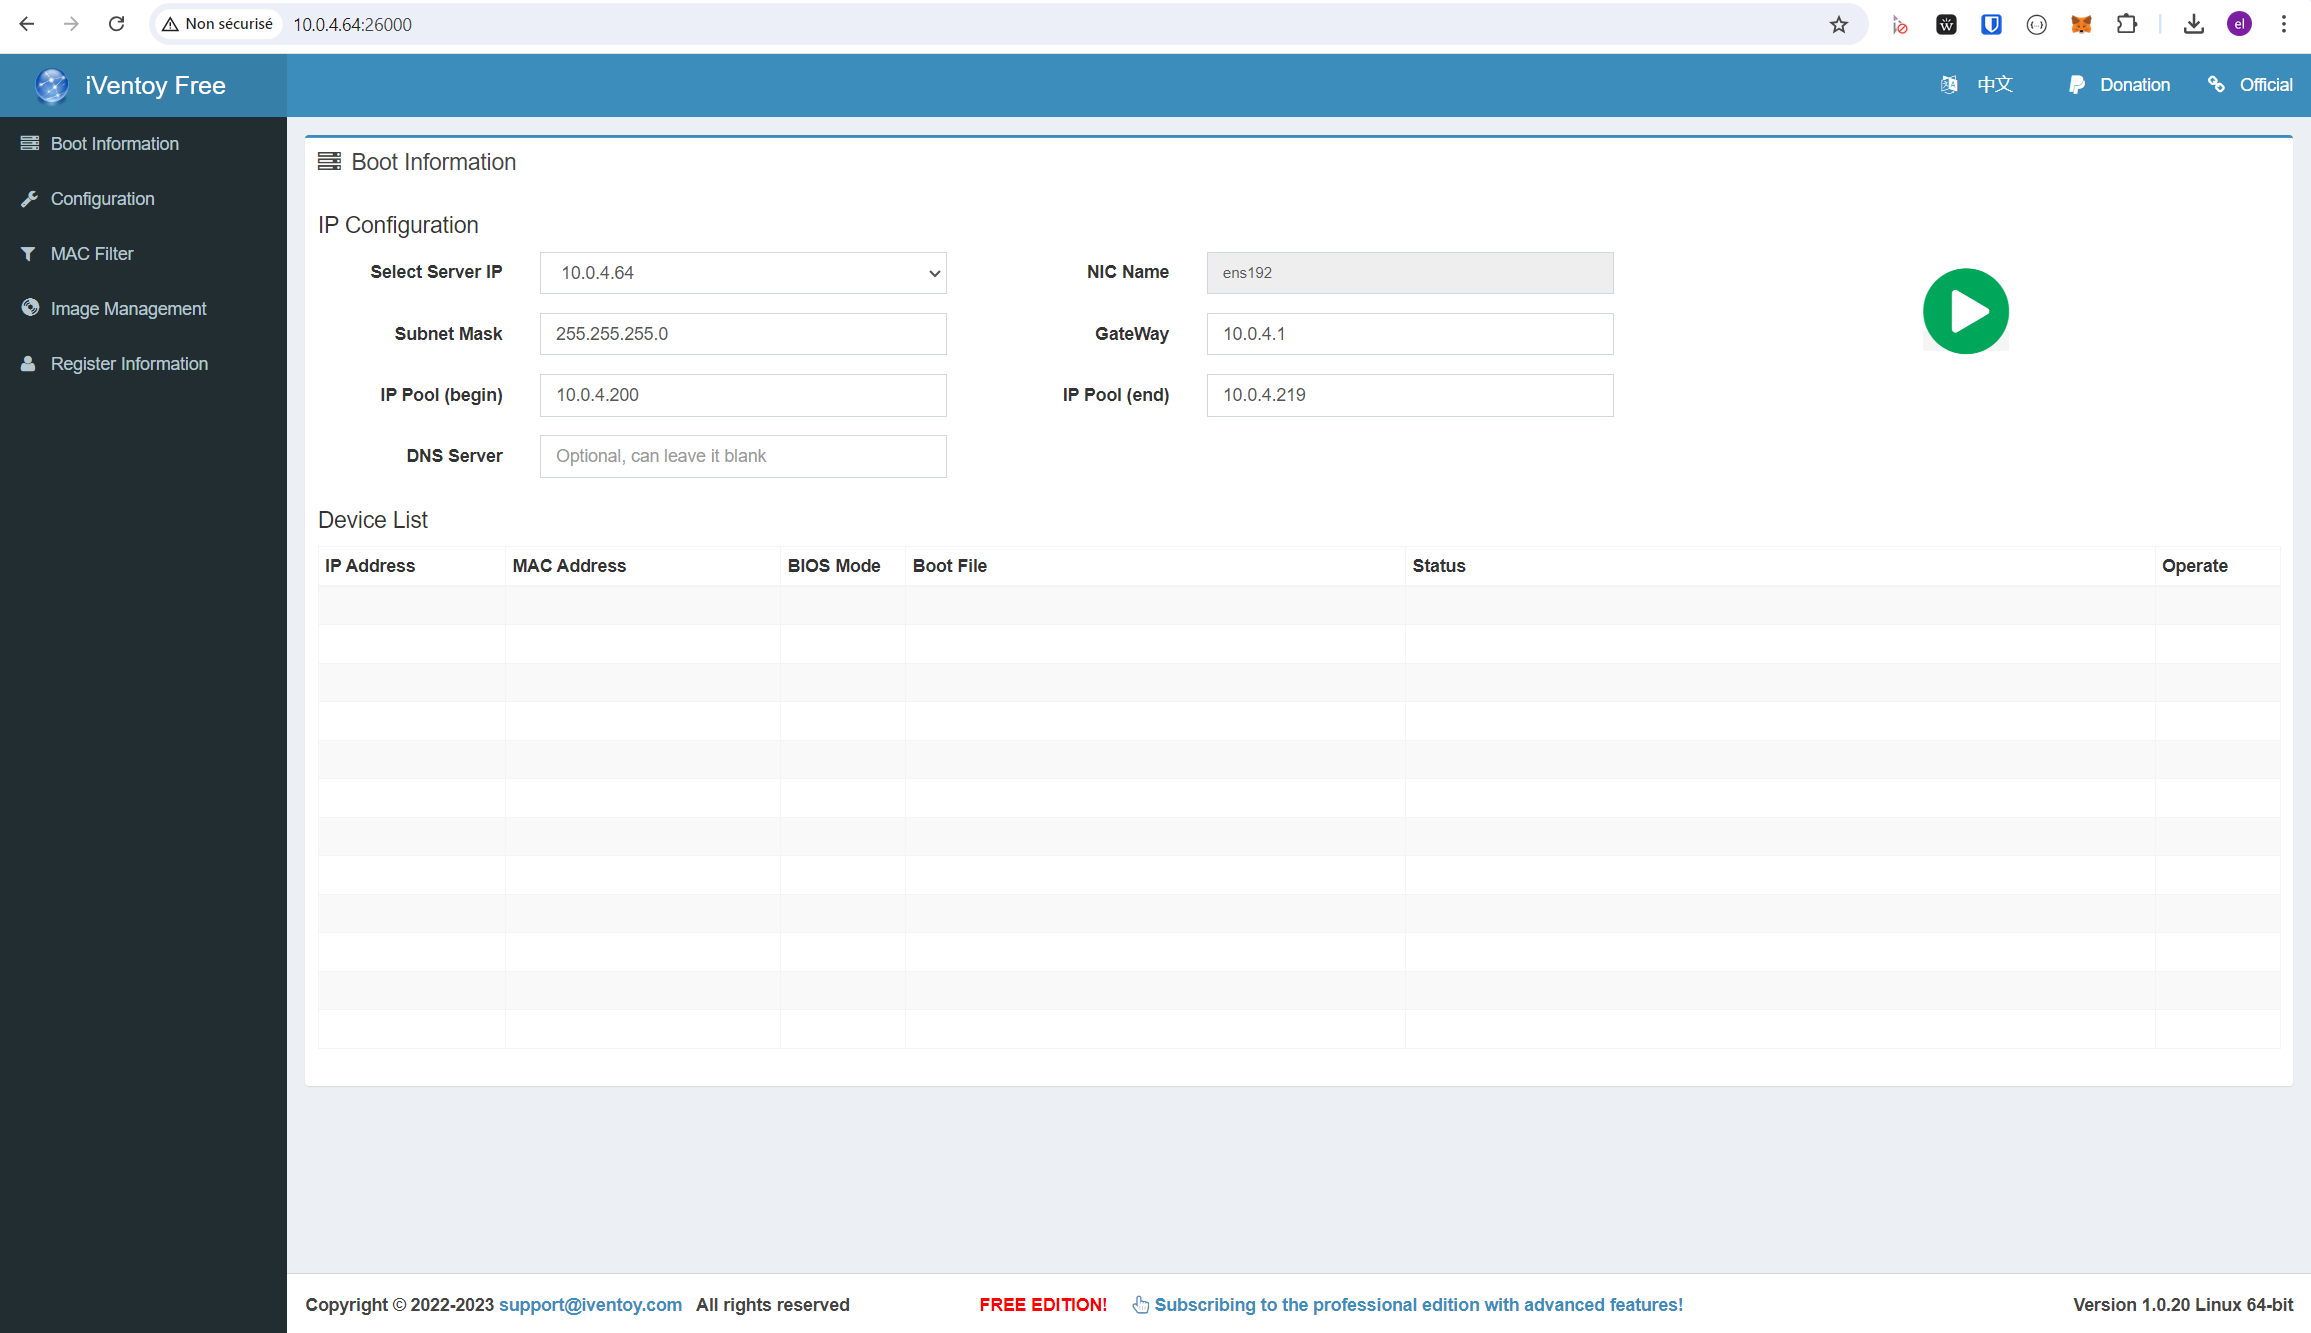
sudo ./iventoy.sh startiVentoy GUI should now be running from this server's IP on port TCP 26000:
DHCP server options
iVentoy comes with a built-in DHCP server, but you can also rely on your own DHCP server.
In the free edition, the built-in DHCP server is limited to 20 IPs, matching the number of PXE boot clients limitation.
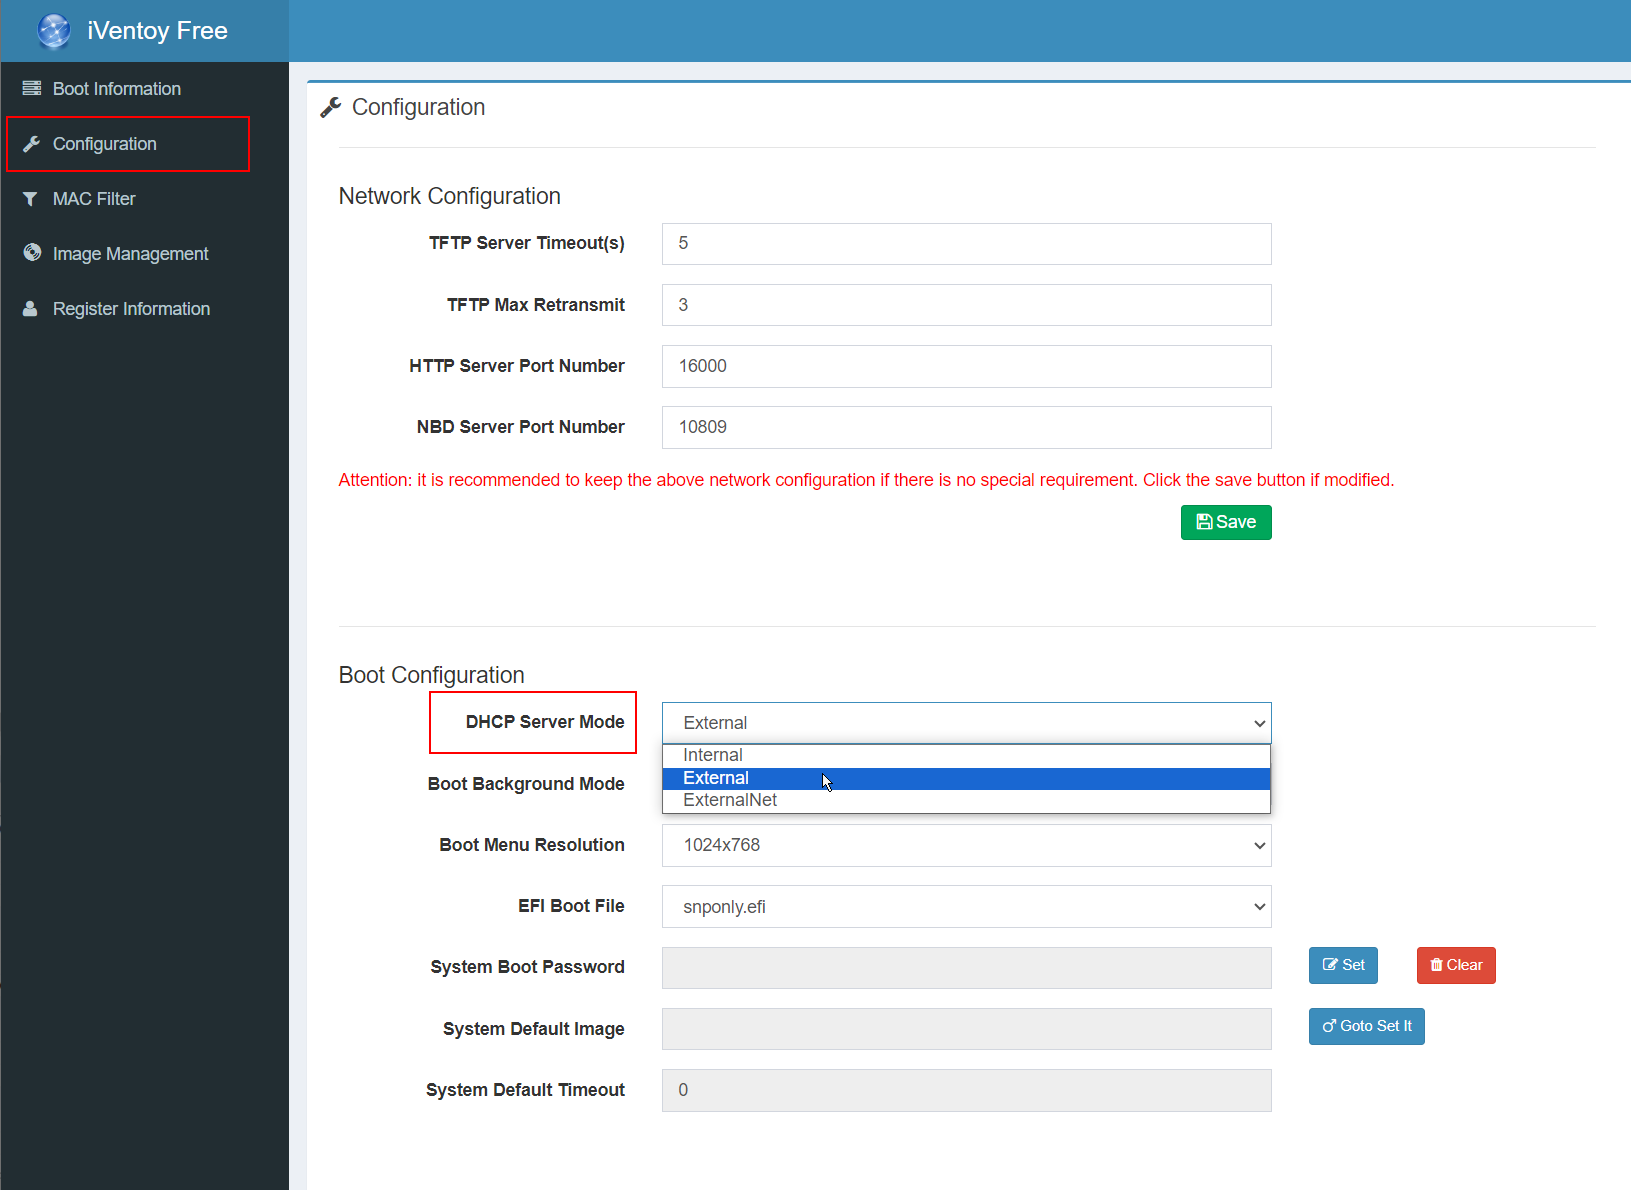
To use your own DHCP server, go to the "Configuration" settings and select "External" server for the "DHCP server mode":
How do I set up my firewall ?
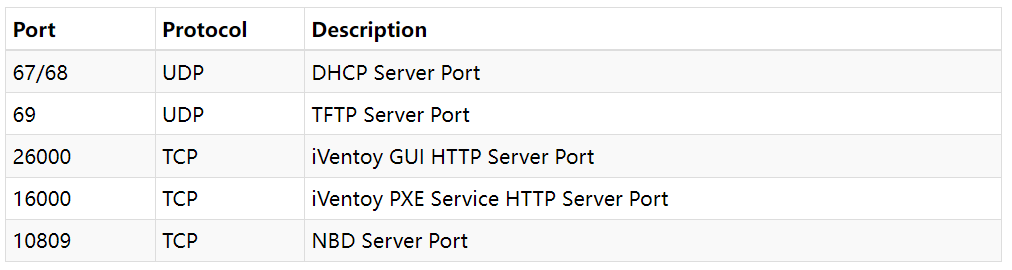
What ports and protocols are used ?
The documentation is quite clear on this, and it provides a helpful table. Just keep in mind that it’s a mix of UDP and TCP protocols, so be careful when configuring.
How to add your ISO files to boot from ?
iVentoy stores ISO files in a directory within its installation called "ISO."
Use your favorite tool (like WinSCP) to upload all the ISO files you want to use for your PXE installations.
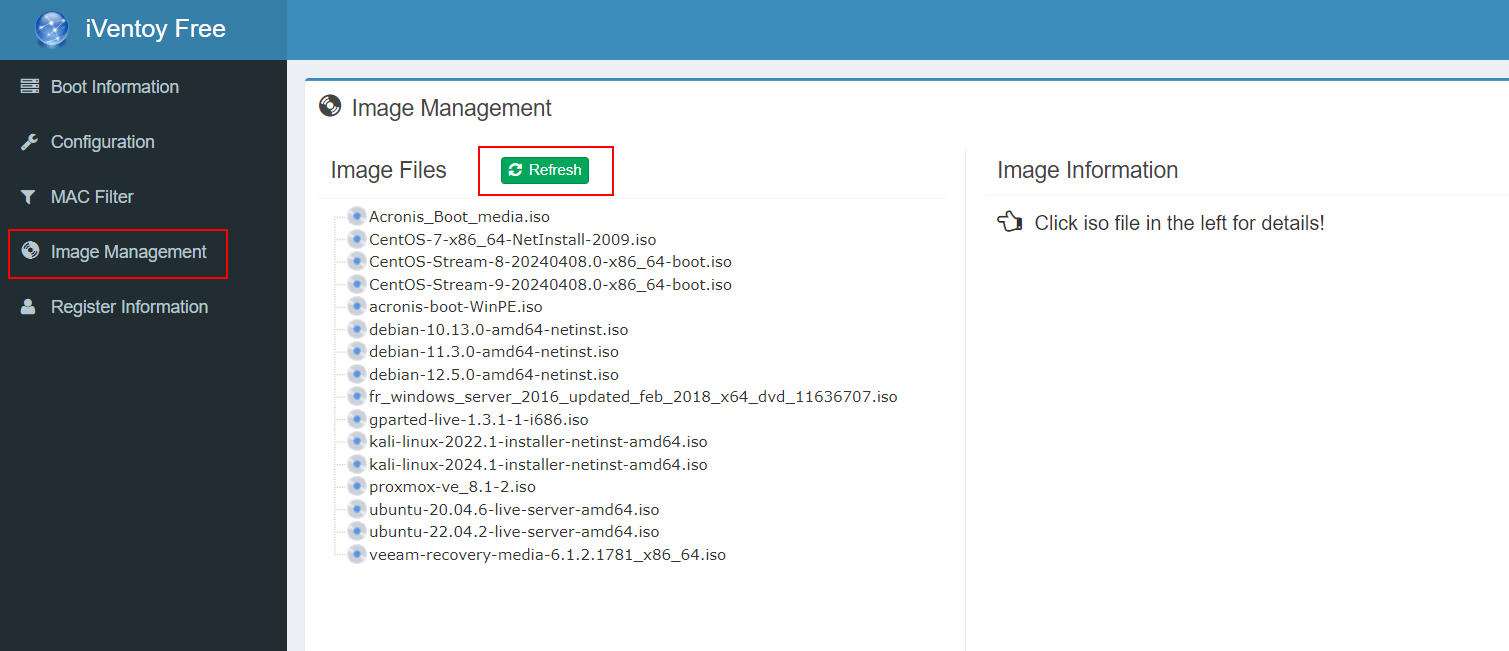
Once that's done, go to the "Image Management" screen in the iVentoy GUI and hit the "Refresh" button. You’ll see all your ISOs appear.
ISO Boot image options available
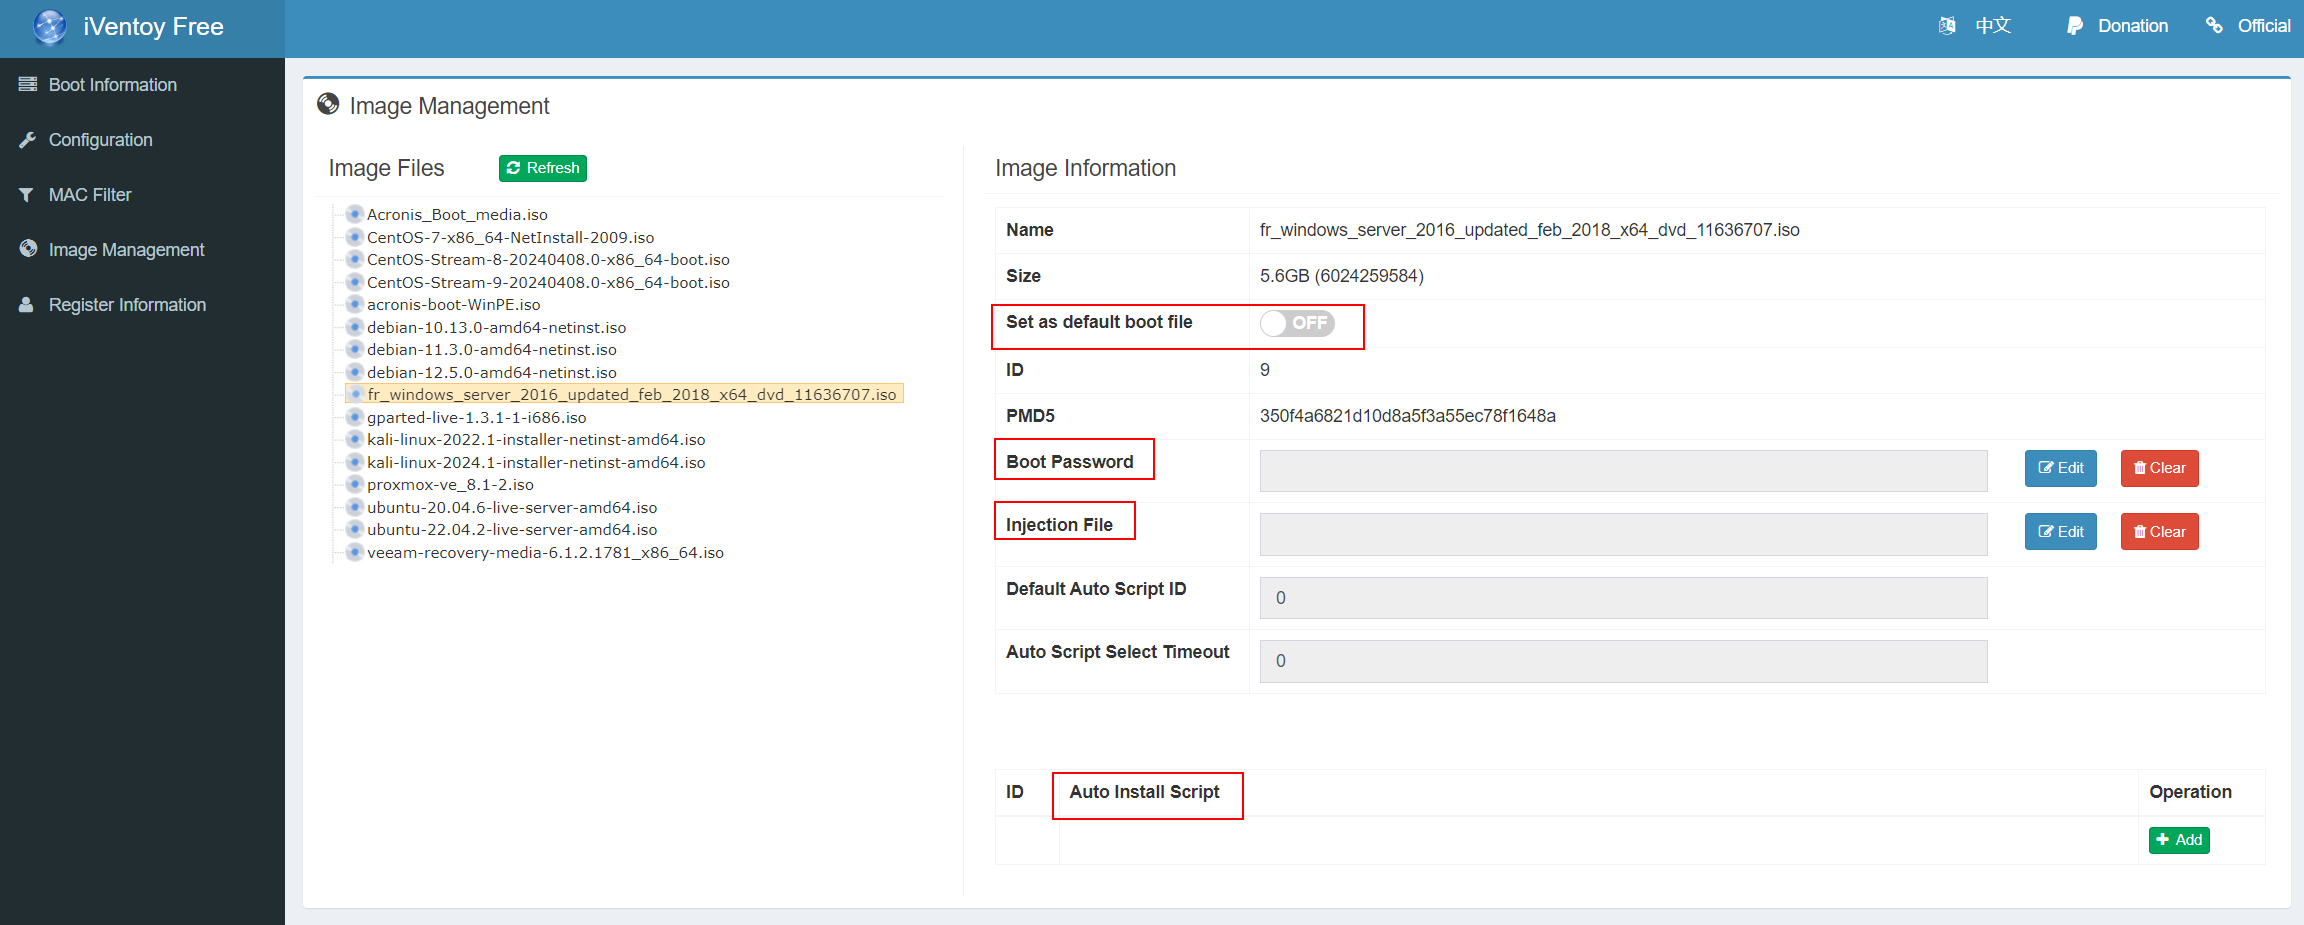
If you select one of your ISOs, you’ll find several options to work with.
You can set an image as the default boot option, add a password to protect it from unauthorized booting, inject files during the boot process (like drivers), or add an installation script to automate the process.
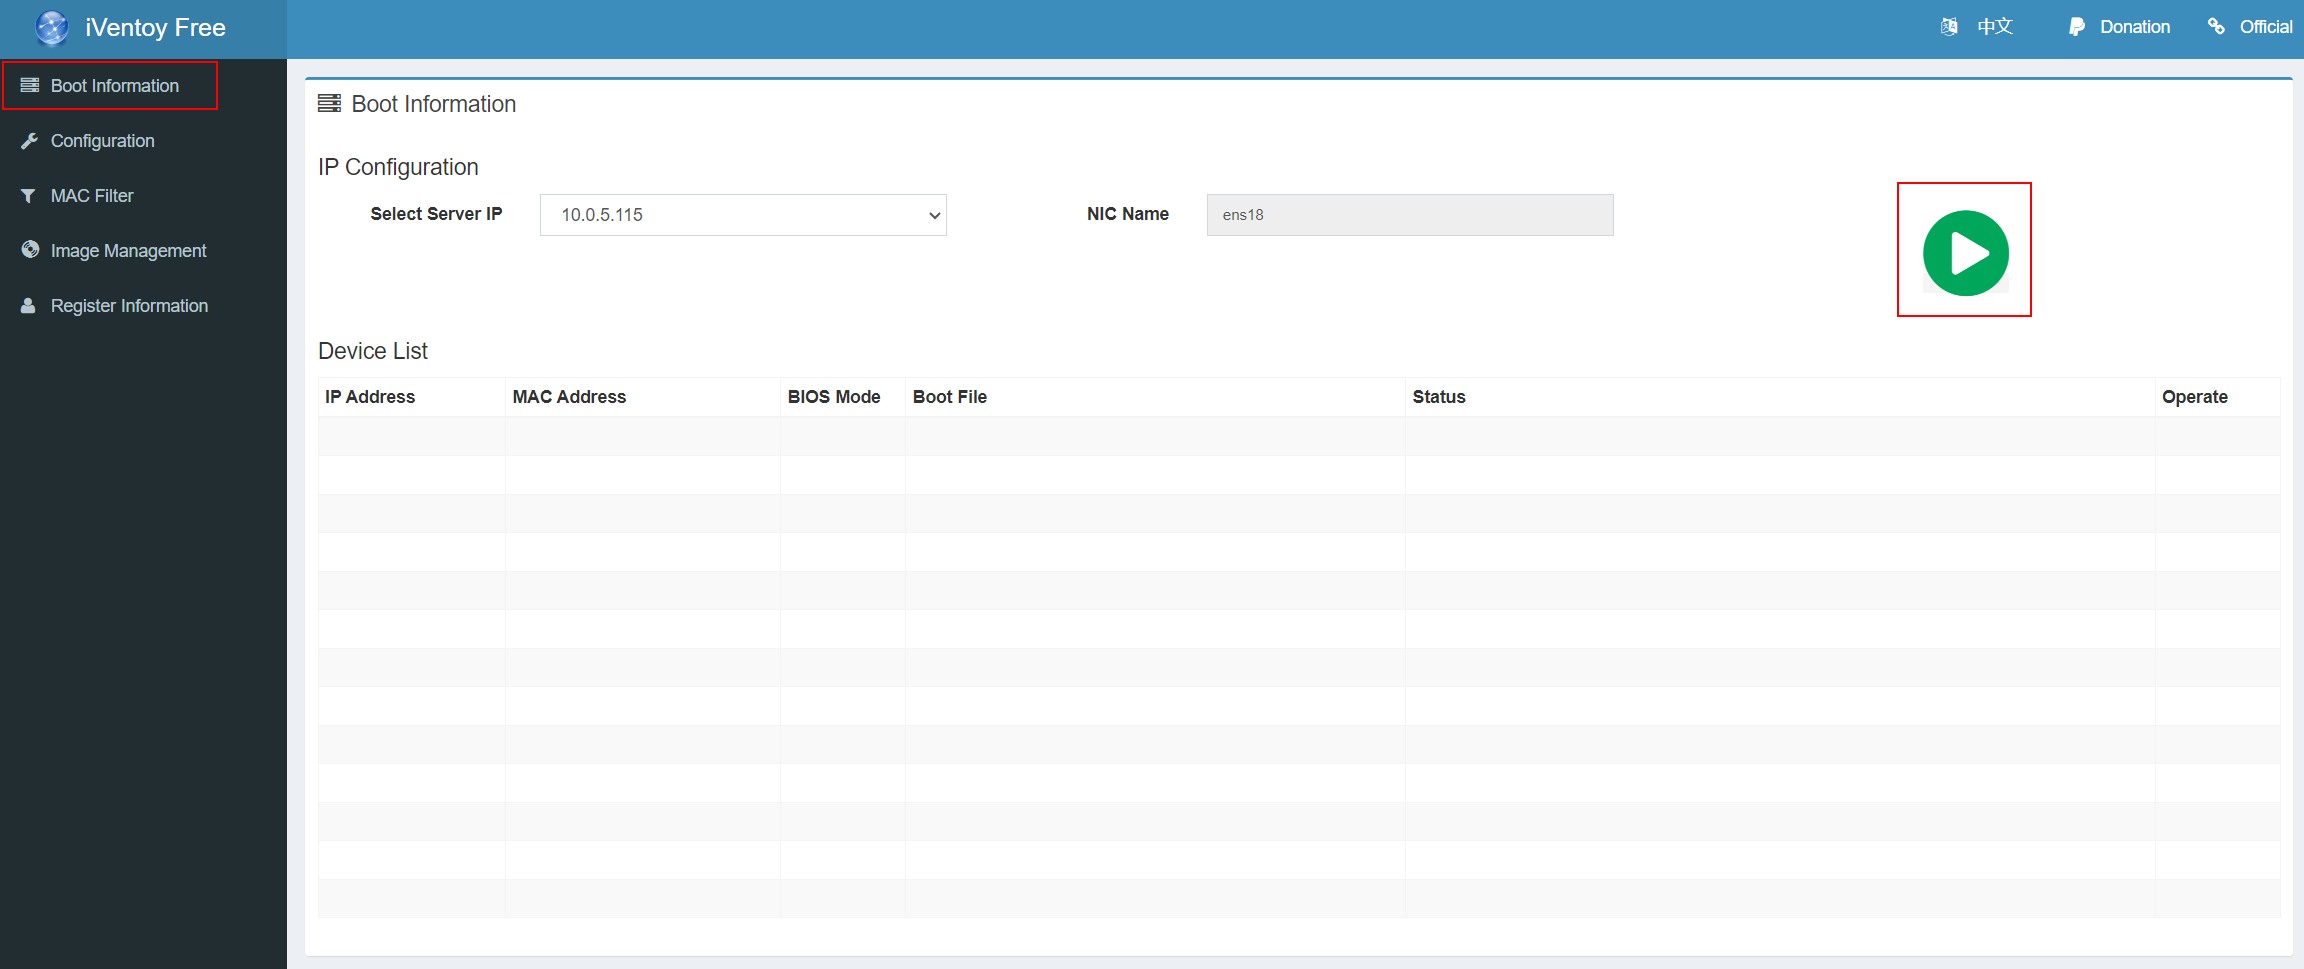
How to run your PXE server ?
Once everything is set up correctly, you'll need to start the server to be ready for PXE boot requests.
Go to "Boot Information" and hit the "green PLAY button":
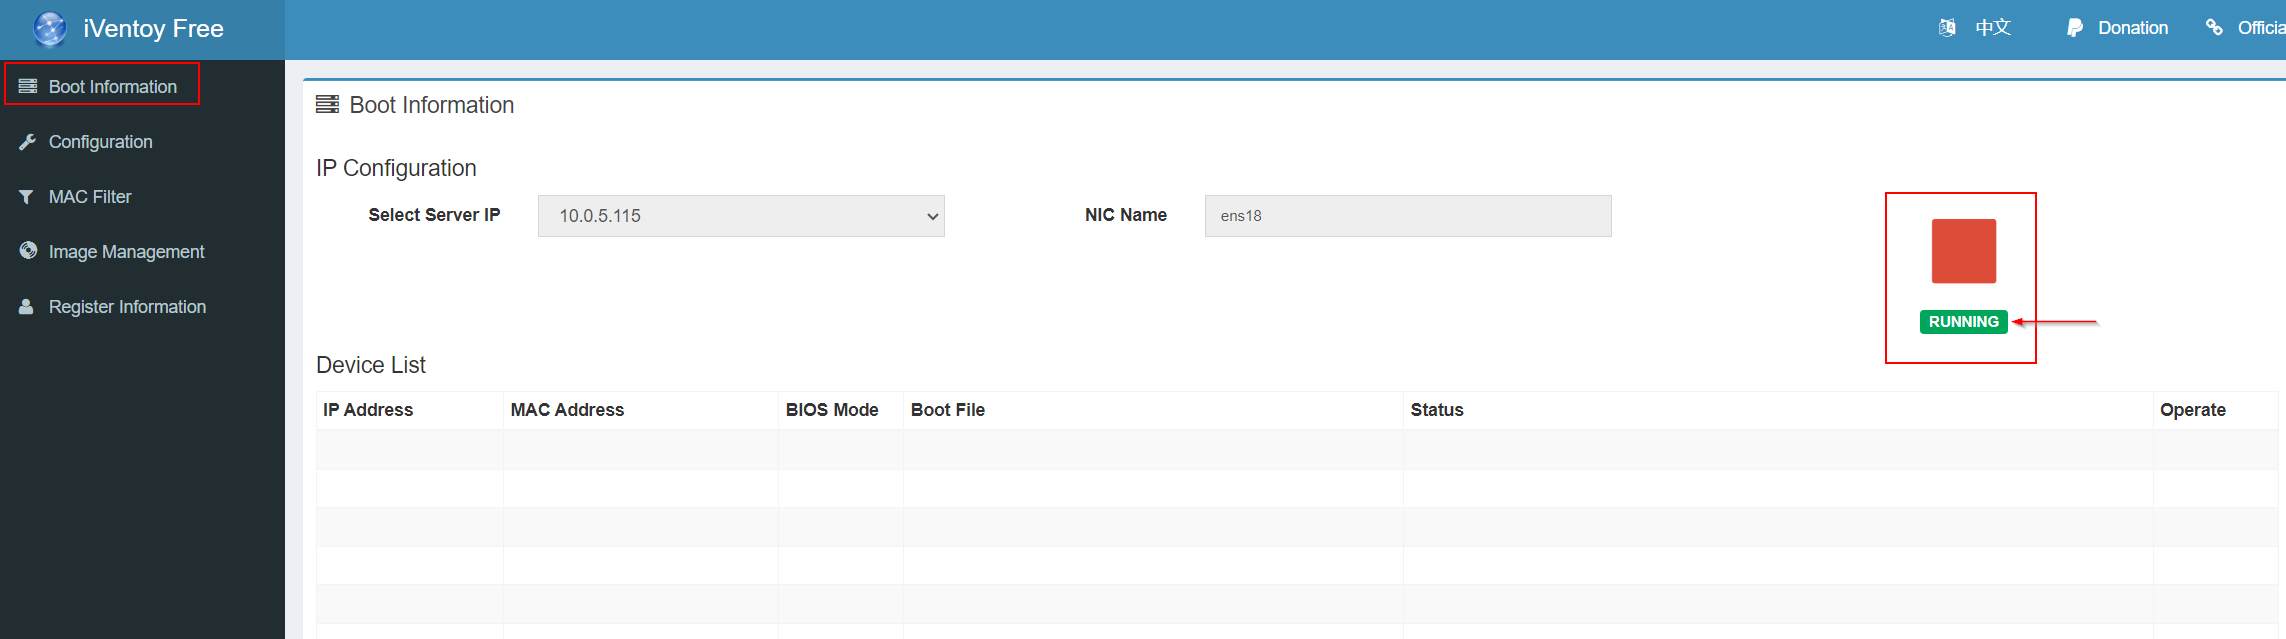
If everything is working correctly, the button will change to indicate that the server is running smoothly:
How can you make it run automatically at startup?
As mentioned, to start iVentoy, you need to start it manually; however, after every server reboot, you’d have to manually run it again.
To automate this, let’s configure the script to run at every startup using init.d.
First, let's create the script to run iVentoy:
sudo nano /etc/init.d/iventoySet it up as follows:
#!/bin/bash

### BEGIN INIT INFO
# Provides:          iventoy
# Required-Start:    $remote_fs $syslog
# Required-Stop:     $remote_fs $syslog
# Default-Start:     2 3 4 5
# Default-Stop:      0 1 6
# Short-Description: my iventoy script
# Description:       Execute my script at startup
### END INIT INFO

# Change to the directory where your script is located
cd /home/mips/iventoy-1.0.20/

# Execute your script
./iventoy.sh -R start
Next, make the script executable:
sudo chmod +x /etc/init.d/iventoyFinally, set it to run at startup:
sudo update-rc.d iventoy defaultsReboot, et voilà! iVentoy will automatically start when the server boots up.
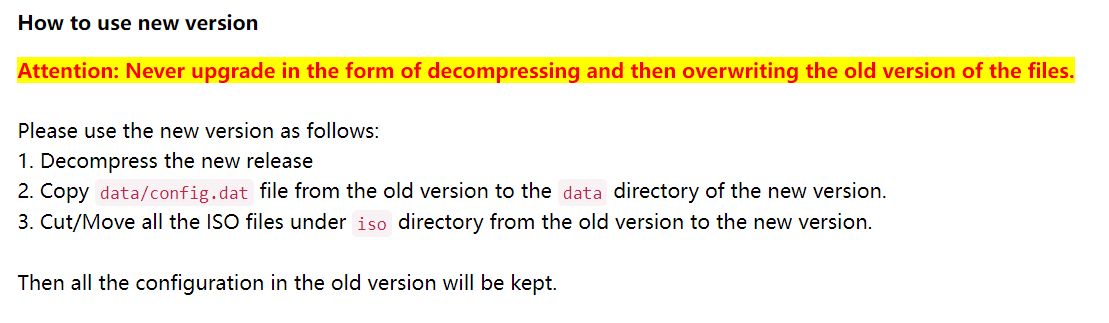
-R option, iVentoy will automatically launch the PXE service with your most recent settings, so you can skip hitting the green button every time. Just be sure you've configured everything and clicked the green start button at least once to lock in those settings.How to update iventoy ?
Upgrading iVentoy to a new version is a manual process that involves copying files.
However, it's quite easy and straightforward. The documentation emphasizes that you should never overwrite your installation files.
Instead, uncompress the new archive and then copy/paste files from your "old" installation to the new one:
Final words
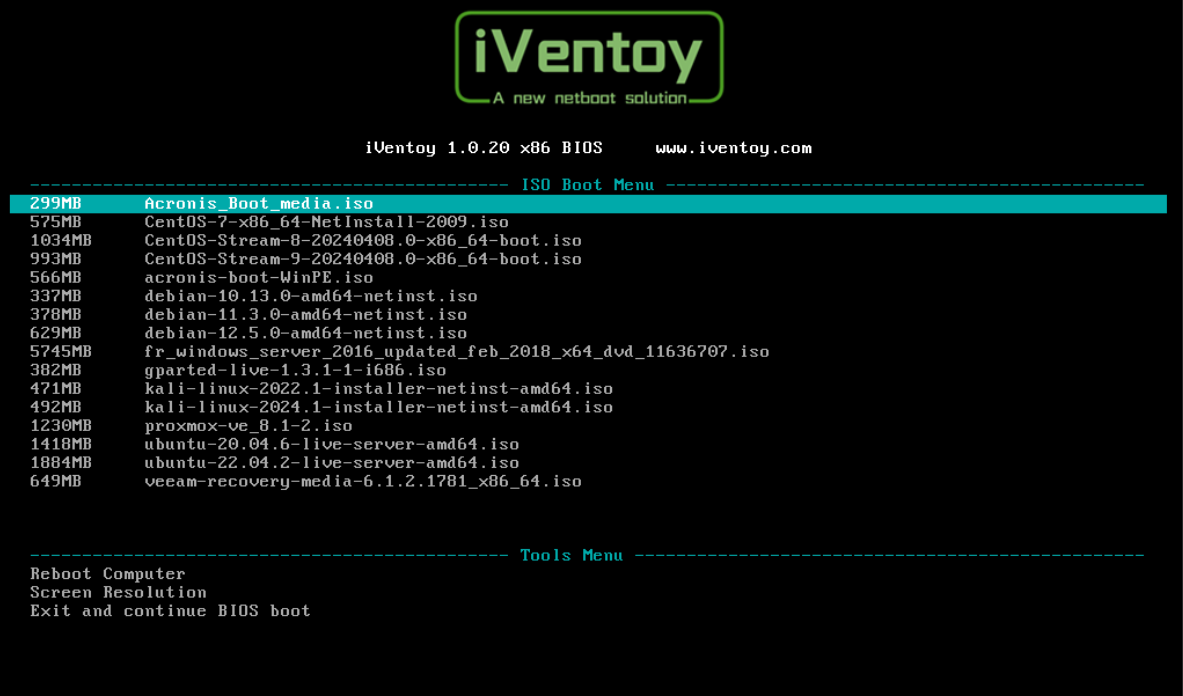
Now, when one of your devices boots from the network, you'll be greeted by the iVentoy boot screen, offering you a buffet of ISO flavors to choose from.
It's a super cool and convenient solution! I hope you enjoy it as much as I do, my fellow tech enthusiasts!