
Pi-Hole clustering: High Availability DNS made simple (full setup)
Learn how to build fully resilient DNS servers with seamless configuration sync, making high availability easy to deploy and even easier to manage


(I’ll be publishing a new article soon with the full configuration details.)
At home, in my lab, all DNS traffic goes through Pi-Hole.
It’s a solid solution, works like a charm, and shields you from the dark side of the internet.
But hey, DNS is DNS… and the moment it goes down, everything else follows!
To avoid a single point of failure, I’ve got 5 Pi-Hole DNS servers, a mix of physical and virtual, to keep things running no matter what.
Cool right? But the pain kicks in when you need to make a config change, because you have to replicate it manually across every single DNS server. 😩
And that’s exactly where Orbital comes to the rescue! 😁
How does it works in my Home/Lab?
I rely on 5 Pi-hole instances to manage 3 separate LANs: my Home LAN (split into Private and IoT segments) and my Lab LAN.
Below is a diagram showing my network topology, designed for DNS redundancy and high availability:
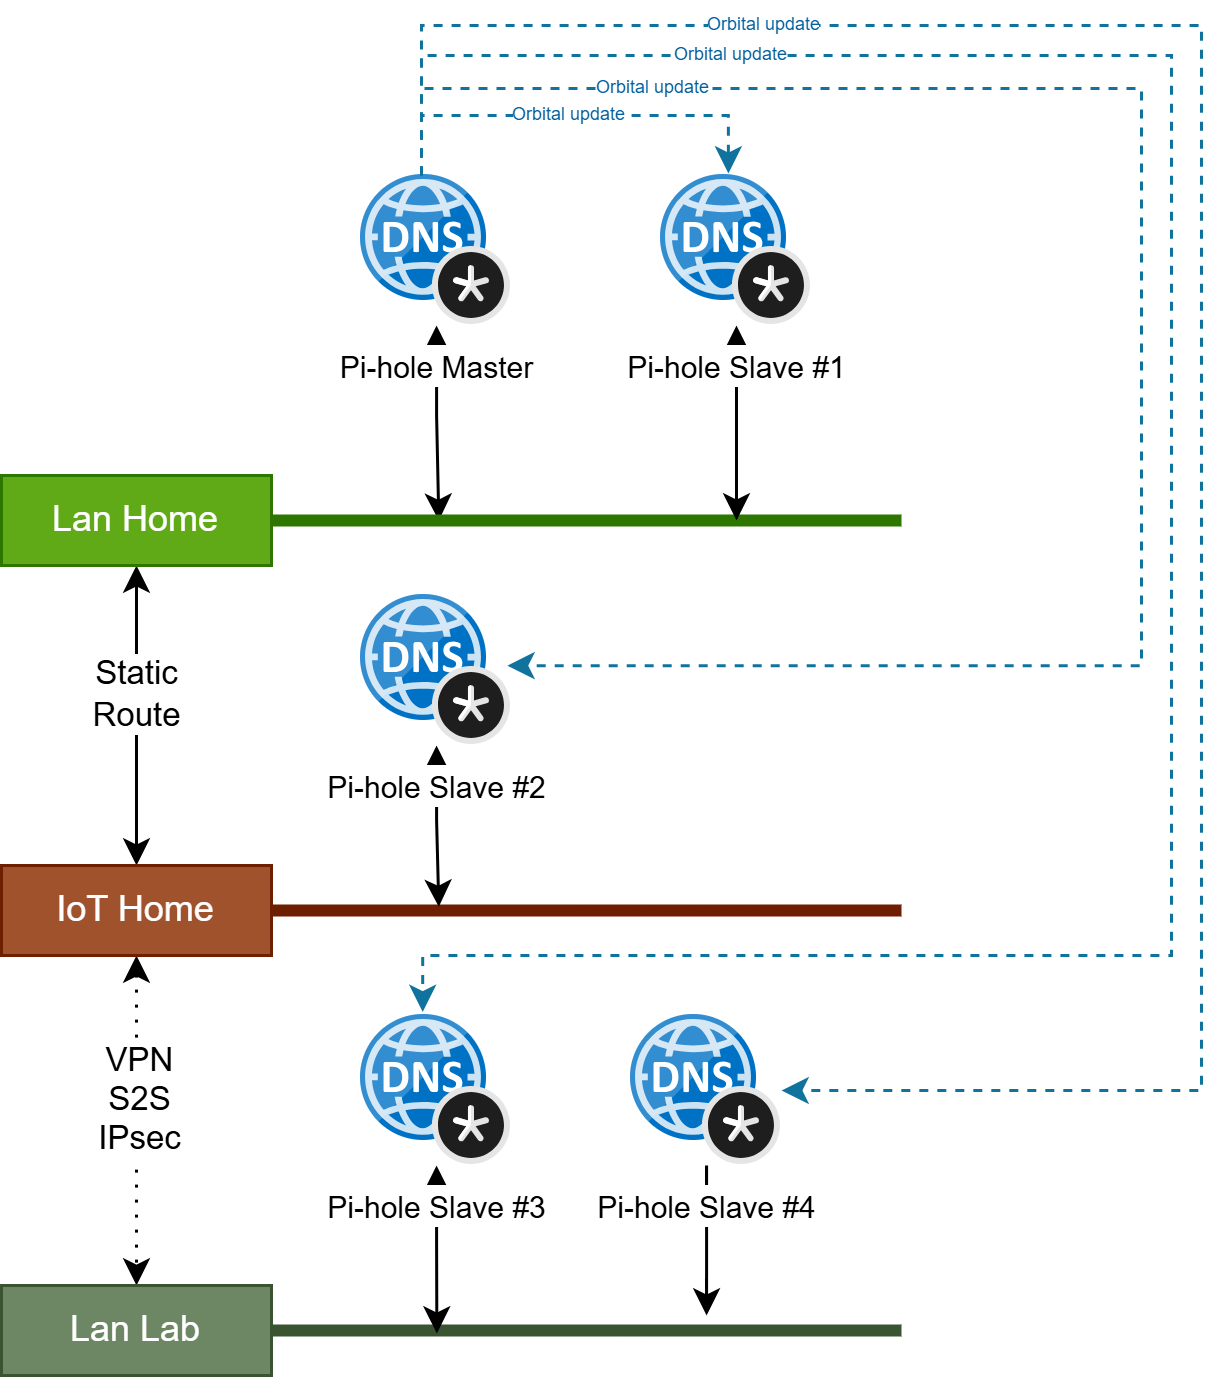
Let’s break it down step by step and see what needs to be done
- Deploy Pi-hole (Master) using a Docker containers with Docker Compose
- Deploy a second Pi-hole instance (slave) on a physical Debian Linux device
- On the master, add some additonnal Block list for url filtering
- On the master, add your own domain names
- On the master, add your own cnames
- Finally, sync your master Pi-hole with your slave Pi-hole instances
1/ Deploy Pi-hole (Master) using a Docker containers with Docker Compose
Deploying Pi-hole with Docker is a breeze. Personally, I like to use Docker Compose, which makes managing Docker setups even easier than it already is.
Below the compose file to deploy Pi-hole :
version: "3"
services:
  pihole:
    container_name: pihole-master
    image: pihole/pihole:latest
network_mode: "host"
    ports:
      - "53:53/tcp"
      - "53:53/udp"
      - "8088:80/tcp"
    environment:
      TZ: 'Europe/Paris'
      WEBPASSWORD: yourbeautifulpasswordhere!
    volumes:
      - '/home/mips/pihole/etc-pihole:/etc/pihole'
      - '/home/mips/pihole/etc-dnsmasq.d:/etc/dnsmasq.d'
    cap_add:
      - NET_ADMIN # Recommended but not required (DHCP needs NET_ADMIN)
    restart: unless-stopped
This setup runs Pi-hole in a container using the host’s network directly.
Feel free to adjust it. Use a bridge or a dedicated Docker network if that suits your environment better.
The admin port has been set to TCP 8088 by default, but feel free to change it to whatever port you prefer.
The Pi-hole admin console will be accessible through this port.
So, if your container has been deployed correctly, you should be able to access it at: http://yourip:8088/admin.
2/ Deploy a second Pi-hole instance (slave) on a physical Debian Linux device
Now, let’s move on to installing the second (slave) Pi-hole instance.
To reduce risk, this one will be set up on a physical device, like a Raspberry Pi running Raspbian or Debian Linux.
No need for heavy hardware here, a 2GB Raspberry Pi 3 is more than enough to handle Pi-hole.
Installing Pi-hole on a Linux device couldn’t be easier, it’s just a one-liner.
Hard to simplify it any further. Just run the following command:
curl -sSL https://install.pi-hole.net | bashAt this point, you should have both of your Pi-hole instances up and running!
3/ On the master, add some additonnal Block list for url filtering
Connect to your master Pi-hole and add the following blocklists.
This step isn’t mandatory, but I’m sharing a curated list I’ve gathered over time. It will enhance your Pi-hole with over 2 million entries for ads, trackers, and malware, giving you stronger protection right out of the gate.
Below is the list of adlists currently added to my Pi-hole configuration:
https//raw.githubusercontent.com/StevenBlack/hosts/master/hosts
http//sysctl.org/cameleon/hosts
https//s3.amazonaws.com/lists.disconnect.me/simple_tracking.txt
https//s3.amazonaws.com/lists.disconnect.me/simple_ad.txt
https//raw.githubusercontent.com/deathbybandaid/piholeparser/master/Subscribable-Lists/ParsedBlacklists/EasyList.txt
https//raw.githubusercontent.com/0Zinc/easylists-for-pihole/master/easylist.txt
https//raw.githubusercontent.com/deathbybandaid/piholeparser/master/Subscribable-Lists/ParsedBlacklists/EasyList-Liste-FR.txt
https//raw.githubusercontent.com/deathbybandaid/piholeparser/master/Subscribable-Lists/CountryCodesLists/France.txt
https//v.firebog.net/hosts/AdguardDNS.txt
https//adaway.org/hosts.txt
https//v.firebog.net/hosts/Admiral.txt
https//raw.githubusercontent.com/anudeepND/blacklist/master/adservers.txt
https//v.firebog.net/hosts/Easyprivacy.txt
https//v.firebog.net/hosts/Prigent-Ads.txt
https//raw.githubusercontent.com/FadeMind/hosts.extras/master/add.2o7Net/hosts
https//raw.githubusercontent.com/crazy-max/WindowsSpyBlocker/master/data/hosts/spy.txt
https//hostfiles.frogeye.fr/firstparty-trackers-hosts.txt
https//v.firebog.net/hosts/Easylist.txt
https//pgl.yoyo.org/adservers/serverlist.php?hostformat=hosts&showintro=0&mimetype=plaintext
https//raw.githubusercontent.com/FadeMind/hosts.extras/master/UncheckyAds/hosts
https//raw.githubusercontent.com/bigdargon/hostsVN/master/hosts
https//raw.githubusercontent.com/jdlingyu/ad-wars/master/hosts
https//www.github.developerdan.com/hosts/lists/ads-and-tracking-extended.txt
https//gitlab.com/quidsup/notrack-blocklists/raw/master/notrack-blocklist.txt
https//raw.githubusercontent.com/DandelionSprout/adfilt/master/Alternate%20versions%20Anti-Malware%20List/AntiMalwareHosts.txt
https//osint.digitalside.it/Threat-Intel/lists/latestdomains.txt
https//s3.amazonaws.com/lists.disconnect.me/simple_malvertising.txt
https//phishing.army/download/phishing_army_blocklist_extended.txt
https//raw.githubusercontent.com/PolishFiltersTeam/KADhosts/master/KADhosts_without_controversies.txt
https//raw.githubusercontent.com/FadeMind/hosts.extras/master/add.Spam/hosts
https//v.firebog.net/hosts/static/w3kbl.txt
https//pgl.yoyo.org/adservers/serverlist.php?hostformat=hosts&showintro=0&mimetype=plaintext
https//raw.githubusercontent.com/FadeMind/hosts.extras/master/add.Risk/hosts
https//urlhaus.abuse.ch/downloads/hostfile/
https//raw.githubusercontent.com/PolishFiltersTeam/KADhosts/master/KADhosts.txt
https//raw.githubusercontent.com/Perflyst/PiHoleBlocklist/master/android-tracking.txt
https//raw.githubusercontent.com/Perflyst/PiHoleBlocklist/master/SmartTV.txt
https//raw.githubusercontent.com/Perflyst/PiHoleBlocklist/master/AmazonFireTV.txt
https//v.firebog.net/hosts/Prigent-Malware.txt
https//raw.githubusercontent.com/matomo-org/referrer-spam-blacklist/master/spammers.txt
https//someonewhocares.org/hosts/zero/hosts
https//v.firebog.net/hosts/Prigent-Crypto.txt
https//bitbucket.org/ethanr/dns-blacklists/raw/8575c9f96e5b4a1308f2f12394abd86d0927a4a0/bad_lists/Mandiant_APT1_Report_Appendix_D.txt
https//gitlab.com/quidsup/notrack-blocklists/raw/master/notrack-malware.txt
https//raw.githubusercontent.com/Spam404/lists/master/main-blacklist.txt
https//raw.githubusercontent.com/VeleSila/yhosts/master/hosts
https//winhelp2002.mvps.org/hosts.txt
https//v.firebog.net/hosts/neohostsbasic.txt
https//raw.githubusercontent.com/RooneyMcNibNug/pihole-stuff/master/SNAFU.txt
https//paulgb.github.io/BarbBlock/blacklists/hosts-file.txt
https//phishing.army/download/phishing_army_blocklist.txt
https//malware-filter.gitlab.io/malware-filter/phishing-filter-hosts.txt
https//v.firebog.net/hosts/RPiList-Malware.txt
https//v.firebog.net/hosts/RPiList-Phishing.txt
https//raw.githubusercontent.com/AssoEchap/stalkerware-indicators/master/generated/hosts
To add a new adlist, go to adlists menu on the left, and then add a new url on center top area.
If you add all these lists, your Gravity database should display over 2 million blocked domains:

4/ On the master, add your own domain names
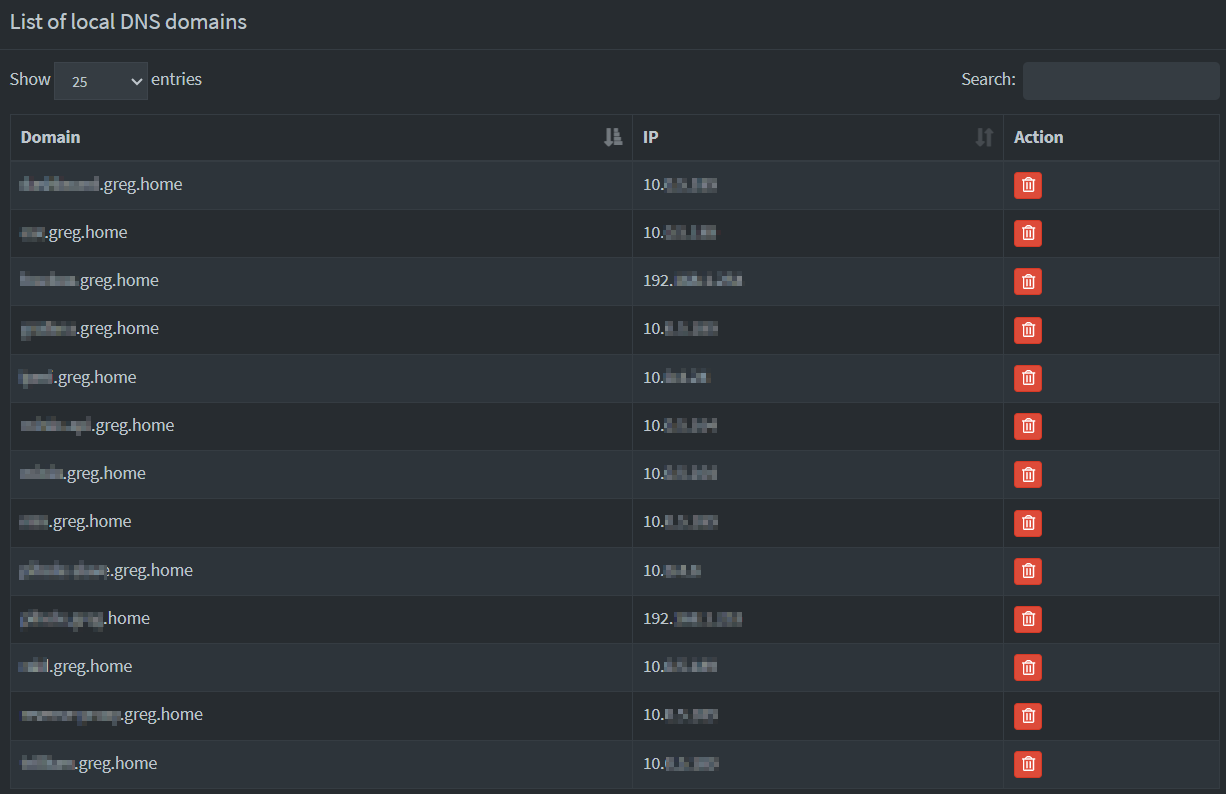
For convenience in my homelab, I use a private domain called "greg.home".
It’s a practical and easy way to manage local DNS entries using Pi-hole.
To set it up, go to the left-hand menu and navigate to "Local DNS → DNS Records".
From there, you can add your own DNS entries, such as:
5/ On the master, add your own cnames
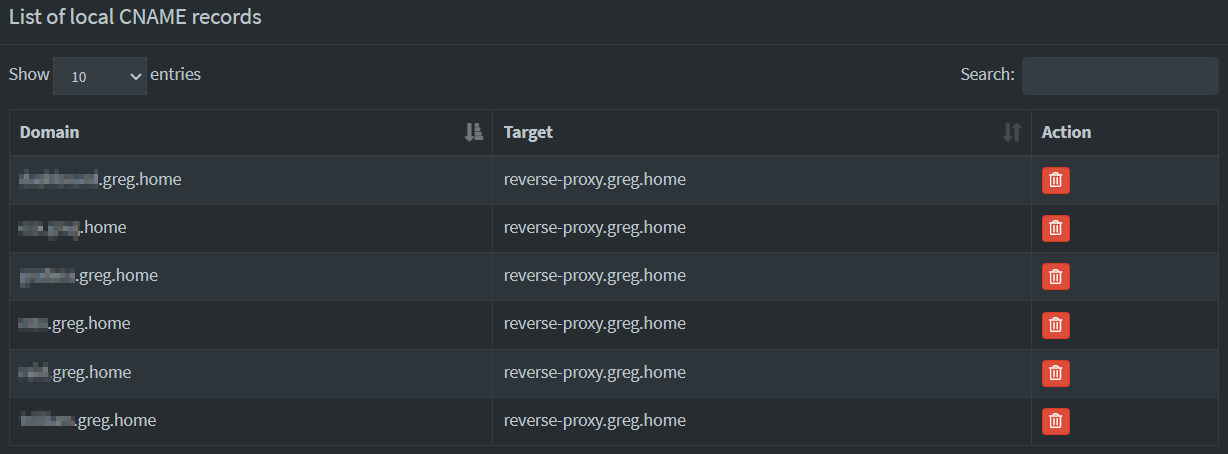
Many of my online services run through a reverse proxy. The issue is, if the reverse proxy's IP changes, I’d have to update every private DNS entry that points to it.
To avoid that hassle, you can use CNAME.
CNAME are simply aliases to another domain name.
So instead of pointing each service directly to an IP, I create a single record for the proxy, like "reverse-proxy.greg.home", and then use CNAME for all services that route through it.
Here’s an example of how my current CNAME setup looks:
6/ Finally, sync your master Pi-hole with your slave Pi-hole instances
Now for the final step: syncing the configuration from your master Pi-hole to your slave instance.
This is where Orbital steps in, a handy synchronization tool that leverages Pi-hole’s native Teleporter feature to back up the config from the master and restore it to the slave.
Pretty cool, right?!
Orbital can be easily deployed using a Docker Compose YAML file.
Here’s the one I use:
services:
  orbital-sync:
    container_name: orbital-sync
    image: mattwebbio/orbital-sync:latest
    environment:
      PRIMARY_HOST_BASE_URL: 'http://yourmasterpiholeip:8088'
      PRIMARY_HOST_PASSWORD: 'yourbeautifulpasswordofthemaster'
      SECONDARY_HOST_1_BASE_URL: 'http://yourslavepiholeip:8088'
      SECONDARY_HOST_1_PASSWORD: 'yourbeautifulpasswordoftheslave'
      SYNC_V5_WHITELIST: 'true'
      SYNC_V5_BLACKLIST: 'true'
      SYNC_V5_REGEX_LIST: 'true'
      SYNC_V5_AD_LIST: 'true'
      SYNC_V5_CLIENT: 'true'
      SYNC_V5_GROUP: 'true'
#     SYNC_STATICDHCPLEASES: 'true'
      SYNC_V5_LOCAL_DNS_RECORDS: 'true'
      SYNC_V5_LOCAL_CNAME_RECORDS: 'true'
      SYNC_V5_FLUSH_TABLES: 'true'
      TZ: Europe/Paris
      INTERVAL_MINUTES: 30
      NOTIFY_ON_SUCCESS: 'true'
    restart: unless-stopped
As I don't use Pi-hole's DHCP, I have commented the DHCPLease sync.
As a result, you should see the following output in your container’s logs, confirming that the synchronization is running as expected:
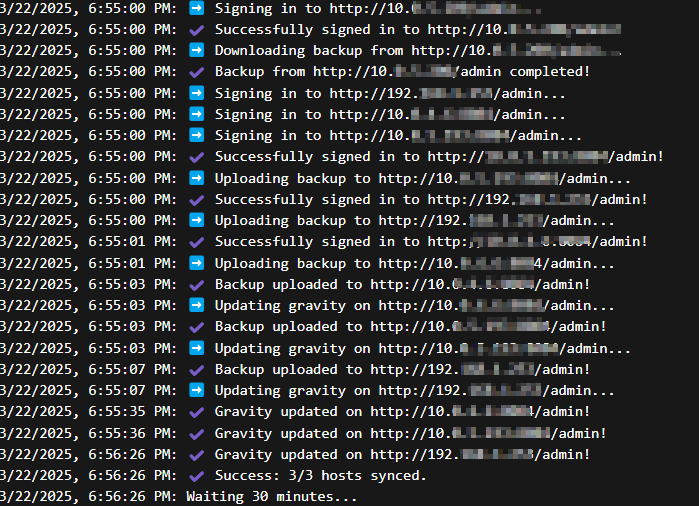
And finally, your second Pi-hole is now automatically updated by the master, bringing you a fully high-availability DNS setup.
Mission accomplished! 🫡
Now, let those DNS sync quietly in the background… and treat yourself to a well-earned, cold beer!