Tired of emails? Let ChatGPT reply for You! 🤪
Learn how to create an automated workflow that uses openAI ChatGPT-4o LLM to intelligently reply to your emails, fully aware of the content and context, ensuring the response is both appropriate and relevant.


Yeah, it might sound a bit crazy, but I have to admit—it’s pretty funny too! 😁
The idea is to grab newly arrived emails from my inbox, feed them to an LLM like ChatGPT to understand the email content and context, and then, let it craft the most natural and appropriate response and send it as an answer.😱
We should be having fun, don't we?! 😎
How should it work :
- Catch new incoming emails from your inbox
- add a filter to target specific email addresses, so it doesn’t reply to every single incoming email
- Extract the following details from the email:
- "From" (sender)
- "To" (recipient)
- "Subject"
- "HTML body" (email content)
- Initiate a chat with the GPT-4 model, starting with a predefined "system prompt"
- Pass the HTML body of the email as the "user" request to the LLM
- The LLM analyzes the email’s tone, style, and language to generate an appropriate response based on these variables
- Catch the LLM’s response and create a new email
- The new email should have:
- The original "From" as the "To"
- The original "To" as the "From"
- Insert the LLM’s response as the new email’s "HTML body"
The tools I used :
- OpenAI chatGPT model 4o thru API
- n8n low code automation tool
Let’s get started and build our very own inbox slave! 📧
First, we start by setting up OpenAI API key
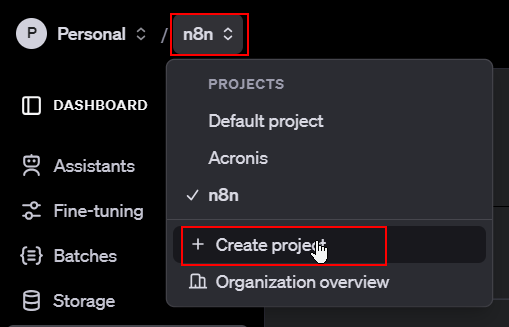
Log in to OpenAI here, then head to your account and create a new project:
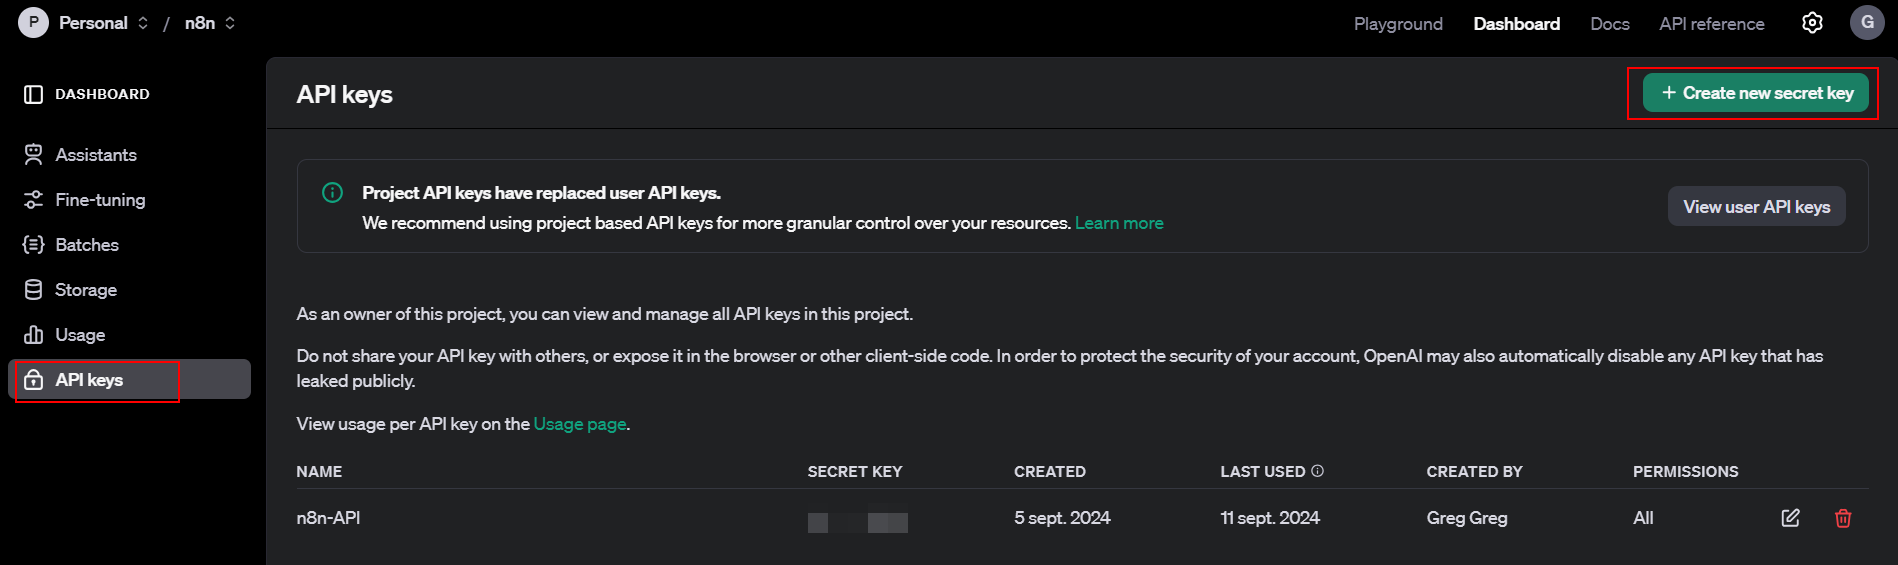
After creating your new project, generate an API key for it:
Then set up n8n to connect to OpenAI API
Log in to your n8n instance. (In a future article, we’ll cover how to set up n8n on Docker for easy self-hosting.)
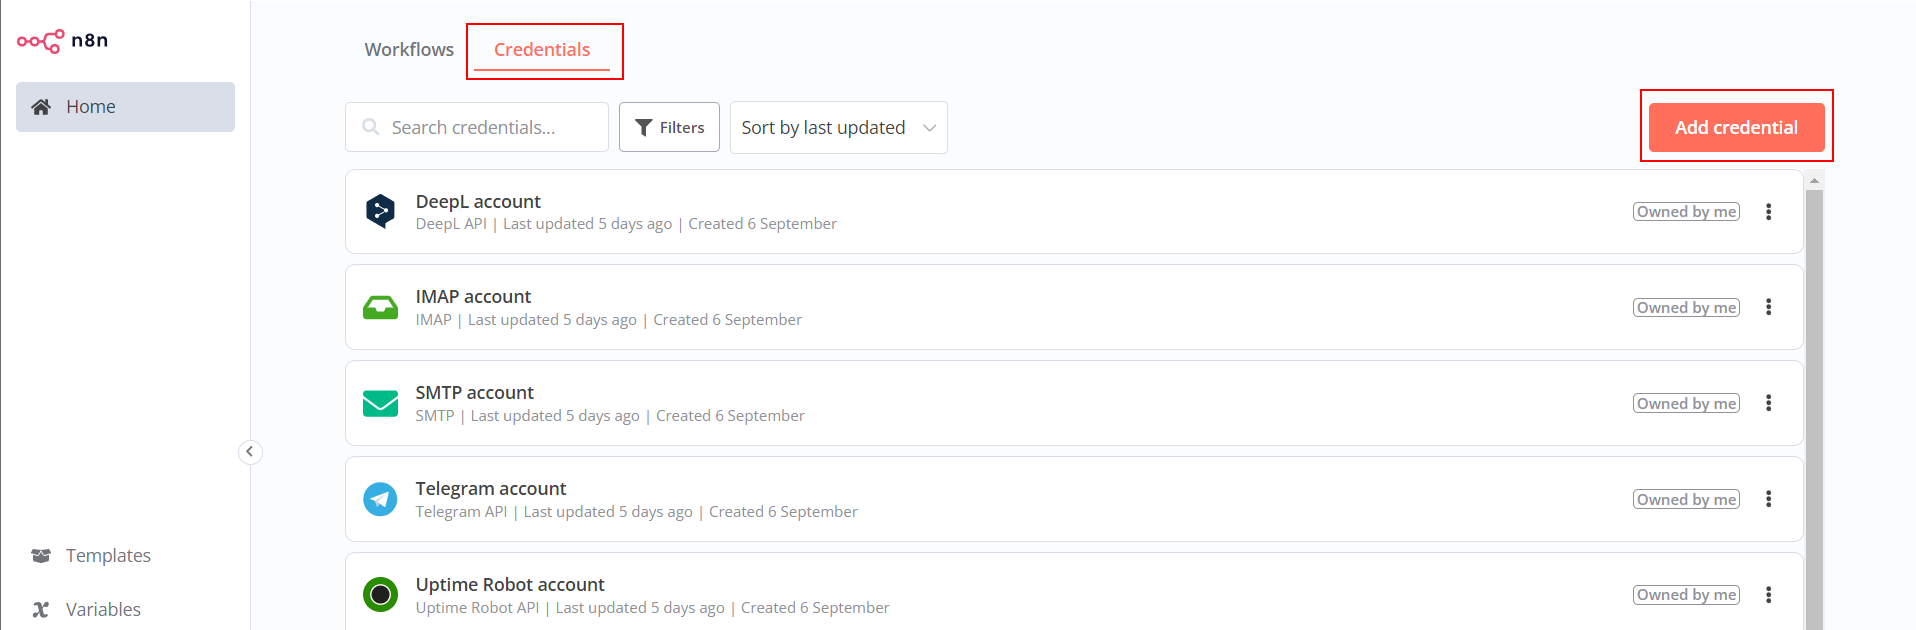
Go to the credentials tab to add your OpenAI account:
Add your openAI API key you have created previously:
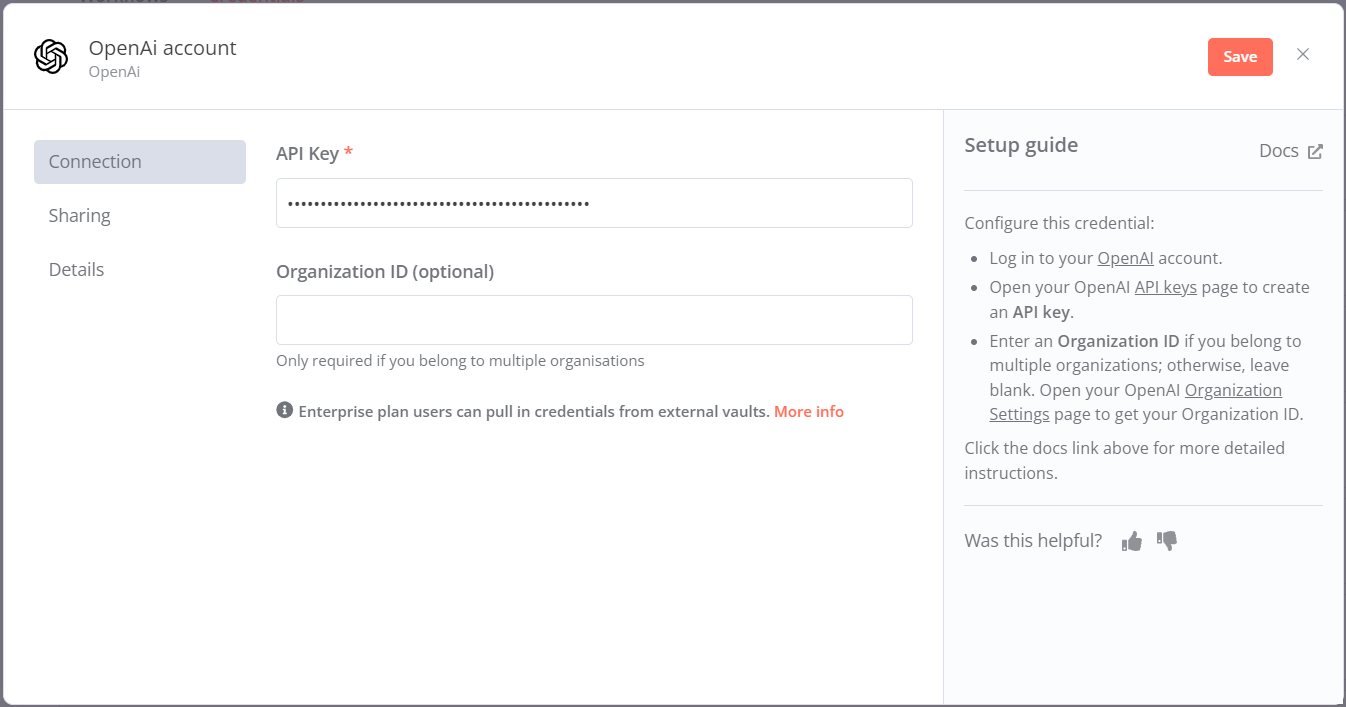
Your OpenAI connection should now be visible in the list of credentials.
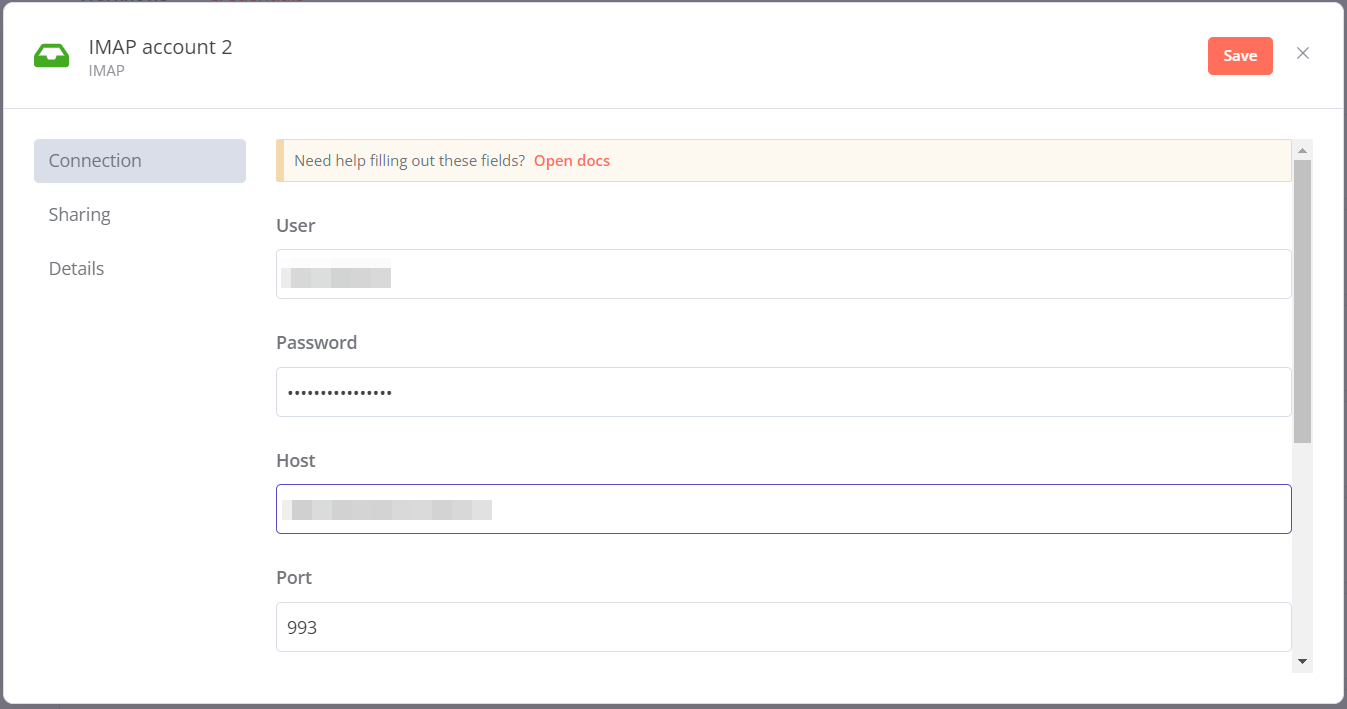
And set up n8n to connect to your email account
Now, add your email (I will personnaly used IMAP but you can setup specific account like gmail) by adding IMAP account:
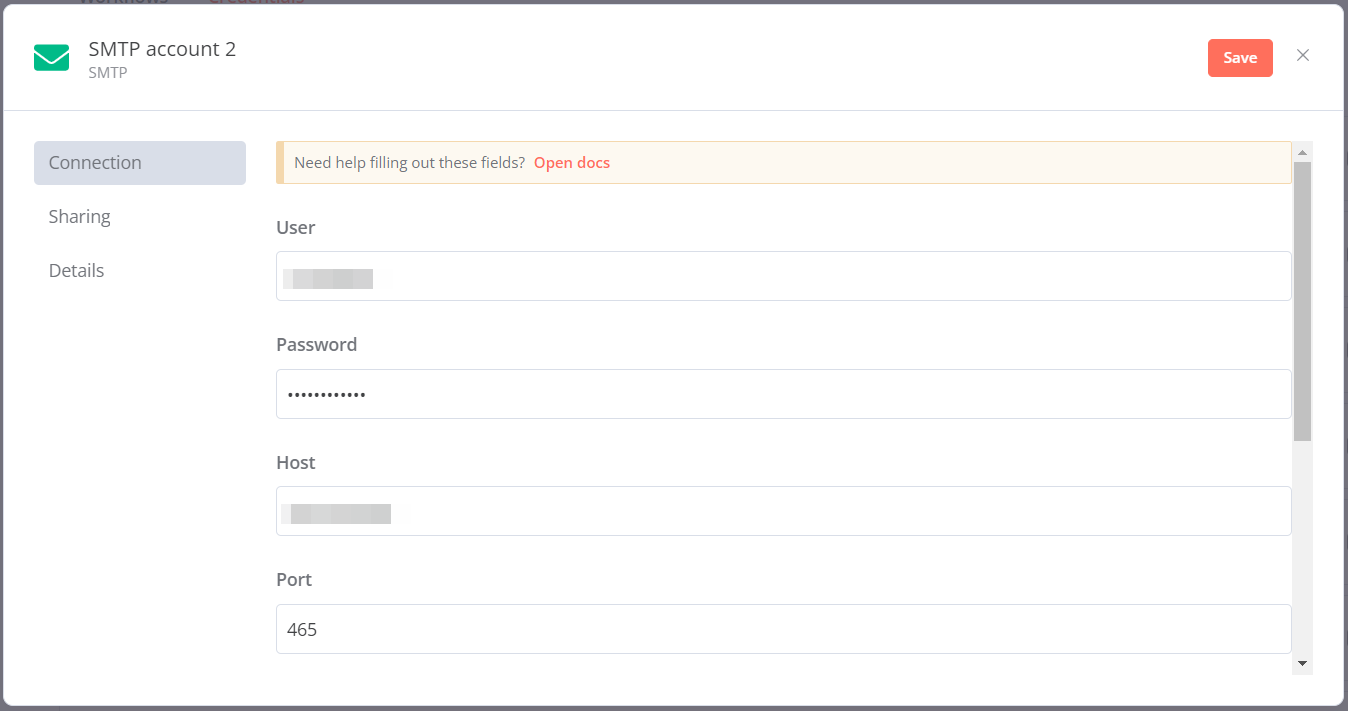
Finish by setting up an SMTP connection to enable sending the reply emails
In the same "Credentials" tab, add an SMTP account and enter your details:
Now, build the automated workflow process
1️⃣ Check the new incoming email from my inbox
In "workflows" tab, add a new worflow:

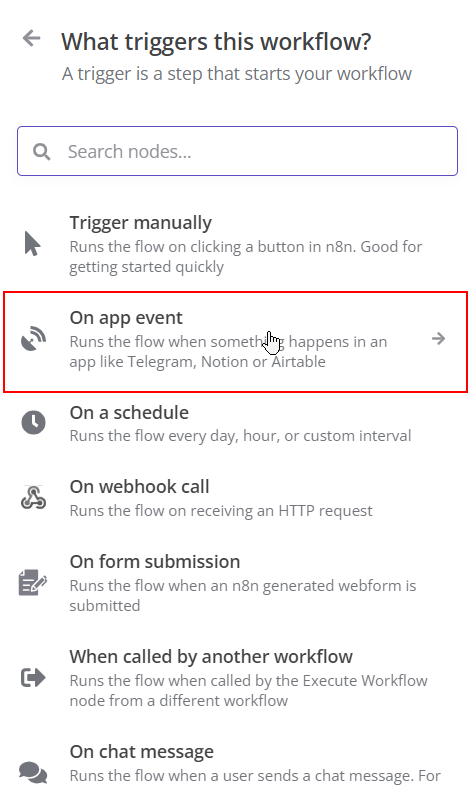
On the top right, click on the "+" button and add a new trigger action:
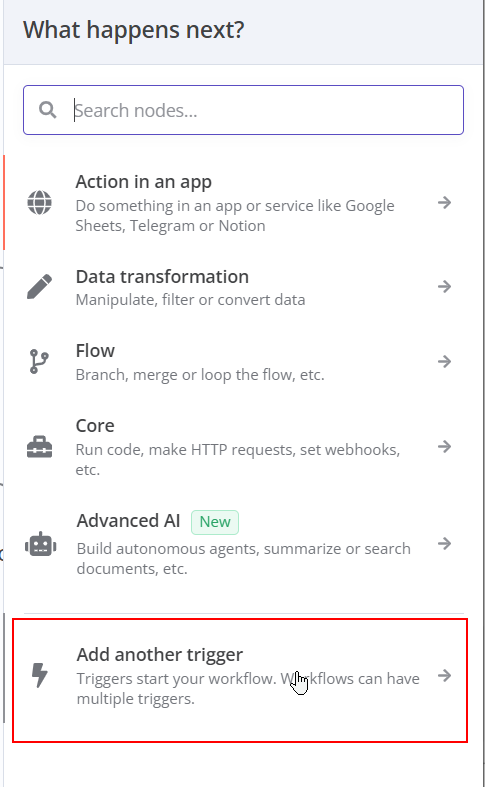
select "On app event":
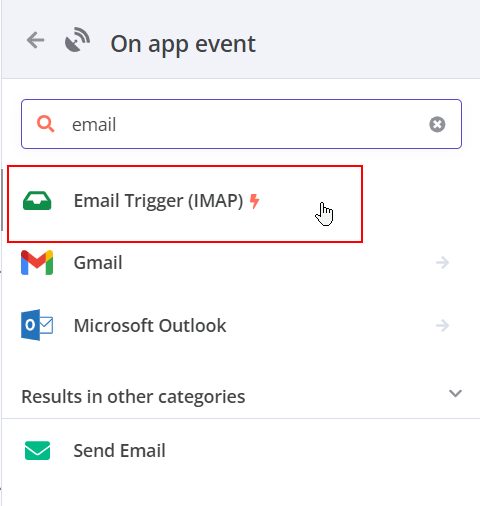
Search for "email" and select "email trigger":
I have defined my email trigger as follow:
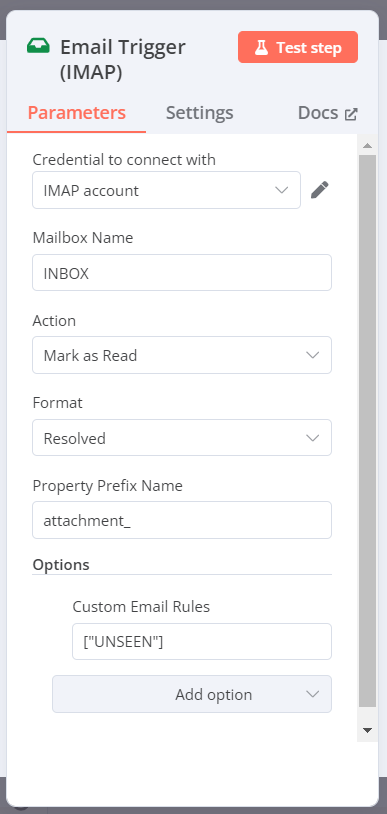
Mailbox name : INBOX -> to check newly arrived email
Action : Mark as read -> to keep a track of what have been done
format : Resolved -> get data in the cleanest state possible
and adding an option as a "customer email rules" : ["UNSEEN"] -> I want this trigger to process only the newly unread emails from my inbox.
2️⃣ Add a condition to filter from specific incoming email
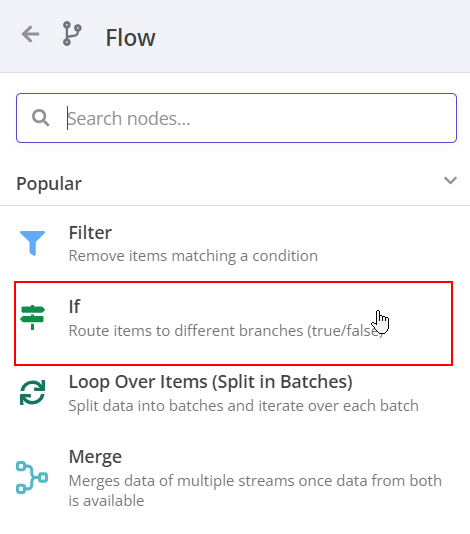
Next, we will add an "if" condition to our workflow.
To proceed, add a "Flow" panel:
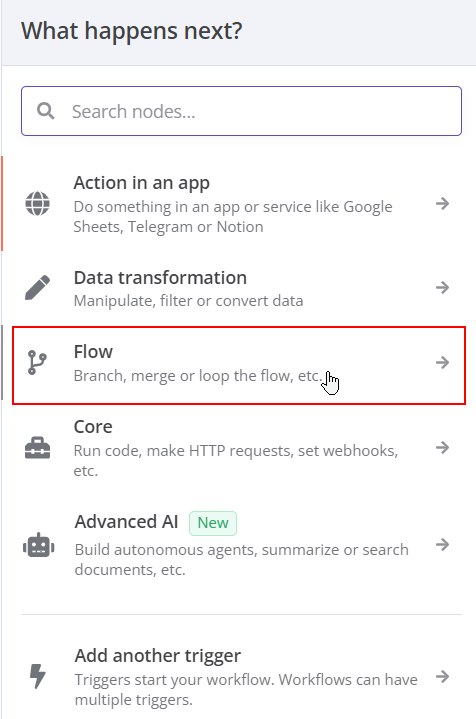
and select an "if" flow for the condition:
The idea is to set up an "if" condition that allows the workflow to continue only if the condition is "true." If it’s "false," the workflow will stop. The "true" condition will check the email "from" address to ensure it matches the one we want to process.
To configure this, we’ll use the previously captured "from" address and verify if it equals a specific email address that we want to approve. Here's how to set it up correctly:
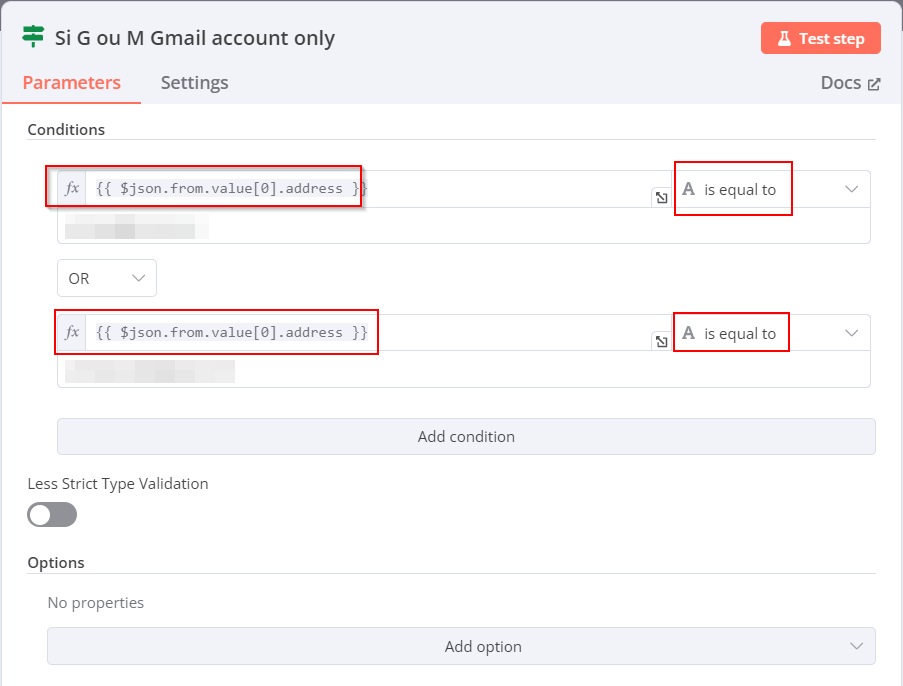
To halt the process when the "false" condition is met, add a new object called "No Operation, Do Nothing" to the false connector of the "if" condition.
3️⃣ Send the data to a conversational LLM for processing
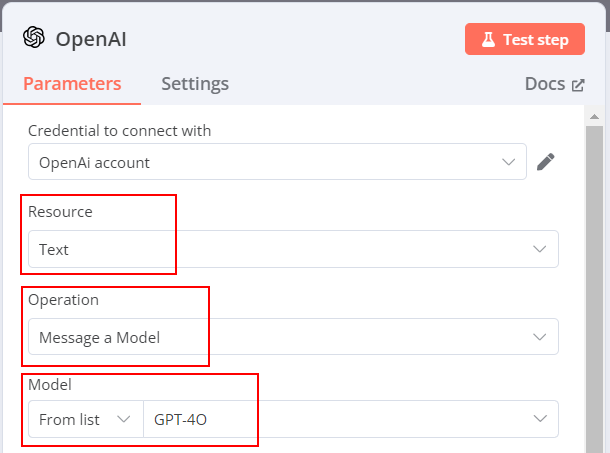
we will now add an OpenAI panel called "message a model":
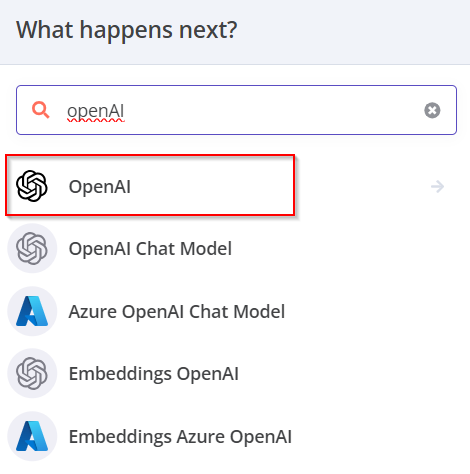
Select "message a model":
Set up the panel to use your OpenAI connection for conversational text, utilizing the GPT-4o model. (Feel free to choose any model you prefer, but I've personally found that GPT-4o delivers more accurate results. GPT-4mini could also be a budget-friendly option!)
Next, add two prompts: one for the "system" as a pre-prompt, and another for the "user" prompt:
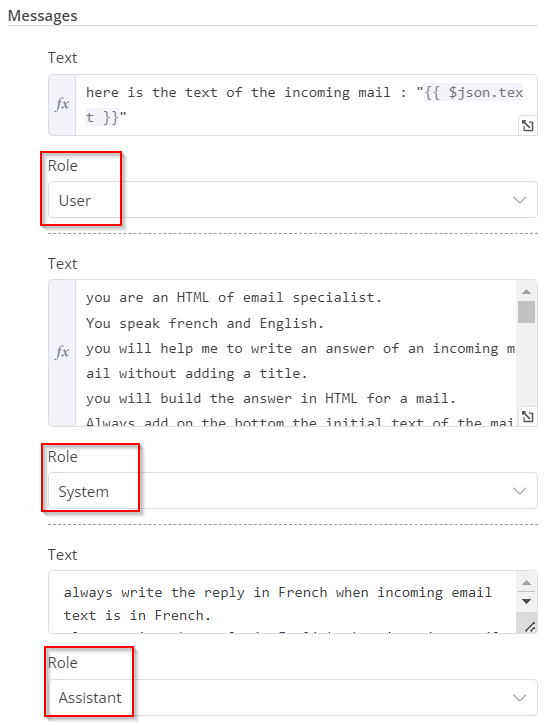
The "system" prompt in the ChatGPT API is used to set the context and provide instructions to ChatGPT, guiding how it should behave and respond.
I use the following one as an example:
you are an HTML of email specialist.
You speak french and English.
you will help me to write an answer of an incoming mail without adding a title.
you will build the answer in HTML for a mail.
Adapt the answer in french when incoming email text is in french.
Adapt the answer in english when incoming email text is in english.
Always add on the bottom the initial text of the mail received with the from : "{{ $json.headers.from }}" and a <br> and the to "{{ $json.headers.to }}" and a <br> and the subject "{{ $json.headers.subject }}" and a <br>.
Don't explain what you are doing in the answer and don't add title.
Don't add "```html" in the answer.
you can user HTML style to format the answer.
you can use smiley but not too much if the incoming email style is casual.
you can use bold, italic or underline html text formatting to emphases important information, but not too much.
you will use the same style of sentences as the one from the incoming email.
use return carrier to make the email easily readable.
don't use double return carrier despite it's important in the paragraph understanding.
Let’s take a closer look at the topics covered by this prompt:
- "you are an HTML of email specialist" -> to set the technical perimeter
- "You speak french and English." -> to set the language perimeter
- "you will help me to write an answer of an incoming mail without adding a title." -> to set the expected behavior
- Always add on the bottom the initial text of the mail received with the from : "{{ $json.headers.from }}" and a <br> and the to "{{ $json.headers.to }}" and a <br> and the subject "{{ $json.headers.subject }}" and a <br> -> manage the reply to get the inital message below like a classical reply.
- "Don't explain what you are doing in the answer and don't add title." -> to get only the answer to the mail and nothing else
- "Don't add "```html" in the answer." -> to not add chatGPT code markdown format of the message
- "you can use smiley but not too much if the incoming email style is casual.
you can use bold, italic or underline html text formatting to emphases important information, but not too much.
you will use the same style of sentences as the one from the incoming email.
use return carrier to make the email easily readable.
don't use double return carrier despite it's important in the paragraph understanding." -> to manages how the answer should be formatted graphically and adjusts the style based on the context and tone of the incoming email.
The "user" prompt in the ChatGPT API is used to represent the user's input. It’s essentially the question or message typed by the user.
here is a text of the incoming mail : "{{ $json.text }}"
The prompt is fairly straightforward.
In the end, the previously captured HTML body from the incoming email is passed to the API call : "{{ $json.text }}"
The "assistant" prompt in the ChatGPT API is used to give a context to the user's prompt.
always write the reply in French when incoming email text is in French.
always write the reply in English when incoming email text is in English.
In that case, I use it to manage the condition to force a reply from the LLM in a specific language.
4️⃣ Send a reply to email using the response generated by the LLM
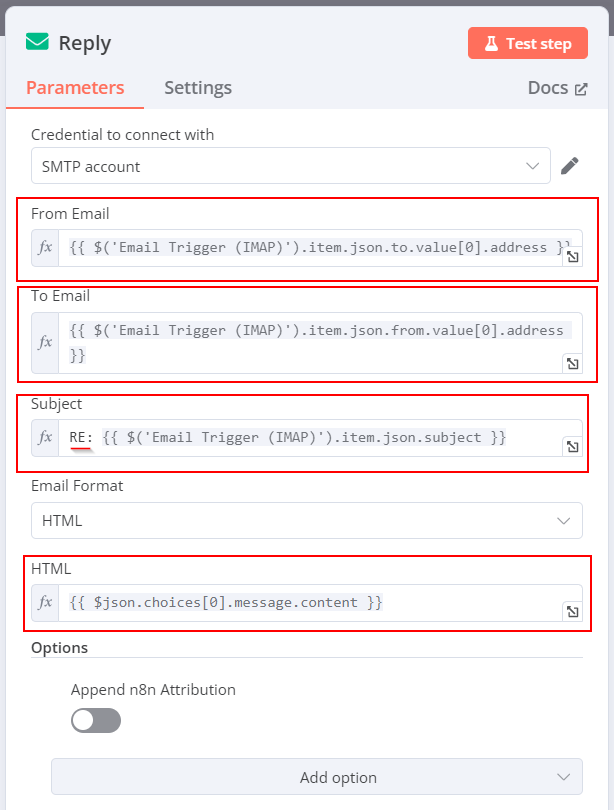
Finally, add a SMTP panel to send the email as a reply to.
Pass the captured "to" email address as the "From Email".
Pass the captured "From" email address as the "To Email".
Use the captured "Subject" from the original email as the new subject, and make sure to prepend it with "RE:"
And pass the LLM answer as the "HTML body" of the new outgoing email.
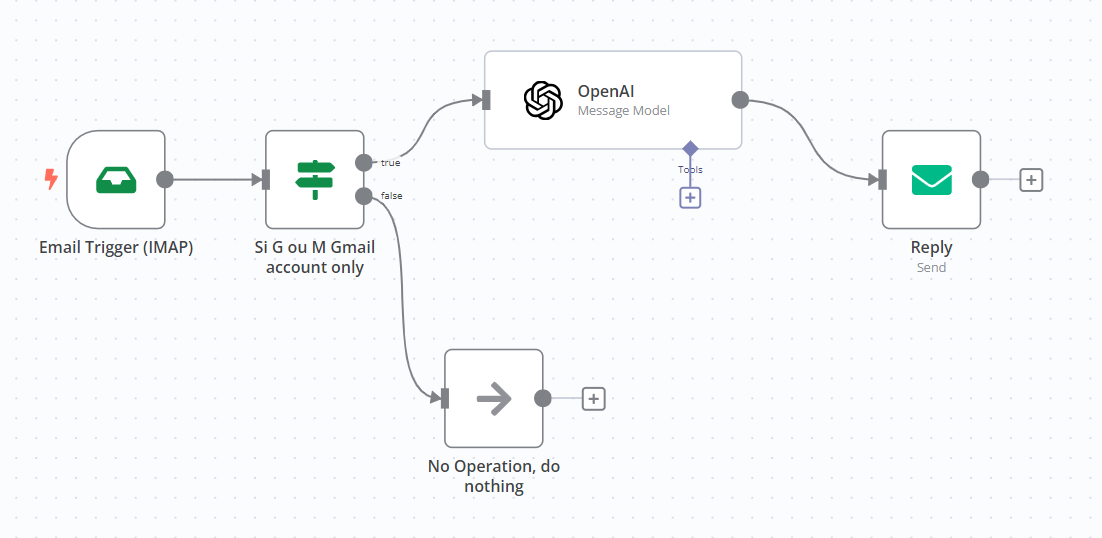
Final workflow: your workflow should look like the following.
Don’t forget to click "Activate" to get it up and running!
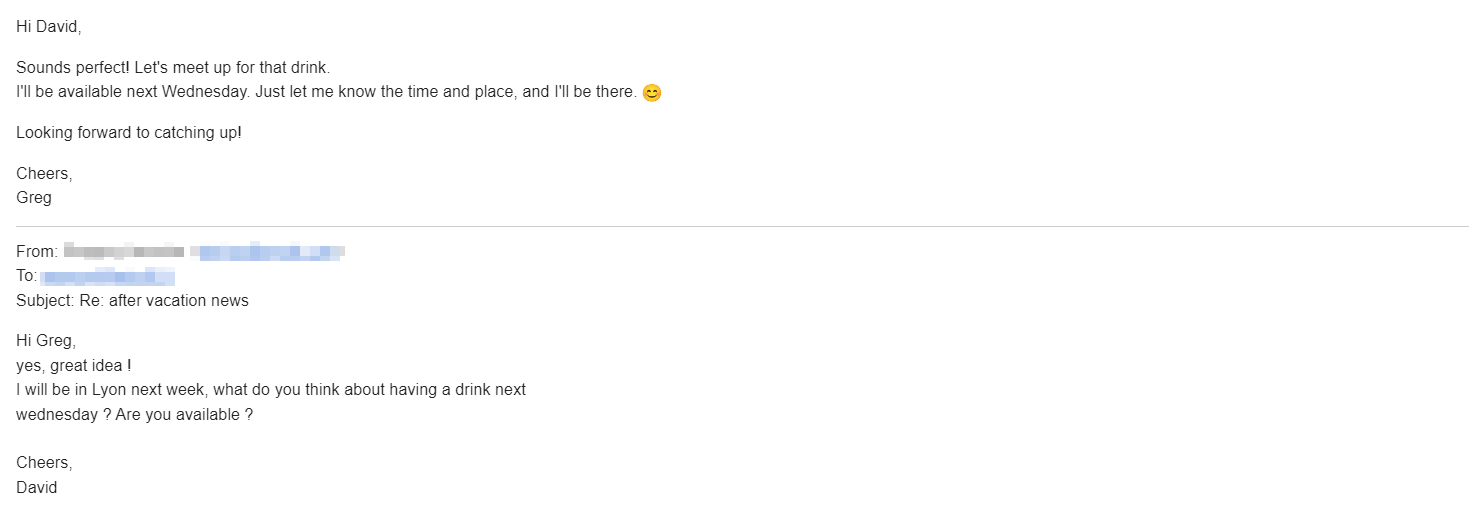
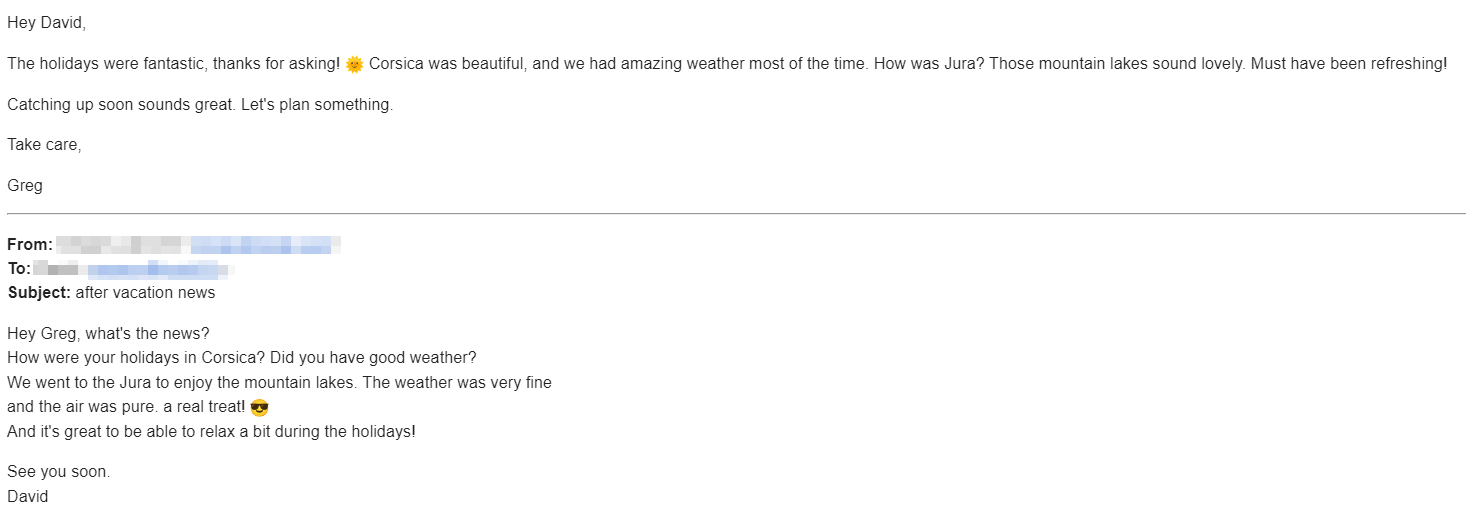
How does it work? Check out the exchange below as an example
🧑 David is the human
🤖 Greg is the LLM answer
Et voilà, my fellow tech aficionados! Our email slave is hard at work! (And here’s hoping it doesn’t come up with any wild answers that land you in a crazy situation! 🤣😉)
Go ahead, send an email to your inbox where the trigger is set, and sit back as your digital twin from the matrix handles the reply! 😉