


Hey my dear tech enthusiasts!
We’ve had a few rainy weekends lately, so you know what that means... a perfect excuse to stay inside, grab a coffee, and spend some good geek time playing with our lovely M365Simulator! 😄
A few new ideas, and some nice optimizations... v5.2 is here!

So, let’s jump in and see what this new version brings to our favorite Microsoft 365 playground!
What's new?
- PIM card: A brand-new card to simulate Privileged Identity Management activities in your tenant.
- Advanced Report card: Schedule detailed reports for selected users, groups, and SharePoint sites. You can also add a dashboard widget to quickly keep an eye on the results.
- Entra ID AI Agent card: Let’s bring some AI agents into the game! Generate realistic file activities performed by AI agents, including creation, access, modification, and deletion. (no real AI needed)
- Save & Revert card: Save mailboxes, OneDrive content, or Entra ID attributes to your own S3-compatible storage, then revert them to a previous saved version whenever you need.
- Users card enhancements: A new Update attributes option lets you easily modify Entra ID properties for selected users on a schedule.
- Customizable dashboard: Drag, drop, and resize your widgets to organize the dashboard the way you want.
- Smarter RUN scheduling: Jobs can now run at random times every day, with an optional time window to spread the activity naturally during the day.
- Modern authentication: Goodbye device code flow, hello modern browser-based authentication.
- Manual Enterprise Application deployment: You can now deploy the Enterprise Application yourself and select only the Microsoft Graph permissions you really need.
And of course, plenty of other improvements under the hood, including security hardening, frontend polishing, and engine optimizations to keep things running smoothly. Not bad for some rainy weekends, right? ☔😁
1/ The new PIM card
When it comes to demonstrating Entra ID security and protection, Privileged Identity Management (PIM) is definitely something worth showing.
These days, more and more companies are paying close attention to how privileged access is managed in Entra ID, and PIM is one of the key tools to help keep those powerful admin permissions under control.
But here's the thing: if you want to demonstrate PIM protection properly, you need a realistic PIM configuration in your tenant. And setting all that up manually isn't exactly everyone's idea of a fun afternoon!
So why not make life easier?
With the new PIM Card, the idea is simple: one turnkey button to automatically build a complete PIM demo environment from scratch, ready for you to explore, test, and showcase.
How does it work?
The idea is pretty simple: pick a scenario, click Run, and let M365Simulator do the job!
It handles several things for you:
- Entra ID roles: creates eligible and active role assignments for existing users.
- PIM groups: creates security groups with eligible members, eligible owners, and active members.
- Security settings: configures activation duration, justification, ticket numbers, and approval requirements.
- Realistic data: adds localized names, business justifications, and simulated incident tickets such as
INC0042817.
Once the card has finished, you can see everything directly in the Microsoft Entra admin center, under Privileged Identity Management.
Eligible vs. active: what’s the difference?
Before going further, here is a quick reminder about these 2 important PIM concepts.
- Eligible: the user can activate the privileged role when needed, following the configured security rules.
- Active: the user already has the permissions and does not need to activate the role first.
M365Simulator creates both types, so your backup, restore, or governance tools have realistic PIM data to work with.
Three scenarios, depending on your needs
You probably don’t need a huge PIM setup just to make a quick demo.
So, like some other M365Simulator cards, the PIM Card comes with three ready-to-use scenarios:
| Simple | Standard | Complete | |
|---|---|---|---|
| Entra roles | 3 | 5 | 8 |
| Eligible role assignments | 4 | 8 | 12 |
| Active role assignments | 1 | 2 | 3 |
| Demo PIM groups | 1 | 2 | 4 |
| Roles with stricter security settings (maximum) | 1 | 2 | 3 |
Simple is great for a quick demo.
Standard adds more roles, assignments, and PIM groups.
Complete goes further and creates a richer PIM environment with more assignments and security settings.
If you already created Business Units with the M365Simulator Business Unit Card, the Complete scenario can use them to scope two eligible role assignments instead of assigning them at tenant level.
A bit more realism, without spending your afternoon configuring everything manually.
Realistic PIM, but with safety in mind!
At this point, you may be thinking: "Wait... we are creating privileged access in my tenant?!!!" 😰
Yes, but the PIM Card includes several safety rules:
First, it only selects existing, enabled member accounts that do not already have administrator roles. (Users created by M365Simulator are preferred when available)
It also applies some important limits:
- Only eight predefined Entra roles can be used.
- Active assignments are limited to three reader roles.
- Highly privileged roles such as Global Administrator and Privileged Role Administrator are never assigned.
- Existing assignments and groups outside the demo setup are left untouched.
- All generated Entra role assignments have an expiration date (For example, eligible assignments usually last between 90 and 180 days, while active assignments last between 7 and 30 days).
The card can also apply stricter security settings, such as a maximum activation duration of 4 hours, mandatory justification, and ticket numbers.
For PIM groups, you can also simulate approval requirements.
And to avoid impacting real administrators, Entra role security settings are only changed when nobody outside the demo setup already has an assignment on that role.
So yes, we are creating a realistic privileged access environment, but we are not giving away Global Administrator permissions like free candy!
Run it once, or keep your PIM environment alive!
Another nice thing: the PIM Card also works with automation flows and scheduled jobs.
When you run it again, M365Simulator checks what already exists, reuses the current demo setup, and recreates missing or expired assignments when needed.
For example, you can schedule the card to run every week and keep your PIM demo environment populated automatically.
Pretty useful if you want a tenant that is always ready for demos without rebuilding everything manually each time.
And when you are done playing?
Open the Delete Card, select PIM (demo setup), and remove the generated configuration.
Ready to test your backup and restore solution?
Let’s take a simple example :
Imagine you want to demonstrate how your Microsoft 365 protection solution handles PIM configurations.
You could do this:
- Create a few test users using the Users Card.
- Optionally create some Business Units.
- Run the PIM Card using the Complete scenario.
- Open the Microsoft Entra admin center and explore the generated PIM configuration.
- Back up the tenant using your favorite protection solution.
- Test how it handles eligible assignments, active assignments, PIM groups, and role settings.
And voilà! 🎉
You now have a realistic PIM environment ready for backup, restore, or governance demos.
Before starting, your tenant needs Microsoft Entra ID P2 or Entra ID Governance licensing.
If you deployed M365Simulator before the PIM Card was added, simply use Update Permissions from the Setup & Deploy section.

2/ The new Advanced Report card
Meet the new tenant metrics on autopilot!
Ever wondered how much data is really sitting inside your Microsoft 365 demo tenant? How many emails, how much OneDrive content, or how fast your SharePoint sites are growing?
M365Simulator already gives you detailed metrics through the Tenant Advanced Report in the Analytics tab. Until now, though, you had to manually click Get Metrics every time you wanted fresh data.
Well... not anymore. 😎
With the new Advanced Report card, you can automate this process and keep your tenant metrics up to date without thinking about it.
The idea is simple: select what you want to monitor, run the card, and let M365Simulator handle the rest!
You can collect metrics from three Microsoft 365 workloads:
- Exchange: mailbox metrics for selected users.
- OneDrive: OneDrive metrics for selected users.
- SharePoint: metrics from selected sites, or from all sites in the tenant (up to 500 sites).
You can select individual users or complete groups.
Where do the results go?
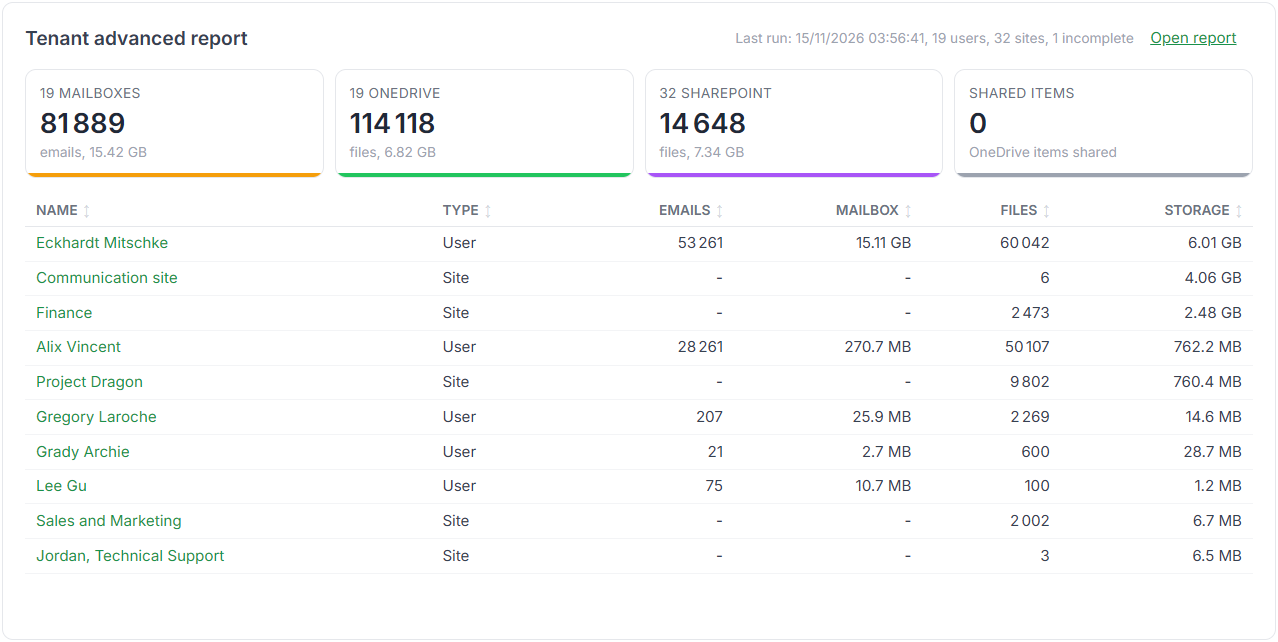
Once the card has finished, it automatically refreshes the existing Tenant Advanced Report.
You can also enable Track in the Dashboard to show the Tenant Advanced Report widget directly on your M365Simulator Dashboard:
Schedule it and forget about it!
This is where it becomes really useful: the Advanced Report card works with M365Simulator automation flows and scheduled jobs.
For example:
- Your scheduled jobs generate emails, OneDrive files, and SharePoint content.
- Every night, the Advanced Report card collects the latest metrics.
- The Tenant Advanced Report is refreshed automatically.
- Your Dashboard shows the updated numbers.
And that’s it!
Your demo tenant keeps growing, and your reporting follows automatically without having to click anything manually.
- 1000 users maximum: the card supports tenants with up to 1,000 users.
- At least one workload: you need to select Exchange, OneDrive, or SharePoint, together with at least one user, group, or site.
- Partial results: if some objects cannot be fully read, the available metrics are still saved and a warning is displayed.
3/ The new Entra ID AI Agent card
These days, humans are no longer the only ones accessing Microsoft 365 data. AI agents have joined the party!
And our new digital colleagues aren't just reading files. Depending on their permissions, they can also create, modify, and yes... even delete data! 🫣
This brings new challenges for organizations: how do you track what AI agents are doing? How do you identify which agent modified a document? And how can you test your AI governance or DSPM solutions?
Well, that's exactly why I've added the new EntraID AI Agent card to M365Simulator!
The idea is simple: simulate AI agents working on Microsoft 365 documents, without building complex AI integrations or paying for LLM API calls.
Meet your new digital colleagues:
The card lets you deploy up to 4 Microsoft Entra Agent ID agents, each representing a different department.
| Agent | Department | Default data |
|---|---|---|
| Claude Marketing agent | Marketing | Online identifiers |
| Finance department AI agent | Finance | Financial |
| Copilot HR | HR | Personal identity |
| OpenAI DevOps agent | DevOps | Source code |
(You can customize their names before deployment)
These aren't just fake users or simulated log entries. They are real Microsoft Entra Agent ID identities, and their file operations are recorded in Microsoft Purview Audit with the agent as the actor, including its identifiers.
Even better, the files they modify show the agent in the Modified by field.
And good news: the agents don't need Microsoft 365 licenses! 🤑
2 modes, 2 different behaviors:
Once your agents are deployed, you can make them work using 2 modes.
- Create mode: give your agents something to work on
In this mode, your agent generates documents in SharePoint or OneDrive.
You select the destination, folder, number of files (up to 2000), file sizes, and the type of sensitive data to generate.
For example, your Finance agent can create 100 financial documents in a SharePoint folder calledFinance/Q4 Reports.
The agent automatically receives edit permissions on that folder, and every Create execution is saved as a session. - Update mode: let the agents do their daily job! (Now comes the fun part!)
Instead of creating a new set of documents, the agent works on files from one of its existing sessions.
You define what percentage of the session's files the agent should:
- Create: Add new documents
- Read: Access existing files
- Modify: Update document content
- Delete: Remove documents
For example, imagine a session containing 50 files.
Configure 20% Create, 40% Read, 50% Modify, and 30% Delete.
Your agent will create 10 files, read 20, modify 25, and delete 15. The session will then contain 45 files.
And yes, deleted documents go to the recycle bin! 😉
Make your agents work while you're away:
The Entra ID AI Agent Card also supports automation flows and scheduled jobs. You can create the documents once, then schedule daily Update jobs to keep your AI agents active in Microsoft 365.
By default, actions already include short random pauses. But in real life, everyone doesn't ask their AI assistant to work at exactly 9 AM, right?
That's where the new Random time and Spread out options in the RUN Card help.
They randomize when jobs start and spread the activity over time, making the simulation feel much more natural.
And what can you actually test?
This is where things become interesting for AI governance and data protection demos.
With real Entra Agent ID identities performing simulated document operations, you can test solutions such as Microsoft Purview DSPM for AI or third-party AI governance tools like Veeam Intelligent ResOps.
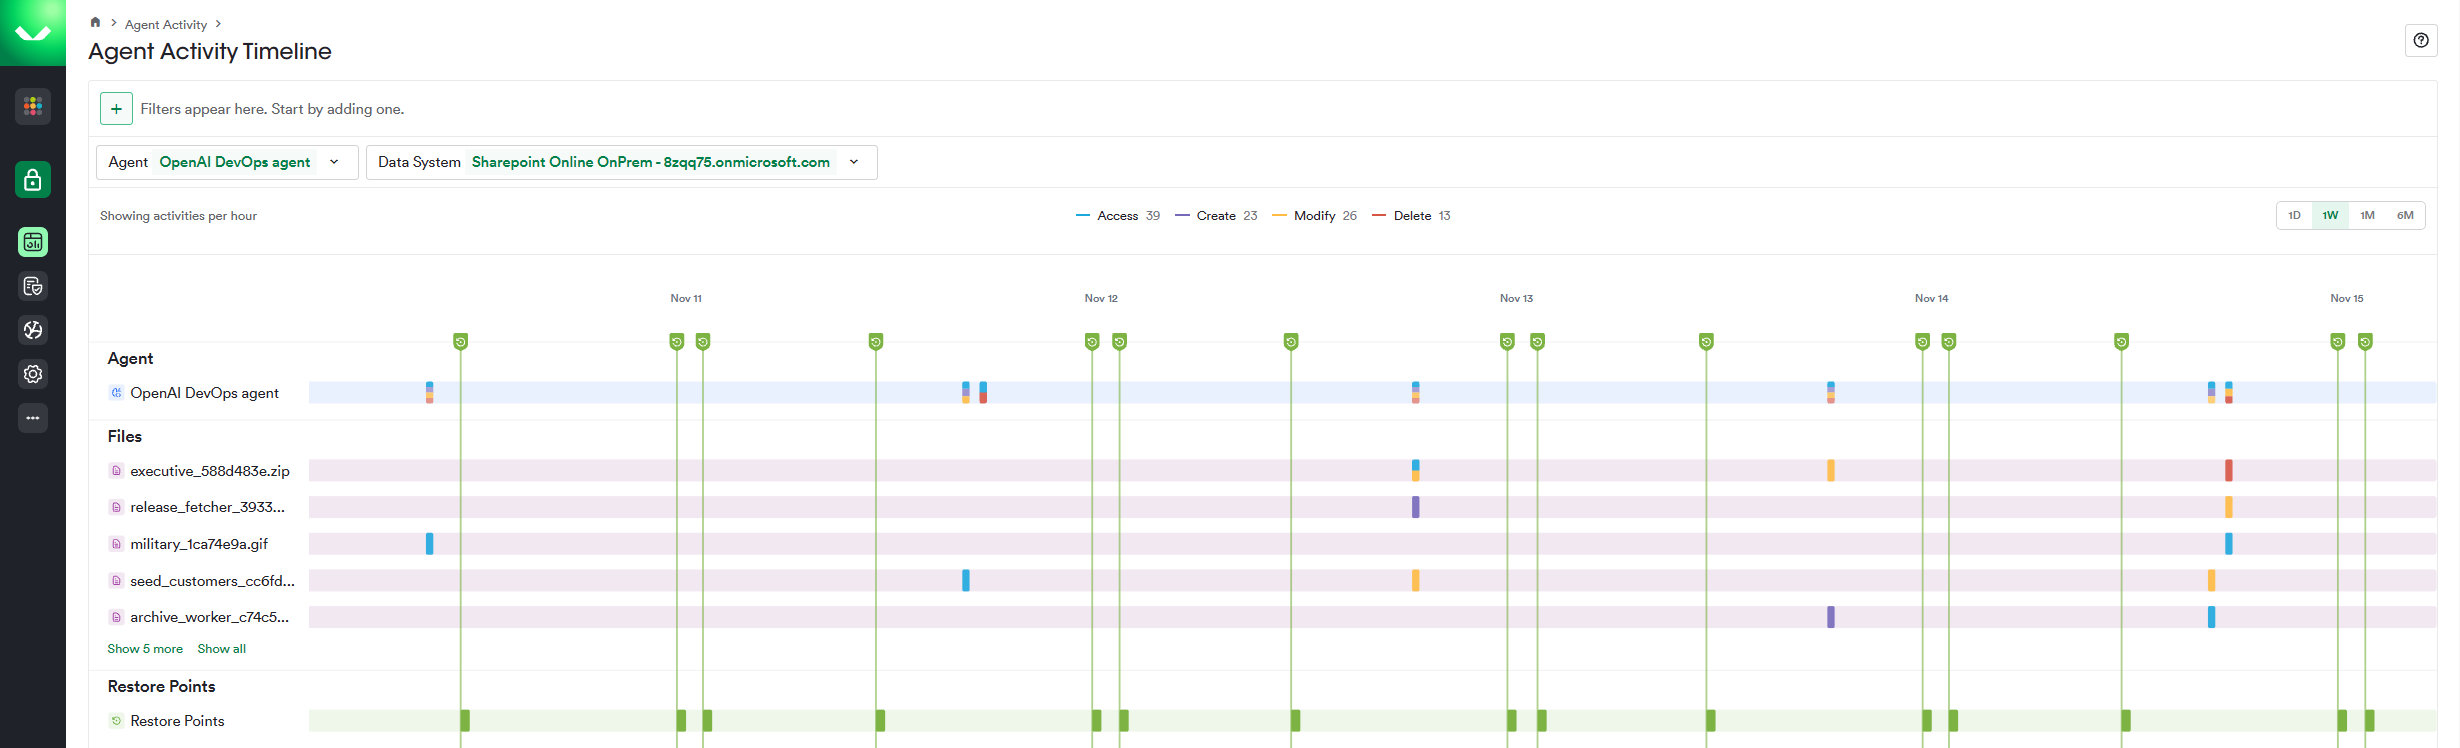
Here’s a quick example of how M365Simulator brings my Veeam Intelligent ResOps demo tenant to life, without me having to do anything! 😎
Every colored dot is an action performed by one of our simulated AI agents:
Ready to give your tenant some AI life?
Deploy your four agents, create some documents, and schedule their daily activities. Then open Microsoft Purview or your favorite AI governance solution and see what it discovers.
And when you're finished, simply remove your agents using Manage agents or the Delete card. (The agents lose their access, but the documents they created remain in place).
4/ The new Save & Revert card
Make a mess, hit Revert, and start again!
Picture this: you’re preparing a Microsoft 365 demo.
You create users, fill their mailboxes with emails, generate OneDrive documents, configure Entra ID accounts... everything looks perfect.
Then the demo starts. You delete emails, move files around, simulate ransomware, change user properties, modify group memberships...
basically, you create a beautiful mess! 😅
And when the demo is finished? You need everything back exactly as it was before.
That’s where the new Save Versions & Revert card comes in!
Save a clean state before the chaos
The idea is simple: save a clean baseline, experiment as much as you want, then go back to that baseline when you’re done.
The card supports 3 types of Microsoft 365 data:
- Exchange: mail folders, emails, and properties such as read status, flags, categories, and dates.
- OneDrive: files, folders, content, and timestamps.
- Entra ID users: profile attributes, managers, direct group memberships, directly assigned licenses, and profile photos.
You can select one or several users, or even complete groups, and save everything under a name like Clean baseline - Before demo.
Each save creates a new version, automatically timestamped and stored in your own S3-compatible storage. So yes, your data stays in storage you control!
Two ways to travel back in time
When you want to restore your demo environment, you have 2 options:
1. Restore only missing items
This is the safe and gentle mode. It restores missing emails, files, folders, and supported Entra ID information without removing anything created after the baseline.
For example, if you deleted 50 emails and 20 OneDrive files during your demo, the card brings them back while leaving the rest untouched.
Existing modified files and properties are not overwritten.
2. Overwrite everything
Now we’re talking about a real reset! This mode brings the selected data back to its saved state.
- Emails are restored to their original folders with their saved properties. Emails created afterward are permanently deleted.
- OneDrive files are restored with their original content and location. Extra files are moved to the recycle bin.
- Entra ID attributes, managers, direct group memberships, and directly assigned licenses are reverted to their saved state.
Even files encrypted and renamed by the M365Simulator Ransom Simulate card can be recovered. The encrypted versions are removed and the original files are restored.
- Multilingual mailboxes? No problem! The card recognizes standard Exchange folders in different mailbox languages, avoiding the classic problem of recreating an English "Inbox" inside a French mailbox.
- Changed a user’s UPN? No problem either. Users are identified through their Entra ID account rather than only by their email address, so a UPN change doesn’t break the revert.
- Something failed during the save? The revert protects data that could not be saved instead of blindly deleting it.
Automate your clean baselines!
Like other M365Simulator cards, Save Versions & Revert works with automation flows and scheduled jobs.
You can even schedule a daily revert to bring your demo users back to their clean baseline, while the Delete Card automatically removes old saved versions from your S3 storage based on your retention period.
Or just keep it simple: save everything before an important demo, make a beautiful mess, then hit Revert when you’re done! 😄
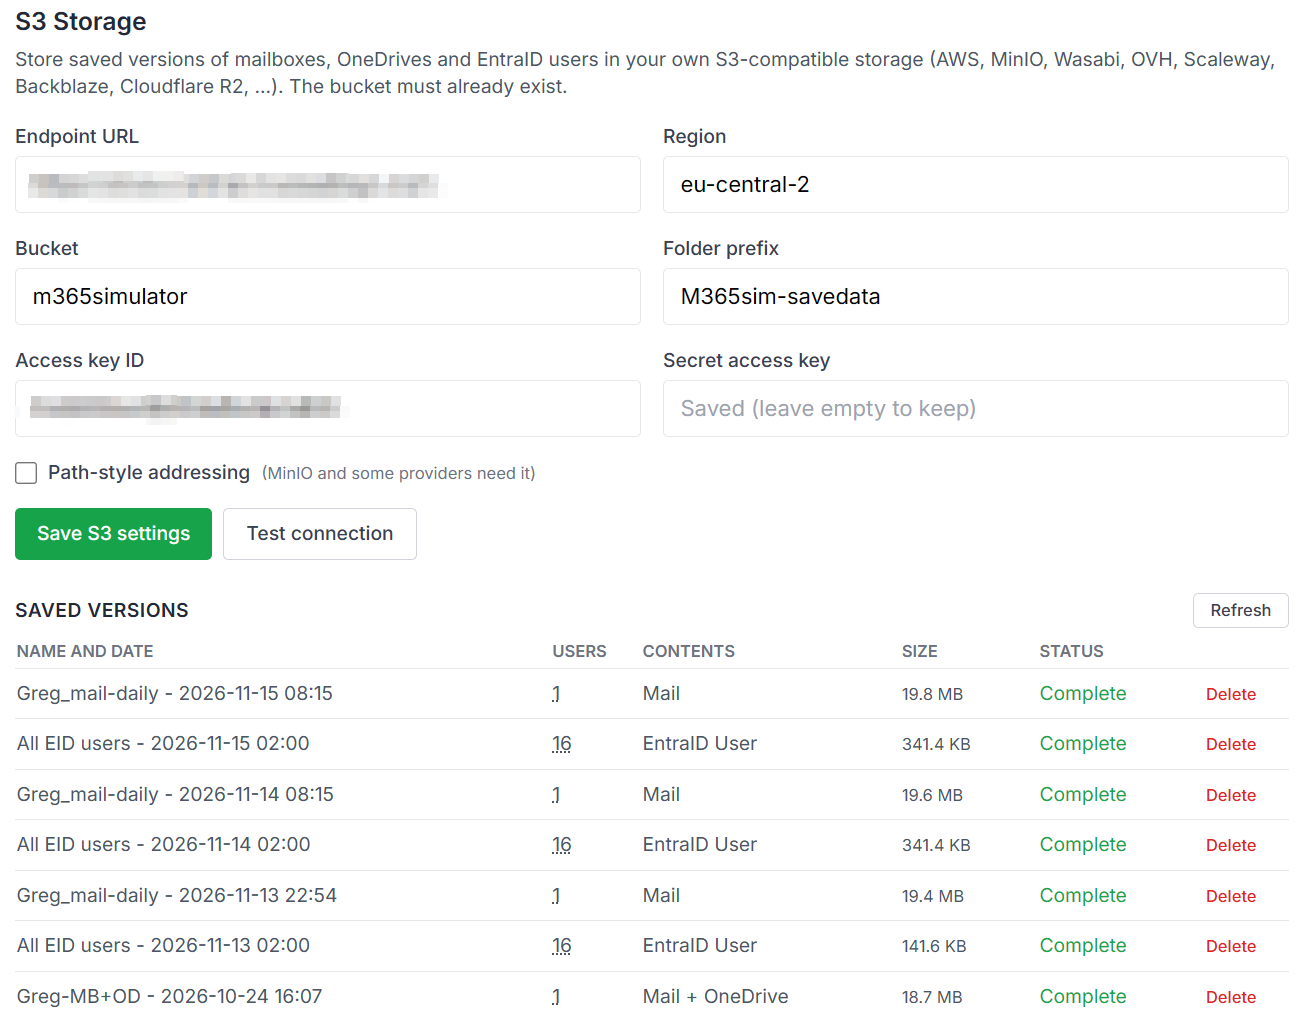
All you need to get started is your own S3-compatible storage configured in the M365Simulator Settings tab.
Then each of your saved versions will appear in your storage as the following:
Save! Experiment! Break things! Revert! Repeat!
5/ New enhancements on the Users card
Your Microsoft 365 users have a life now! Meet the new automatic attributes update!
Let’s be honest, our demo users usually have pretty boring lives!
You create them, give them a job title, department, office location... and then nothing ever changes...
But in a real company, people get promoted, change teams, move to another office, or get a new manager.
So why shouldn’t our M365Simulator users have the same kind of life?
That’s exactly what the new Update users feature brings to the existing Users card!
Give your users a career (and maybe a promotion!) 😆
The Users card now includes a new Update users option.
Enable it, select your existing users or Entra ID groups, and choose which attributes you want M365Simulator to update.
You can change:
- Job: job title, department, office location, employee type, and manager.
- Location: street address, city, state, postal code, country, usage location, and preferred language.
- Contact: business phone and mobile phone.
Each time the card runs, M365Simulator generates new realistic values for the selected attributes.
For example, John from Sales could become a Marketing Manager, move to the Paris office, and get a new manager.
Congratulations, John! 🎉😊
And don’t worry, important properties like usernames, passwords, employee IDs, and company names are left untouched.
Same changes for everyone? Or something more personal?
Here’s another nice option: you can use the same attributes for all selected users, or enable Choose attributes per user to decide what changes for each person.
For example:
- John gets a new job title and department.
- Sarah moves to another office and gets a new phone number.
- Steve gets a new manager.
- Poor David gets nothing. Maybe next time! 😅
(Per-user customization supports up to 50 users)
Put your users’ careers on autopilot!
Of course, this wouldn’t be M365Simulator without some automation!
The Update users feature also works with automation flows and scheduled jobs.
For example, you could run it every Monday morning. So each week, your demo tenant gets new organizational changes: different departments, job titles, managers, office locations, and contact details.
Instead of manually changing Entra ID attributes just to create some activity, M365Simulator does it for you.
- Administrator accounts: selected attributes can be updated, but business and mobile phone changes are skipped.
- Guest accounts: never updated.
- On-premises synchronized accounts: skipped because their attributes are managed by the local directory.
- Disabled accounts: can still be updated.
Even demo users deserve a career! 😎
6/ The new customizable dashboard
Your dashboard, your rules! Drag, drop, resize... and make it yours!
We all work differently. Some of us love charts, others prefer numbers, and some just want everything visible without scrolling forever.
So why should everyone use the same dashboard layout?
Good news: the M365Simulator Dashboard is now fully customizable!
You can move widgets, resize them, and organize the dashboard exactly the way you want.
Drag, drop, and make yourself at home!
Customizing the dashboard is now very simple.
Hover over a widget and you’ll see two small handles:
- Top-right corner: drag it to move the widget.
- Bottom-right corner: drag it to resize the widget.
While you move things around, the other widgets automatically reorganize themselves to make space.
You can even swap 2 widgets by dragging one over the other.
Behind the scenes, everything stays aligned on a clean 12-column grid, so even your creative layouts stay organized.
Bigger widgets, more details!
Resizing is not only cosmetic.
Some widgets actually show more information when you make them larger.
For example, if you enlarge one of the Activity Overview summary cards:
- Medium size: you get grid lines, dates, and axis values.
- Large size: you also get individual data points, extra change indicators, and more detailed tooltips.
Other charts automatically grow to use the available space, while information-heavy widgets can simply scroll.
Your layout follows you everywhere
Every move and resize is automatically saved in your M365Simulator profile.
Close the browser, come back tomorrow, or open the same profile somewhere else, your layout stays there.
And if your dashboard becomes a complete puzzle after too much experimenting...
Just click Reset to default next to the Activity Overview title to restore the original layout and sizes.
Your dashboard should work the way you do, not the other way around!
So move things around, make some space for your favorite metrics, and build your own M365Simulator command center!
7/ A smarter scheduling task for the RUN card
Make your M365Simulator scheduled jobs behave more like real people!
Imagine a company where everyone sends emails, creates documents, and updates calendars at exactly 9:00 AM. Every single day.
A little suspicious, right? 😅
That’s basically what happens when all your M365Simulator automation flows start at a fixed time.
But we’re trying to simulate a real company here, not an army of perfectly synchronized robots!
That’s why the RUN Card now supports Random time and Spread out options for Daily schedules, bringing a much more natural rhythm to your Microsoft 365 demo tenant.
First, random time: no more predictable schedules!
When creating a Daily schedule, you’ll now find a new Random time option.
Instead of choosing one fixed execution time, simply define a time window:
- From: 08:00
- To: 18:00
M365Simulator then picks a random start time inside that window, with a new time every day.
Monday at 09:17, Tuesday at 14:32, Wednesday at 11:06... you get the idea!
The job still runs once per day, just not always at the same time.
Then, spread out: because nobody creates 100 files in one second!
A random start time is already nice, but what if the activity itself could also happen progressively?
That’s exactly what Spread out does.
Enable it, choose how long the job should run, and M365Simulator distributes the generated items across that period.
For example, your flow generates:
- 10 emails
- 20 OneDrive files
With a 60 mn duration, the emails could be generated over roughly 20 minutes, followed by the OneDrive files over the remaining 40 minutes.
Instead of one big burst, items appear progressively with irregular pauses between them.
A few emails here, some documents there... suddenly your demo tenant looks like people are actually working! 😉
Other cards, such as Users, Devices, and Delete, continue to run at their normal speed.
Use Random time + Spread out across different departments to create more natural, staggered Microsoft 365 activity throughout the day, making your demo tenant feel much closer to a real company.
A few things worth knowing
Before scheduling your entire company, here are a few useful details:
- Daily schedules only: Random time is not available for One-time, Weekly, or Monthly schedules.
- Spread out duration: choose between 10 and 120 minutes, without going beyond your configured time window.
- Smart scheduling: M365Simulator picks a start time that leaves enough time for the full Spread out duration.
- Run Now: manually starting a scheduled job still respects its Spread out settings.
- Cancellation: you can stop a job even while it is waiting between generated items.
Less robotic activity, more realistic tenants!
Small improvement, big difference! With random start times and activities spread throughout the day, your Microsoft 365 tenant gets a much more natural rhythm.
And here's a nice bonus: fewer sudden bursts of API requests, which can also help keep our old friend Mr. Throttling from showing up too often! 😄
8/ Modern authentication to deploy the enterprise app
Goodbye Device Code Flow, hello modern browser authentication!
Until now, M365Simulator was using Device Code Flow to deploy its Enterprise Application into your Microsoft 365 tenant.
You know the process: get a code, open the Microsoft authentication page, enter the code, sign in... and that's it.
It worked well, but Microsoft security recommendations are evolving.
Why move away from Device Code Flow?
Device Code Flow is not really an old authentication method. It is still part of modern OAuth authentication.
The problem is that it has become a common target for phishing attacks.
An attacker can trick a user into entering a device code on a legitimate Microsoft sign-in page and potentially gain access to the account.
Because of this, Microsoft recommends blocking Device Code Flow whenever possible.
And since July 1, 2026, new Microsoft Entra tenants block Device Code Flow by default through Security Defaults.
I must admit it's not very convenient when you want to deploy M365Simulator into a fresh tenant! 😅
Welcome to browser-based authentication!
Good news: M365Simulator now supports browser-based interactive authentication!
Instead of generating a code and asking you to enter it manually, the deployment opens the standard Microsoft browser authentication flow.
You sign in with your Microsoft 365 administrator account, complete MFA if required, and continue the deployment.
This brings a few nice improvements:
- Simpler experience: no more copying and entering device codes.
- Better security alignment: uses browser sign-in instead of a flow Microsoft recommends blocking.
- Conditional Access support: works with the authentication and security policies configured in your tenant.
- Better support for new tenants: no need to disable Security Defaults just to allow Device Code Flow.
A small change, but an important one!
This is not another big flashy feature. It is simply about keeping M365Simulator aligned with Microsoft security recommendations while making the initial setup easier.
And that was definitely worth improving!
Goodbye device codes, hello browser sign-in!
9/ The new manual Enterprise Application deployment process
Want full control? M365Simulator now offers manual Enterprise App setup!
Automatic deployment is great. Click a button, authenticate, and let M365Simulator handle the configuration. Easy!
But let's face it, not every company is happy to let a tool deploy an Enterprise Application automatically.
Security policies, administrative restrictions, permission reviews... You know the story. Sometimes, IT security wants to check every little detail before giving the green light.
That's why M365Simulator now offers a manual Enterprise Application deployment option!
Your tenant, your App Registration, your rules!
The idea is simple: you decide what gets deployed and which Microsoft Graph permissions are granted.
Instead of letting M365Simulator handle everything automatically, you can configure the application yourself in Microsoft Entra ID.
The process follows a few familiar steps:
- Register the application in your Microsoft Entra ID tenant.
- Select the Microsoft Graph permissions required for the M365Simulator features you want to use.
- Grant administrator consent for the selected permissions.
- Complete the connection between M365Simulator and your tenant.
et voilà ladies and gentlemen! Your application is ready, with a configuration you've reviewed and approved yourself.
The nice part is that you don't necessarily need to grant every permission M365Simulator supports.
Only interested in testing Exchange and OneDrive? You can focus on the permissions required for those features rather than granting access to everything.
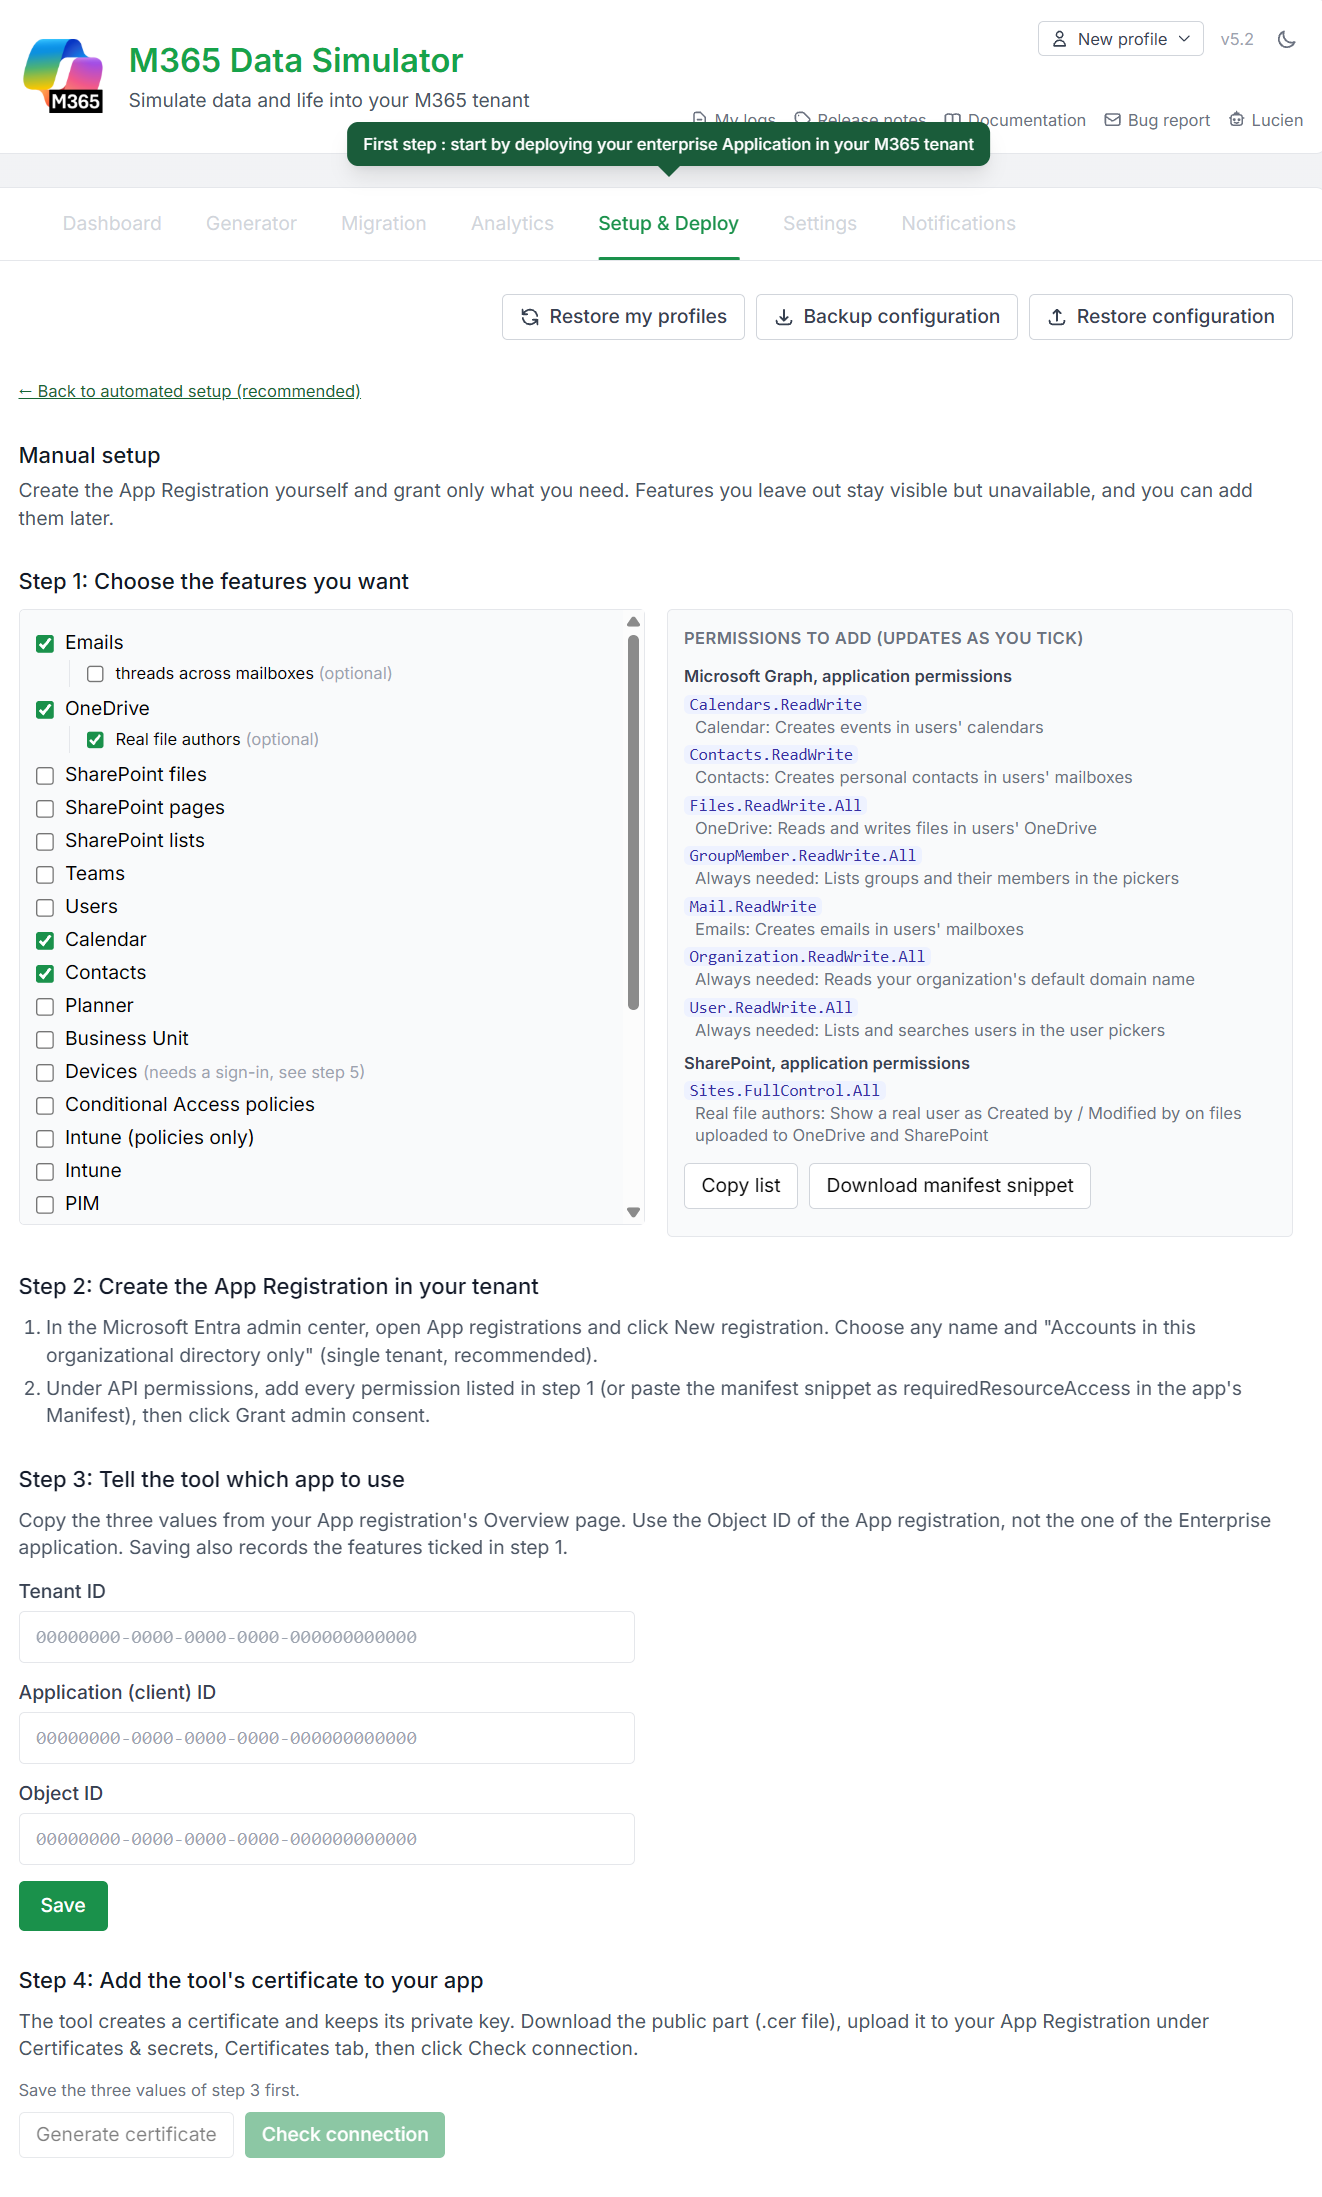
A little more control, and a nice way to follow the principle of least privilege.
Why would you choose manual deployment?
For a personal lab or demo tenant, automatic deployment is usually the quickest option.
But in corporate environments, manual deployment can make a lot of sense, especially when application registrations and API permissions must go through an approval process.
It also gives you a clearer view of what M365Simulator needs to access and why.
More flexibility, same simulator!
Automatic deployment for simplicity. Manual deployment for control.
And for those of us who enjoy spending a little extra time exploring Microsoft Entra ID settings... well, here's another good excuse! 😁
And that's a wrap, my dear fellow techies!
Our little journey through M365Simulator v5.2 comes to an end, but you know how it goes... there's always another idea waiting around the corner!
So, what should we cook up for v5.3?
Any crazy ideas, missing features, or new challenges you'd love to see? Let me know, guys! I'm always looking for a good excuse to spend another weekend coding! 😆
So, what should be the next delicious addition to our M365Simulator menu? I'm all ears, and the kitchen is still open!